Showing posts with label cupcake. Show all posts

Monday, April 13, 2015

Black Glutinous Cupcakes (Pulut Hitam Cupcakes)

If you have been an avid reader of Christopher Tan's work, be it his webpage at www.foodfella.com or the fortnightly food column in The Strait Times, you would have already heard of his latest, greatest creation. His new cookbook, the  "NerdBaker", published by EPIGRAM Books. So you must be wondering why am I writing about him? Well, firstly, I happened to be invited to attend his book launch last week...yes, felt so privileged! Of course I got to meet Christopher himself. Nerd or not, he was definitely a walking encyclopedia on food. You can sense his passion, not just in baking, but to share his knowledge on how to bake better and more delicious food. And that book, "NerdBaker" also showcased what he has researched, tested (tasted of course) and presented to you in the most detailed manner on how to replicate his wonderful recipes.

The other main reason why I love about his book is that he incorporates local flairs or flavors into his bakes. Like Pulut Hitam (Black glutinous rice), lemongrass and even miso, into cakes and pastries. Some recipes are just plain exciting, like the Bacon Kouignou-Amann, Chocolate Matcha Macaron Tart and Intelligent Black Rice Cake! I am literally planning which day I can try these recipes out! Be still my heart, haha! 

I really wanted to try his recipes even though it has been a crazy busy weekend...I opted for an  easier recipe in the book; Black Velvet cupcakes. Why black, what makes it black? Bamboo charcoal? Super Black Chocolate? Neh...it is Black glutinous rice flour, aka Tepung Pulut Hitam.
Kind of black I know. But they are Black Velvet cupcakes right haha! Some how mine didn't turn out as pretty purplish-looking as Chris's version in the book, which I think he uses grains from different country maybe? But I am pretty sure the taste is almost as awesome as his...because these babies are delish!
Due to Copyrights reasons, I won't be able to share Christopher's original recipes here. But I bake a varied version which I made several changes to the original recipe. Changes which I felt will not alter the "integrity" of this wonderful recipe. ;) But bare in mind this is my own creation and has in no way trying to replace Chris's recipe. And that is why I named mine Black Glutinous Rice Cupcakes instead of Black Velvet Cupcakes. So ya...try at your own risk heehee...

Recipe for Black Glutinous Rice Cupcakes (Makes 10-12 3-ounces cupcakes)
125g  Black Glutinous Flour (See *Note)
125g cake flour
1/3 tsp salt
2 tsp baking powder
120g caster sugar
2 large eggs
1 tbsp of wild flower honey
150ml coconut milk (I used Ayam Brand canned coconut milk, really good!)
50 ml fresh white milk (I will try buttermilk next time!)
80g unsalted butter, melted and cooled
40 ml cold pressed coconut oil (I bought mine from California during my last trip back "home")

*Note : The last time I "encountered"black glutinous rice flour was actually from a nice blogger friend whom bought a pack of the flour for me when she return from Batam. I have tried searching for it here but couldn't find any. :P So I took up Chris's advice in the book; that is to buy raw black glutinous rice grains, freeze them hard and blend them with a high wattage blender till powdery form. 
To ensure the flour is fine enough, sieve it through a fine sieve. Repeat the blending on those bigger grains till all is finely ground till flour form. Store in air tight containers for use later. Should stay fresh for a good 2-3 weeks.

Method:
  • Combine the coconut milk and milk together in a heatproof bowl. Microwave it for 2 minutes on high. Or you can put in a pot over medium fire and cook till small tiny bubbles appear on the side. immediately remove from fire. DO NOT boil it. 
  • Add the black glutinous rice flour and salt into the heated milk. Give it a good stir till well combined. Let the mixture sit at room temperature for 20 minutes. (This step will allow the rice to absorb the milk and thus soften the grains more easily)

  •  In the meantime, prepare pan with cupcake liners. Preheat oven to 180C. Have a cup of kopi and chill till the alarm calls for you. ;)
  • Next you sift in the cake flour and baking powder in. Add in the 2 eggs, coconut oil, melted butter and caster sugar.
  •  Mix well with a whisk till well incorporated. 
  • Lastly, add in 1 tbsp of that wild flower honey. Hmmm...why honey in pulut hitam...why not gula melaka? I'll ask Chris next time haha!
  •  Scoop the batter into the prepared cupcake liners. Bake the cupcakes in the preheated oven for 14-16 minutes or till the cake tester comes out clean.

 Not hard to make isn't it? I think even my kids can do this! Perhaps the most tedious part was blending the black glutinous rice to flour.


 The taste is like eating "Orh-Bee-Ber" (Bubur Pulut Hitam) in cake form. If you are already a fan of this Black Glutinous Rice dessert, then you are gonna love this cake. Moist, fine crumbs and all so fragrant! It has this unique texture of slight chewiness...a true replica of a local flavor into a whole new form. A "form" even the younger generation will love, like my kids!


 I hope this recipe inspire you to try it out. It seriously taste better then it looks haha! Hopefully I will be able to try out more recipes from Chris's book...soon. ;)


If you are interested to get "NerdBaker" cookbook, head on to any major bookstores like Kinokuniya or Popular. Alternatively, Shermay's Cooking School in Holland Village also carries signed copies with an additional 10% off! Hurry! In case you wonder...No, I'm not paid to say any of the above, all view and opinions are mine. 

 Okay, signing off now, before the clock strikes 12am! 
Till next time, happy baking guys!

Friday, February 3, 2012

Oreo Surprise Chocolate Cupcakes

After baking batches and batches of New Year cookies for the past weeks, it seems all "refreshing" to bake up some cupcakes for a change. Plus my girls have been asking for some cupcakes with buttercream lately. I guess they had enough of fatt goh and kueh lapis for now, lol! So I decided to bake some moist dark chocolate cupcakes (with an Oreo surprise) and top them off with delicious Oreo cookie Swiss Meringue buttercream. Sounds good? It is. ;)
Ehh...where's the cake? Oopsie...guess I filled the batter a bit too short, and probably worried about all that overflowing of chocolaty goodness. :P So if you does attempt this recipe, remember to be a little more generous and fill to 75% to 80% full.
Nevertheless, the taste of the cupcakes didn't disappoint, it was chocolaty and very "Oreoy", just what I was hoping for. ;) If you are wondering what and where is that "Oreo surprise" I was referring to....read on.

recipe inspired by Bakegirl plus some modifications
Ingredients for Oreo Surprise Chocolate Cupcake with Oreo SMB (Makes about 12 cupcakes)
90g dark chocolate, finely chopped (I used Valrohna)
40g unsweetened cocoa powder (I used Valrohna cocoa powder)
3/4 cup hot coffee, preferably brewed
1/2 tsp salt
1/2 tsp baking soda
1/2 tsp baking powder
100g all purpose flour
6 tbsp vegetable oil
2 large eggs
2 tsp white vinegar
1 tsp pure vanilla extract
12-15 Oreo halves with cream filling attached

Making the cupcakes:

  • Preheat oven to 175C. Prepare about 12 to 15 cupcake liners. The place the Oreo halves with cream at the bottom of the liners with the cream facing up. (That's the hidden Oreo surprise!)
  • Place the chopped chocolates and sifted cocoa powder a heat proof bowl. Then heat up the coffee till very hot. Pour the coffee over the chocolate and cocoa powder and then gently mix it up till all combined and smooth. Let cool before use.
  • In a large mixing bowl, whisk in eggs, vegetable oil, vanilla extract and vinegar till combined. Then add in the cooled chocolate mixture and stir in well.
  • Sift the plain flour, baking powder, salt and baking powder in. Then gently stir well and do not over mix. Divide the batter equally into the cupcake liners and fill up to 80% full.
  • Bake in the preheated oven for about 15 minutes or till the tester comes out clean or with soft crumbs. Let cool completely before topping with cream.
  • For the cream topping, I have chose to use Swiss meringue Buttercream mixed with the reserved halves of the Oreo cookies blended till crumbs. You can use sweetened whipping cream if desired too. For the SMB recipe, please refer to here.
My kids love anything with Oreo...so this is such a treat for them ...and me too! ;)
I hope these little Oreo cupcakes will be part of your sweet deserts served over this weekend (last CNY weekend!). I had fun making them, hope it will be for you too!

Have a super duper nice weekend all! Cheers!

Wednesday, November 30, 2011

Root Beer Float Cupcake

Hi there all! How is everyone doing? Well, if anyone have noticed, I've gone missing for 2 weeks and now I am finally back! I was far and away on a fun holiday with my little family. We went on a self-drive trip in lovely Melbourne and I have so many photos that I want to share with everyone! But that will probably be in my next post since there are much sorting and editing with those photos. :) In the meantime, I have this "unusual" yet delicious cupcake recipe to share with you all, Root Bear Float Cupcake. (^_^)
If you don't already know, I love root beer! It's probably the only soft drink that I consume. :) Last year I did a Root Beer Chocolate Chunks Chocolate Cake and it was really good too. However I find that this cupcake has a much intense root beer taste to it!
This recipe was inspired by Deb from Smitten Kitchen. When I saw it, I knew I had to give it a try. ;) I did several changes to it to match the amount of root beer in a standard can size for easier baking.

Ingredients for Root Beer Float Cupcakes (makes about 6 X 4oz cupcakes)
Cupcake
1 can or 330ml root beer (I used A&W brand, but any brand should do fine)
85g unsweetened cocoa powder
85g unsalted butter
180g Caster sugar
60g light brown sugar
170g cake flour
1/2 tsp baking soda
3/4 tsp salt
2 eggs
1 cup vanilla Swiss Meringue Buttercream (recipe follows)
Some maraschino cherry (cocktail) or fresh cherries

Method:
  • Preheat oven to 175°C. In a small saucepan, heat the root beer, cocoa powder and butter over medium heat until the butter is melted. Add the sugars and whisk until dissolved. Remove from heat and let cool.
  • In a large bowl, whisk flour, baking soda, and salt together. In a small bowl, whisk the eggs until just beaten then whisk them into the cooled cocoa mixture until combined.
  • Fold the liquid and flour mixtures together in the large bowl. The batter will be slightly lumpy; this is okay. If you overbeat it, it will get tough.
  • Fill cupcake liners about 80% full and bake for about 17 to 20 minutes or till the tester comes out clean. Transfer pan to a wire rack to cool completely.
Topping is Vanilla Swiss Meringue Buttercream (makes ~4 to 5 cups)
5 oz egg whites (~140g)
5 oz caster sugar
(~140g)
1/4 tsp salt
bean scrapings from 1/2 of a vanilla bean
1 tsp quality vanilla extract
500g unsalted butter, cut into 2” chunks, room temperature

Method:
  • Prepare a double boiler with a gentle simmer. In a heat proof bowl, combine egg whites, sugar and salt into it. Mix well but no beating is required. Place the bowl over the double boiler and placing a candy thermometer to monitor the temperature.
  • Stir once in awhile to prevent the egg white from curdling at sides. Aim to to have the temperature reached at least 146F / 63C for food safety reasons.
  • Once the temperature is reached, remove from heat and beat it till it is silky white. Add vanilla extract and mix well. If the mixture is still hot, place it over a bath of ice water to cool it down.
  • Add the butter chunks one piece at a time and continue to beat while doing so. Continue to beat till all the butter has been added and the buttercream is smooth and silken.
  • Use about 1 cup for the cupcake while you can chill the rest in the fridge for use in future.
I'm pretty sure many of you have had a root beer float before? In order to create that root beer float effect, that vanilla buttercream on top is supposingly the vanilla ice cream scoop. The cherry? Well, it does give it a more sundae look, don't you think? Although using a Maraschino cherry would be more "appropriate" but personally, I much prefer to fresh version. :))
Since I did reduce the sugar level quite a bit, so with the vanilla SMB, the sweetness is just right. And you know, after chilling it, every bite does gives you that root beer float taste! How cool, a favorite beverage recreated into cupcake form, lol! If you like root beer like me, this will knock your socks off!

I will be submitting this fun cupcake to this month's Aspiring Bakers #13: Enjoy Cupcakes! (November 2011) hosted by Min of Min's Blog. Thanks Sze Min!

Alrighty everyone! Hope you all have a good day now, cheers!


Friday, November 11, 2011

Coconut Cupcakes with Coconut Swiss Meringue Buttercream

Have not been baking much lately. Since exam is over, I'm out with my kids most of the time. Plus the weather is getting better too, less rain and more sunshine! We went swimming, walks in parks, movies and shopping, just to break away from the books for now. :) But I didn't want to stop blogging for too long as I know it will be really hard to get back on track again if I get into the slacking "mode". :P So I decided to make some Coconut cupcakes yesterday, a recipe that I've saved for sometime. But when I saw Jane posting it a couple weeks back, I then remember about it. The original recipe comes from 鲸鱼蓝蓝小窝居 , so thanks to these ladies, I finally bake this yummy cake. :)
I have decided to dress up the coconut cupcakes by topping it with Coconut Swiss Meringue Buttercream and some toasted coconut flakes. (^_^) Although the cupcake itself is already moist with nice coconut scent, but with the SMB, it becomes real decadent and even more delicious!
I was please that even my 2 kids whom are not fond of coconut flavor found these good. :) But I believe it has something to do with the SMB....they just LOVE Swiss Meringue Buttercream! They kept saying it taste like ice cream after it's chilled, lol!

Ingredients for Coconut Cupcakes (makes about 20 cupcakes)
200g butter, room temperature
100g caster sugar
4 eggs
6 tbsp milk
200g cake flour (I used Top flour)
2 tsp baking powder
100g coconut powder
40g desiccated coconut
80g plump raisins

Method:
  • Preheat the oven to 180C.
  • In a mixing bowl, cream the butter and sugar till light and creamy. Then crack in one egg at a time and mix well after each addition.
  • Add in the milk and mix well.
  • Then sieve in the coconut powder, flour, baking powder and mix till just incorporated.
  • Finally, add in the desiccated coconut flakes and raisins and stir to blend in.
  • Scoop batter into cupcake liners till 3/4 full. Then bake them in the preheated oven for 15 minutes till the tester comes out clean.

Coconut Swiss Meringue Buttercream:

20g coconut powder (Alternatively, you can just add 15g of coconut thick cream)


100g Swiss Meringue Buttercream (I followed Bravetart's recipe, please refer to link)


In a small bowl, weigh out the coconut powder, then add in 2 - 3 tbsp of hot water, mix well till it all the powder is incorporated. Mixture should be slightly thick. Let cool before mixing into the Swiss Meringue Buttercream. Once mix in, chill it till needed.


For the toasted coconut flakes, place about 1 heaping tbsp of desiccated coconut flakes on a non stick frying pan at medium low heat. Stir fry it constantly and try not to burnt it. Once it turns light golden brown, remove from fire and let cool completely before sprinkling over the cupcakes.


If you like coconut flavor and enjoy that extra texture of the flakes in the cake, you will love this one. I find that the coconut scent is slightly stronger the next day. I might try using vegetable oil in place of butter the next time so that the butter will not "steal" the lime light of the coconut scent. ;)
A look at the inside of this moist tender cake. With a cup of nice hot tea will be perfect! Try it out folks!

I am happy to submit this to this month's Aspiring Bakers #13: Enjoy Cupcakes! (November 2011) hosted by Min of Min's Blog. Thanks so much for hosting this month Min!

Take care all and have a great weekend!


Wednesday, November 2, 2011

Chocolate Banana Cupcakes / Cake

Chocolate and banana, the perfect combination to a delicious desert. No matter how you combine them, they still taste good. (^_^) I then realize I have yet baked a cake that blends both chocolate and banana in it. Well, it's never too late right? And when I found THE recipe from Dorie Greenspan's book "Baking from my home to yours", I knew I had to try it! Since I have some ready ripen bananas around, what better excuse then to bake some right away?
This cake actually uses 1 whole cup of cocoa powder (vs 2 cup plain flour) which you can imagine how strong the chocolate aroma is. Can you see how dark the cake look...intense. :P But I do find the strong chocolate scent masking the banana taste though. :P So I went ahead and piped some Strawberry Swiss Meringue over the cakes to make it more moist. Didn't want to do big swirls of it as I worry it might just turn out too sweet. :P

Ingredients for Chocolate Banana Cupcakes (makes about 24) / Cake
2 cups (310g) all purpose flour (I used 300g cake flour)
1 cup (80g)cocoa powder
1 & 1/2 tsp baking powder
1/4 tsp salt
1/4 tsp baking soda
8 tbsp butter (113g), at room temperature
1 cup (250g) caster sugar (I used 180g)

1/4 cup (124g) packed light brown sugar
2 large eggs
3 ripe bananas, mashed
3/4 cup buttermilk (I used 3/4 cup fresh milk + 3/4 tsp fresh lemon juice, stand 5 mins)
3 oz bittersweet chocolate, chopped


Method:
  • Preheat the oven to 175C. Line a baking tray with some cupcake liners. Then sift together the flour, cocoa, baking powder, salt and baking soda.
  • In a mixer bowl, beat the butter until softened. Add the sugars and beat for 2 minutes more. Add the eggs one at a time, beating for a minute after each addition.
  • Reduce the mixer speed to low and mix in the mashed bananas. Add the dry ingredients in 3 additions, mixing only until they disappear into the batter.
  • Still on low speed, add the buttermilk, mixing until it is incorporated. Stir in the chopped chocolate. Divide the batter equally among the cupcake liners, filling them to about 3/4 full.
  • Bake for 14 to 15 minutes. or until a tester comes out clean. Transfer the pan to a rack and coo.

Will be submitting it to this month's Aspiring Bakers #13: Enjoy Cupcakes! (November 2011) hosted by Min of Min's Blog.

I actually made a loaf with half of the batter and it was equally good. :) But the brown is kind of dark, it scares me a little, lol!
If you like a chocolaty cake with slight banana scent, this would be the one for you. The cake is moist and adding the chocolate chip is also key to making it great. Try it!

Okay all, have a nice day! Cheers!

Monday, October 17, 2011

Happy Birthday to my little girl

It has been a crazy busy week for me and it always happens when it's around my kids' birthday. Besides making a special fondant cake for the family celebration, I had to prepare cupcakes for her school celebration as well. Although it is a lot of work, but I gladly do it for them since it's my gift plus I love working with fondants! Lol! Besides, how many more years will they be thrilled over my homemade cakes? Not too many I guess. :P Anyway, this year my little one has requested for a Smurfette Cake for her birthday. At first I was kind of lost on how should I do it, but after some research and help from a couple of good friends, I manage to get this done:
I am sure many of you have come to know about Smurfs when you were young. It was again popularized recently with the phone / IPad App game and also the recent The Smurfs movie. However my girl got to love Smurffette was neither of those but was from the free toy she got from her McDonald Happy Meal. :P

I did not do a good job on the cake, so much to brush up on. I guess I did not give myself enough time for the buttercream to set before covering the cake up with fondant. So it wasn't as smooth as I hope it would be. :P Good thing its for my own girl, lol! Guess I need more practice! Comparing with last year's Tinkle Bell cake, which one do you think is better?
I took my friend's recommendation and used a chocolate bundt cake recipe plus a yellow buttermilk cake recipe from Martha Stewart. These cake are much more sturdy then the ones I used previously. But because the family has been so used to fluffy cakes, they were not too keen on these denser cakes. :P Conclusion? Its so hard to please everyone! (=_=")
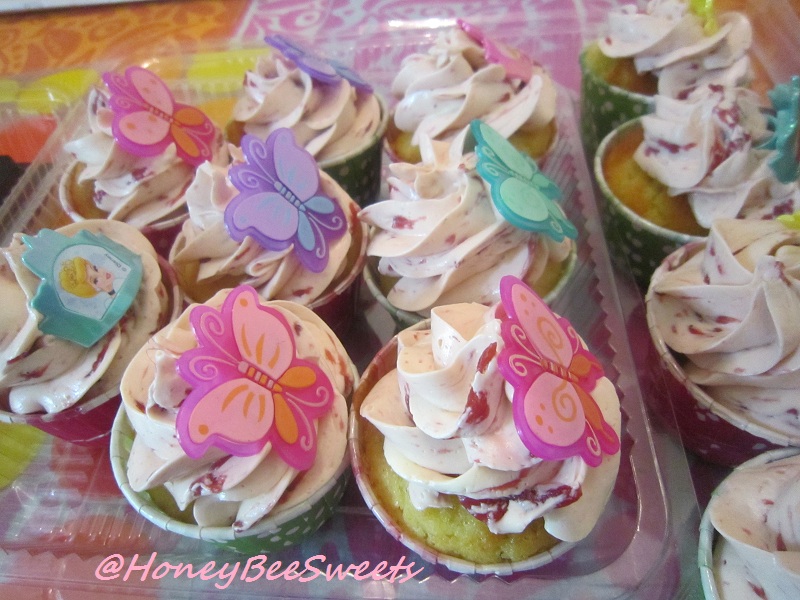
For my girl's class celebration. I used just the yellow buttermilk cupcake recipe and top them off with Chocolate and Strawberry Swiss Meringue Buttercream. Not forgetting to add a little fun by placing a princess or butterfly toy ring on each cupcake so the kids can keep them as a souvenir after enjoying the cupcake. :)
My daughter ended up enjoying the cupcake more then the Smurfette cake. Why? I guess she gets to have the ring to play with, whereas the smurf cake was merely for viewing and eating pleasure only. :P I too love the SM buttercream and yellow cake combo too, think I will use it again next time I'm baking for such occasions.
Her classmates love the cupcakes too! Saw them happily licking off the delicious buttercream and munching on the soft yellow cake, a satisfaction that is hard to describe. :) My little girl came to me today and gave me tender a hug and softly said. "Thank you mummy for making my birthday cakes." Priceless. :)

Another Mummy mission completed. :) Overall contented with the results, but could be better. :P Thanks folks for staying to read my post. Hopefully will get time to post up some kueh recipe soon. :) Till then, have a great week ahead! Cheers!

Wednesday, February 16, 2011

Birthday Cakes

It has been quite a busy week for me right after CNY. I got 2 birthday cake orders to fill so I was literally stuck home making birthday cakes and doing house chores the whole time. ;P Frankly speaking, I like it! (not the chores part of course!) I feel honored to take this all important job for making someone's birthday just a little more special. :) The first order came from a neighbor whom has requested me to make birthday cupcakes for her daughter. After some discussion, it was decided on garden theme. So here it is:
If you ask me, this is 60% fun, 40% hardwork. :) I love playing with fondant, so when my neighbor asked for it, I jump to the opportunity! Lol! Even though it does take up time for the moulding, but with proper time planning, everything will fall into place nicely. :) Furthermore, cupcakes are much easier to handle rather then a whole cake. :P
Comparing this with my previous fondant cupcakes for my kid's birthday, this is definitely a much easier one. :) I made the usual chocolate butter cake, piped buttercream tinted with leaf green over it and top off with the fondant "insects", wordings and flowers. :)
I do hope the birthday girl and her friends love these cupcakes. :) Happy Birthday Jade!

The other order I got was from my husband's office. I guess the primary reason why this order came about was from my Root Beer Chocolate Chunk Cake. Apparently the birthday gal loves to drink Coke and so her thoughtful husband took the initiative to order a Coke Chocolate Birthday cake to celebrate her birthday. :)
As I did mention in my previous post, the root beer taste was not evident so I suspected it was gonna to be the same even if I switch it to Coke. Furthermore I had to change the recipe to sponge cake rather then pound cake but still using Coke as the base fluid ingredient. Reason is simple...who uses pound cake for birthday cakes?!
I have adapted the technique "分蛋式海绵蛋糕" from my new cookbook collection; 孟老师的美味蛋糕卷. It is a little different from your usual chiffon method, but supposedly more soft and yet stays fluff without deflating. However since I needed to incorporate Coke into the cake, it got a little more tricky even though I have tried that technique before. Well, a baker's gotta do what a baker's gotta do...just bake!
It's good that the chocolate cake still turned out decant. *phew* However, even though as much Coke as I've added to the recipe, the Cola taste wasn't that evident. :P I even soaked a couple tablespoons of Coke onto each layer of the sponge cake! Oh well, I did what I could, I just hope the birthday girl wasn't too disappointed about it. :P Anyway, hope you have a great birthday celebration! :)

I won't be sharing this recipe since I did modified the original recipe from
孟老师的美味蛋糕卷. I will post up another Swiss roll recipe with this technique soon, so stay tune if you're interested. :)

Okay, thanks for staying on to read my post. But I gotta go now. :P Hope you all have a great remaining week! Cheers~!