Monday, December 30, 2013

Kafta with Pomegranate Molasses - AFF featuring West Asia

Decided to post up my final post of the year by participating in this month's AFF. In fact I have been procrastinating on recipe since 1st week of Dec haha! Anyways, I am glad I finally got it done and over with....and it was really delicious haha! So no regrets there for sure. :) In fact this is perfect timing to make this dish since poms are on sale and you will need at least 4 of those big fruits to extract a cup of the precious molasses for this dish.
Please pardon the qualities of my pictures as most of them are taken using my phone camera haha! Anyway, brown coloured food are usually harder to produce nicer shots. ;P There is basically two steps in making this dish, first is of course making the pom molasses is most of the tedious part is the reduction of the juice. So here is the recipe:

Pomegranate Molasses (makes 1 cup)
3 large pomegranates, yields about 500ml juice
juice of 1/2 lemon
1/2 cup caster sugar
  • Place all the pomegranate seeds into a blender and zap at high speed for about 1-2minutes.
  • Using a fine sieve, drain through all the pom juice and toss the pulp and seed.
  • In a saucepan, add in all the pom juice, lemon juice and sugar. Set to medium fire and bring to a boil. Then lower the fire to low and let it cook down till it is thick, much like syrup consistency.
  • Let cool completely and set aside for later use.
 Kafta with Pomegranate molasses (Serves 2-3)
Ingredients:
200g minced beef
1 large onion
2 -3 sprigs fresh parsely
3 cloves garlic
1/2 tsp cumin
1/4 tsp cinnamon
1/2 tsp seasalt
1/2 tsp white pepper
1/2 tsp freshly ground black pepper
1 tsp bread crumbs
1/2 diced onion 
2-3 tbsp pomegranate molsses

  • In the blender, add in onion, parsley, garlic and all of the seasoning. Once it blend till paste form, pour into a mixing bowl.
  • Add the minced beef & bread crumbs into the mixing bowl and stir to combine paste with meat till uniform.
  • Form about 1.5" balls from the meat mixture. Then chill if needed prior to cooking so that it will be more firm.
  • In a large skillet, add about 1 tbsp of cooking oil over medium heat. Add the kafta balls and cook till golden brown. Add a couple tablespoons of water to steam cook if necessary.
  • Remove the kafta balls from the skillet once cooked and add in the 1/2 diced onions and cook till soft.
  • Return the cooked kafta balls into the skillet and 2-3 tablespoons of the pomegranate molasses.
  • Toss and coat the meatballs with the molasses and dish up.Serve when it is still hot with steam rice.
I was really please when my two little ones love these meatballs! The meat was moist and tender and flavorful, yummy! Loving the slight tang the pom juice gave the meatballs, plus the spices wasn't overpowering at all...definitely a keeper around my household.

I am please to submit this month's  Asian Food Fest: West Asia hosted by Shannon from Just As Delish.

Signing off now and wishing everyone a wonderful new year! Promise I will post more often haha


Saturday, December 28, 2013

Pumpkin Wholewheat Blueberry cake with Oatmeal Streusel

Feeling a little motivated to blog tonight, so I immediately got myself to work on it before the feeling fades away, haha! Been baking and cooking as often as I usually am, just lacking that "umph" to get me to seat down to type out all these. Anyways, tonight shall be an exception, at least I get this post up before the year 2013 ends. No worries, I will be blogging still, but taking my time and posting selective recipes. :)

Without further ado, here is the healthy cake which I concocted after reading several cookbooks over the last couple days. Pumpkin wholewheat blueberry cake topped with Oatmeal streusel. Frankly speaking, I am a sucker for anything with streusel, haha! Crunchy sweet and buttery altogether, what's not to like seriously! But mixing oatmeal into it....oh that's like goodness in a whole new level.:9 And I just love adding healthy stuff like pumpkin and wholewheat to my bakes. ;)


Ingredients: (Makes 9"x 12" rectangular pan, I chose to bake in mini loaf pans)
Streusel Topping:
150g all purpose flour
80g instant oat 
150g light brown sugar
1 tsp cinnamon powder
1/2 tsp salt
150g unsalted butter, cold and cut into cubes

Pumpkin wholewheat blueberry cake:
100g cake flour
100g wholewheat flour
1.5 tsp baking powder
1/2 tsp salt
100g caster sugar
4 tbsp vegetable oil
125ml fresh milk 
125g peeled, steamed pumpkin and blended/mashed till smooth
1 large egg
1 tsp vanilla extract
1 cup fresh or frozen blueberries(tossed in 1 tbsp flour)
  • Preheat the oven to 180C. Grease and line with parchment the baking pan. 
  • To make the Streusel: In a large bowl, mix together the flour, instant oat, brown sugar, cinnamon, and salt together. Add in the cubed butter and rub in till well combined. Work the mixture with your fingertips to press into nice karge crumbs, set aside.
  • To make the cake: Heat up the milk to almost bubble. Remove from heat, add in the pumpkin, sugar, vegetable oil and mix well. Add in the egg, vanilla and stir well.
  • Add the liquid mixture to the flour mixture and combine well. Pour the batter into the prepared pan and scatter with the blueberries that has been tossed in flour (prevent sticking) over the top of the batter.
  • Then sprinkle evenly the streusel crumb evenly over the blueberries and cake batter. It will completely cover the whole top of the cake, it ok!
  •  
  • Bake and rotating at mid time through the baking time until the tester comes out clean and the streusel topping is golden brown, about 45 minutes.
  • Remove from the oven to a cooling rack and let cool completely before removing from the pan.

So loving the golden pumpkin cake and I can't taste the wholewheat in it too! The juicy blueberries giving the cake a even more moist mouth feel. Plus the ever so yummy streusel oatmeal topping to complete the whole cake, too good! I am super please with the outcome of this cake, definitely a keeper. ;)
If you do try this out, do let me know by dropping me a comment or tag me in Instagram @ig_honeybeesweets . ;)

Have a good night guys! Gonna catch some Zzzz before the start of another busy day. ;)


Friday, November 29, 2013

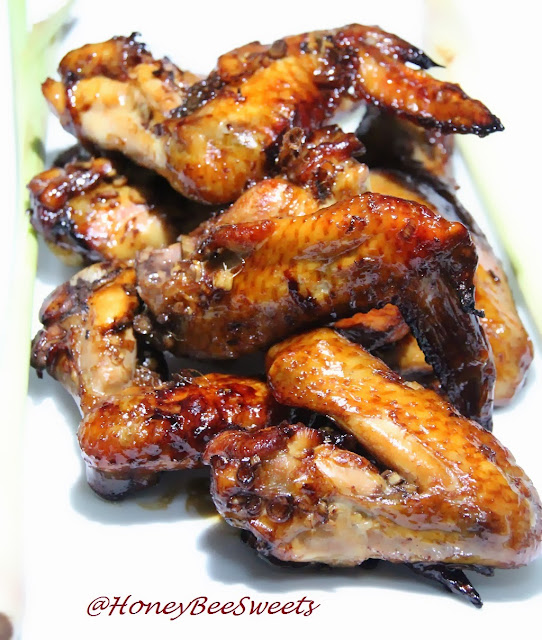
Roasted Lemongrass Chicken (Gai Ob Ta Khai) -AFF featuring Thailand

Posting a quick one in support of this month's AFF featuring Thailand. This time I made something simple; Roasted Lemongrass Chicken (Gai Ob Ta Khai). The key to making this dish a successful one is the long hours of marination. So it is best to make this ahead and let it chill in the fridge marinating. :) But the cooking part was really a no fuss easy oven baked dish!

Check out the glisten on that chicken wing haha! I guess to every meat we enjoy, we wish its tender, succulent and flavorful. Well this dish pretty much covers all these criteria! So let's check out what you need to get this on your dinner table. ;) I adapted this recipe from "Cooking Classics Thailand" by Forest Leong.

Ingredients for Roasted Lemongrass Chicken Wings (Serves 3-4)
8 chicken wings, trimmed of fat, wash and pat dry
3 lemongrass stalks
2 Tbsp olive oil

Marinate
2 lemongrass stalks, ends trimmed and bruised
1 tbsp dark soy
1 tbsp light soy sauce
2 tbsp oyster sauce
1 tbsp fish sauce
1 tbsp sugar
125 ml water 

Method:
  • Prepare the marinate 3-4 hours ahead. Chop the lemongrass finely. Heat the saucepan on medium fire and add in the lemongrass in. Then add in all the rest of the marinate ingredients and bring to a boil. Then remove from fire, cover and let cool completely.
  • Once the marinate is cooled, pour into a big mixing bowl. Then add in the chicken wings, coat the chicken wings well with the marinate sauce. Leave the chicken to absorb the marinate in the fridge for 3-4hrs.
  • Preheat the oven to 200C
  • Take chicken wings out from the fridge. Arrange chicken pieces on an aluminum foil lined baking tray. 
  • Using the bruised lemongrass stalk, dip in cooking oil and use it as a brush and brush the chicken wings well. This step will help crisp up the skin / surface and prevent burning.
  • Bake in the oven for 12-15 minutes or till the juice runs clear.
  • Remove from oven and place on serving plate and serve immediately. Garnish with lemongrass if desired. 

The skin was crisp and super flavorful. So delicious with a bowl of steam rice! Loving the savory, lemon twist in this dish. If you like lemongrass like I do, you should definitely give this a try. :)

I am submitting this to Asian Food Fest ( Thailand ) November Month hosted by frozen wings


Thursday, October 31, 2013

Matcha soba noodle salad -AFF featuring Japan

Okay, this is gonna be another rushed out post for AFF. Matcha soba noodle salad, a simple yet all so refreshing and delicious meal to have at anytime of the day. And it is really really so easy to prepare...I think even my kids can do it haha!
Ingredients for Matcha soda noodle salad (Serves 1)
1/2 package of matcha soba (or any flavor you prefer)
1 egg (tamago), beaten and pan fried, cut into thin strip
3-4 imitation crab meat, cut into thin strips
2 slices ham, sliced thin
1/2 Japanese cucumber, sliced thinly
1 tsp vegetable / olive oil

Dipping sauce:
1 tsp dashi granules
50ml mirin
50 soy sauce
1 tsp caster sugar 
  • Bring a pot of water to boil and add in the soba noodles. Takes about 4-5 minutes depending on the thickness of the noodle. Do read the package for details.
  • Drain and rinse under tap water to cool it to stop it from cooking.
  • Toss the cooled noodles in vegetable or olive oil to prevent it from sticking together.
  • Place all the sliced ingredients nicely over the noodles. Then add a tsp of the tobiko over the top as garnish if desired.
  • Prepare the dipping sauce by mixing everything together.
  • You can either toss the toppings together and drizzle the sauce over or simple just fork out mouthfuls of noodle to dip into the sauce. Enjoy!
Such a simple and healthy dish to serve to your family and friends! Do try this at home. :)

I am happy to submit this to this month's Asian Food Fest #1 Oct 2013 : Japan, hosted by Alan from travelling-foodies   


California Maki -AFF featuring Japan

Oh my, this is bad. Bad as in I am gone too long and still feel comfortable about it, haha! Gosh, I seriously hope this ain't gonna become a habit! Anyways, Shan't waste time doing small talks, let's just get down to business. This is a much delayed post since I made this like 3 weeks ago haha! California Maki, a rather popular a kind of sushi roll, usually made inside-out, containing cucumber, crab meat or imitation crab, and avocado. In short, it is delicious sushi, haha!


Ingredients for California Maki (Serves 3)
1 cup sushi rice (uncooked)
1/2 tsp Japanese rice vinegar
1/2 tsp mirin
  • Cook the rice as per normal. Once done, add in the vinegar and mirin and gently fold in to combine. Let rice cool before use
~3-4 tbsp tobiko
1 ripe avocado, peeled, cored and sliced into 8 equal strips lengthwise
1 Japanese cucumber, also peeled, removed seed portion and cut lengthwise into 4
8-10 strips of imitation crab meat
2 egg, beaten and pan fried, cut into strips (Optional)
Some Japanese mayo
4 nori sheets

You will also need:
Bamboo mat
Saran wrap
  • I usually will wrap the bamboo wrap so that the rice will not get in between and hard to wash up later.
  • I cut the nori sheets into half.
  • Place about 3 to 4 tbsp amount of sushi rice and press down so that the rice stick nicely.
  •  Next you gently flip the nori sheet over and rice facing down.
  •  Place the avocado, crab meat and cucumber on top. At the same time, squeeze some Japanese mayo on top.
  •  Then roll it up tightly. If at this point you find the ingredients are "oozing out", it means you have place too much ingredients. If you prefer having more ingredients, you might not want cut the nori sheets into half.
  • Using a teaspoon and sprinkle/press the tobiko over the top surface of the sushi roll.
  •  Then place a saran wrap over the top and then gently using the bamboo shoot and roll it up to press down the tobiko.
  • Unwrap the bamboo and saran, then using a sharp knife to cut the sushi into half first. Then cut each half into 3 equal portions.
I actually kind of enjoyed making this California maki. In fact I love making sushi for my kids and this inside out version was kinda of a challenge haha! But definitely worth a try if you love sushi, :)
I am happy to submit this to this month's Asian Food Fest #1 Oct 2013 : Japan, hosted by Alan from travelling-foodies
Have a good night all!

Friday, October 4, 2013

Onsen Tamago (Tofu with Hot Spring Egg) -AFF featuring Japan

Okay, let's not dwell on how long I've gone missing here haha! But at least I/m back for now for a good reason. :) I realize I need some food events or even my blogger friends to get me going on my blogging lately. Well, thanks to them, Alan & Wendy etc, coming up with this Asian Food Fest and here am I again haha! Okay, enough jibbing, let's get to business! I am posting a really simple, tofu lover's, yet just so delicious dish; Onsen Tamago. In English, it means Tofu with soft boil egg. The name itself already gets me hungry! :P
I do apologies on the poor lighting on the picture...probably because I haven't been using my DSLR for too long hahaha! Anway, the dish came out lovely! Happy with the result but maybe the egg needs a wee bit more work and practice. ;) I got this recipe from the book "Harumi's Japanese cooking", author is Harumi Kurihara...quite a delightful read I must say haha!

Ingredients for Onsen Tamago (Serves 4)
600g soft/silken  (2 packs)
2 hot spring egg (recipe follows)
5g dried fish flakes (bonito flakes)
1/4 cup / 50ml soy sauce
2 tbsp mirin
1 tbsp sake / Japanese cooking wine
grated fresh white radish (my own addition)
chopped spring onion (optional)
grated ginger (optional - I omitted this)
  • Drain the tofu and wrap in kitchen paper to remove excess water.
  • Make the dressing by combining the dried fish flakes, soy sauce, mirin and sake in a sauce pot. Cook over low heat until mixture boils. Remove from fire and let mixture cools and strain. Note: If you cannot find the fish flakes/bonito, use a little concentrated fish stock to give a slight fish flavor to the dressing.
  • Cut the tofu into 4 pieces and place one piece in each bowl.
  • Scoop out a hollow in each piece of tofu.
  • To make hot spring eggs (onsen tamago): place the room temperature eggs into a wide neck flask or any container that will hold heat. Add boiling water to cover them. Leave for 10 minutes.The yolks should still be runny with the white just cooked.
  • Gently crack the egg into the cavity of the tofu squares.Place grated radish (if using), spring onion and grated ginger along side the tofu.
  • Gently pour the soy dressing over the tofu and serve. Yummy!!
This couldn't be a simpler dish to prepare. I love how the runny yolk adds on to the flavor of the dish when it is cut up and enjoyed together. So delish! And the addition of the grated white radish was added bonus! It gives the dish a slight kick to the overall taste. And soy bonito sauce is fabulous! So flavorful...I can make this anyday and go with plain tofu and taste so so good.

Do give this awesome dish a try...highly recommend it!

I am happy to submit this to this month's Asian Food Fest #1 Oct 2013 : Japan, hosted by Alan from travelling-foodies

Get in the fun guys and join in the event. Added bonus is a give away by our dear generous Alan! Hahaha! 

Signing off now, cheers and will post soon!


Thursday, August 29, 2013

Kampar Lor Mai Fan (Glutinous Rice) - MFF featuring Perak

I am so glad that the term exam is finally over and now I can have some spare time to blog. Have been busy baking and cooking non stop I assure you but just didn't find time to blog about all those recipes. It looks like I need more motivation to sit in front of my lab top nowadays. :P Anyway, I did gave my word to Wendy that I will make this Lo Mai Fan earlier this month, so here it is!

Personally I love any kind of glutinous rice dishes, Puen Kueh, Lo Mai Gai and Hokkien glutinous rice and now this! This Kampar Lo Mai Fan is indeed quite delicious with its unique serving of curry sauce with it. Love! H

I have adapted the recipe from none other the Wendy. However I did omit the pork fat because it just slipped my mind to buy a piece of pork fat, hahaha! Anyway, here it is:

Ingredients for Kampar Lo Mai Fan (Serves ~6)
Red Roasted Char Siew Pork
300gm pork tenderloin
60gm sugar
30gm light soy sauce
1/4 tsp salt
1 Tbsp rose wine (Mei gui lu)

some red food coloring gel


In a small mixing bowl, add everything in except the pork and mix well. Pour the mixture into a big ziplock bag and place the pork tenderloin in as well. Seal tight and let the pork marinate in the sauce for a good 6-8 hours before use. Bake in oven for 20-23 minutes in 200C. Remember to let meat cool completely before slicing.


300gm glutinous rice
1 heaping tbsp of dried shrimp, soaked and chopped finely
3 shallots, minced
2 clove garlic, minced
1 tbsp oyster sauce
2 tbsp light soy sauce
2 tbsp dark caramel sauce
Salt if needed
Boiling water

  • Soak the glutinous rice for at least an hour before use.
  • In the meantime, prepare the steamer to a small rolling boil.
  • In a small pot, fry the shallot till its all golden and crisp. Dish out and set aside.
  • In another cooking pan, add in some cooking oil at medium fire. Add in the garlic and chopped dried shrimp in and cook for a couple minutes till fragrant. 
  • Drain the rice and discard soaking water. Then add in the soaked glutinous rice into the cooking pan and stir to mix well.
  • Add in the seasoning to the rice and stir fry till it is uniform in colour.
  • Add in the fried shallots and stir to combine. Cook for about 2-3 minutes.
  • Now transfer the rice into a taming vessel and add water to just cover the rice. Steam at medium high fire till the rice is cooked, about 20-25 minutes.
  • Remember to let the rice cool first before scooping it, this allows the rice to firm up a little and not get all mushed up when you scoop.

Assembly
1/2 cup fried peanuts
Spring onions, sliced

Red roasted char siew
  • In a small oiled bowl, scoop in some steamed glutinous rice in and press it down to level.
  • Then carefully invert the rice over a serving plate.
  • Garnish with juliened green onions, fried peanuts and top with sliced char siew.
  • Serve with curry sauce if desired.
Oh how I love the crunchy peanuts with this Lo Mai Fan, hahaha! And the curry, yes the curry sauce....didn't know it taste so good with curry!
For the curry sauce, please refer to here for more details.

I am more then happy to submit this post to this month's Malaysian Food Fest Perak Month hosted by WendyinKK of Table for 2 or more

Thanks for staying with me and bearing with me for my absence!
Have a great day everyone! Its TGIF tomorrow! Yay!

Friday, August 9, 2013

Strawbwerry Apricot Oat Cake with Chia Seeds

This is a much delayed post that I had promise many awhile back. Sincere apologies! Anyway, its always the usual story that I'm always on IG and feel free to come say hi when you are there. As I will be posting less here in my blog sphere unless required. :P Anyway, today's recipe Strawberry Apricot Oat cake with Chia Seeds is really an impromptu recipe that I came up so as to clear off those over stocked fruits that I always impulsively buy every time. :P But the outcome was great, think I will bake it again, perhaps with a different fresh fruit topping.


Ingredients for Strawberry Oat Cake: (Makes one 9x5" loaf or two 7x3.5" loaves)
114g unsalted butter, room temperature
90g caster sugar
2 large eggs
1 tsp vanilla extract
100g cake flour
40g oat flour
1/2 tsp baking powder
2 tbsp non fat Greek yoghurt (or any plain yoghurt)
8 large strawberries, halved
8 ripe apricots, halved and seed removed
1 tbsp Organic Chia Seeds
  • Preheat the oven to 170C, grease and line the baking pan with parchment paper.
  • In the mixing bowl, beat the butter and sugar together until light and fluffy. Add the egg one at a time and mix after each addition.
  • Add in salt and vanilla extract, mix well.
  • Add in the Greek yoghurt,and mix again. Lastly shift in the cake flour and mix well.
  • Add the oat flour and Chia seeds last and stir till no lumps.
  • Pour the batter into the prepared pans.
  • Place the strawberry and apricot halves on top of the batter, alternating one fruit after another.
  •  
  • Bake in the preheated oven for 38-40 minutes or till the cake tester comes out clean.
  • Once baked, remove from oven and let cool on rack completely before slicing.
Showing off the moist soft interior with the fruits still soft and juicy. Love the tender crumbs, so delicious! As I mention earlier, you are most welcome to change the fruit topping to any kind of your preference. :)

Also want to take this opportunity to wish Singapore a very Happy 48th Birthday today! Actually made a strawberry yoghurt dessert in lieu of the occasion, haha!
This is just layering of Passion fruit Greek yoghurt and fresh cut strawberries. The red and white is just like our Singapore flag! Yay! Anyway, have a great long weekend peeps! 

Cheers to Singapore and many more great years to come and prosper!

Wednesday, July 31, 2013

Pumpkin Bao with Char Siew filling

I realize that I have not been making baos for awhile now. And since making bao is much much easier as compared to bread baking, I will usually opt for steaming up some baos instead during busy days. This time I decided to make the bao a flavored one, which is pumpkin! Such an obvious choice since I love root vegetables! And just so happened I bought some char siew from the market, so char siew pumpkin bao it is!
I adapted the pumpkin bao dough recipe from Carol's cookbook on "面点新手必用的第一本书 " which was pretty easy to handle. Here is the recipe:
Char Siew Filling:
300g Char siew pork, chopped finely (store bought)
6 shallots*, sliced thinly and fried till golden brown
Seasonings:
120ml water

1
.5 tbsp light soy sauce
1 tbsp oyster sauce

1 tsp dark soy sauce

2.5 tbsp sugar

1 tbsp tapioca flour

1 tbsp corn flour

1 tsp plain flour
  • In a large mixing bowl, add all the seasoning ingredients together and mix well.
  • In the saucepan with medium low heat, add the seasoning mixture and cook till it thickens.
  • Add the chopped char siew pork and fried shallots and stir till well combined.
  • Off the fire and dish up to cool till ready to use. This can be made ahead of time and kept in the fridge for 24 to 48 hrs. 

Starter dough: 
120g plain flour
1/4 tsp instant active yeast
80ml water
pinch of salt
  • Mix everything together to a soft pliable dough. Cover and let rest in a greased bowl to proof for 1hr so it doubles in size.
 Main Dough:
180g pumpkin (peeled, steamed and mashed)
100g starter dough
300g cake flour/ Top flour / HK flour
1/2 tsp instant active yeast
20g milk powder
20g caster sugar
20g olive oil
1/8 tsp salt
10-20ml water can be added is dough is too try. Or 10-20g cake flour can be added if dough is too wet
  • Knead everything together in a mixer till not sticky and everything comes together into a smooth pliable dough.
  • Let dough rest in greased bowl covered for another 45mins to 1 hr until double in size.
  • In the meantime, prepare steamer and some cut out grease paper.
  • Punch out the air and divide the dough into 45g portions, roll round and let sit for 10 mins covered before wrapping.
  • Take a portion and roll flat into a round disk, place about 1 heaping teaspoon of char siew filling in the center and then seal up the dough by pleating along side. 
  • Place the wrapped bao on a grease paper and let it proof for another 15-20 mins before steaming. Repeat this till all the dough portions are used.
  • While the steamer is boiling at medium low, place the baos in and steam at medium fire for 10-12 minutes. make sure your steamer cover is wrapped with kitchen towel to prevent the water from dripping on the baos.
  • Once done, off fire and let seat for 5 minutes. Then slowly lift cover and open a small gap to cool for another 10 minutes before removing the cover completely.
 
The bao skin is fluffy soft and with the pairing of char siew filling was awesome! My kids ate them happily and say it's better then store bought! ~happiness~ hahaha! The bao skin does have a faint pumpkin aroma to it! I love! :D

Do try this recipe if you like baos and pumpkin as much as I do. And feel free to change the filling to whatever you like, red bean, lotus paste or even black sesame, I think it'll be yummy too! ;)

Okay folks, thats all for today, will post another fruity cake soon, stay tune!


Tuesday, July 30, 2013

Steamed Moist Chocolate Oat cake with Bananas

This is a long over due post! Haha, my sincere apologies again. :P I guess I am posting upon on demand now since I can see my followers' interest are. Well mainly from Instagram though since that is where I am most of the time now. :P Anyways, I am gonna post one of the more popular recipes today which I have repetitive requests on. It is Steamed Moist Chocolate Oat cake (with banana). I actually first made this for Easter...yeah 3 months late, hahaha! Oops busted! LOL!

This is such an easy recipe to whip up! I guess the only tedious part is the blending the rolled oats and steaming the batter, haha! Anyways, I adapted this recipe from Cooking Crave but modified the recipe to a healthier version. Here is my recipe:

Ingredients for Steamed Moist Chocolate Oat Cake (makes about 12 standard 4oz)
120ml vegetable oil
200ml chocolate milk (low fat milk can be used)
2 large eggs
1/4 tsp salt
150g light brown sugar (I used 140g when I added banana in)
80g cake flour
50g oat flour (blend rolled oats till very fine)
50g unsweetened cocoa powder (I used Valrohna) 
1/2 tsp baking powder
1/4 tsp baking soda
1 tsp pure vanilla extract
4 ripe bananas, half or quartered to be inserted into cake
  • Get ready steamer with cupcake liners or an 8" round cake pan, greased and lined with parchment paper. Set the steamer on low fire
  • In a large mixing bowl, add oil, milk, eggs, salt and sugar. Stir well and make sure sugar has dissolved. You can speed up the process by placing bowl over double boiler.
  • Sift the cake flour, cocoa powder, baking powder and baking soda into the milk mixture. aAdd in the oat flour at this point. Stir well making sure everything is combined and no visible lumps.
  • Lastly add in the vanilla extract and mix. Batter will be runny.
  • Pour the batter into the prepared containers. If adding bananas, now you can insert them, letting them stand up right. 
  • Make sure when you place the batter into the steamer, it is already on low boil. For a whole 8" cake, steam at medium fire for 40mins till cake tester comes out clean. For cupcakes, steam for 10-12 mins till cake tester comes out clean as well.
The addition of oats did not compromise the taste nor much of its soft texture. And with the bananas, you can opt to not add more sugar as it will enhance the sweetness when you bite into the fruit. Yums!
Showing off the moist tender interior of the yummy healthy, yes healthy cake. :D Love the addition of the banana...really makes this cake a whole lot more enjoyable haha!

Okay, that's all for now folks, will post up something savory next, stay tune!
 

Wednesday, July 17, 2013

Strawberry and Cream Oat Muffins with Chia Seeds

Hi everyone! So sorry for my long absence again. Gosh I gotta stop doing this, disappearing and coming back being all apologetic, haha! But I reckon I will be slowing down in my posts here. No worries, I won't abandon it altogether but will still be lurking around, coming back with some awesome recipes to share, especially those that are in quite high "demand" in my Instagram account. I have to say it ain't easy to maintain two accounts....blog and IG. And since IG is a much easier posting, haha, I naturally lean towards that. Nonetheless will not leave my blog as I promised, so no worries!

Today's recipe is actually inspired by Jane's Sweets and Baking Journal. She has this really awesome recipe of strawberry cream cheese muffins which I made quite awhile back (not too sure have I posted it before, haha) But anyways, I decided to remaking it into a much healthier version, adding oat flour and chia seeds. Ok ok, back up you say? Chia what? Haha, it is the next BIG hit in super-food. Read all about its greatness here. Anyway, here is my baked muffin:
Note that all pictures posted on this post are taken using my iphone5...ehh yeah I kinda didn't expect to post this recipe so didn't even bother to whip out my DSLR, haha. So please pardon the slightly not up to standard qualities ya?  

Okay, here is my version of the recipe:
Ingredients for Strawberry & Cream Oat Muffins with Chia Seeds (Makes 16 of 4 oz cuppies)
1 cup buttermilk (I used 2 tsp of fresh lemon juice, combined with 1 cup fresh milk, rest 5 mins)
113g unsalted butter, room temperature
1 tbsp pure vanilla extract
2 large eggs
180g cake flour
50g oar flour (50g rolled oats, blend till very fine)
140g light brown sugar
1/2 salt
2 tsp baking powder
2 tbsp chia seeds (adjust amount to your liking but do not add too much)  

Cream cheese filling
125g cream cheese, room temperature
1 and 1/2 Tbsp. of liquid from one whole egg that's been beaten lightly

1 tbsp of strawberry jam (optional)
3 tbsp confectioner's sugar
1/4 tsp. vanilla extract
 

1 cup fresh ripe strawberries cut into small chunks

  • In a small mixing bowl, add in cream cheese, powder sugar, egg, strawberry jam and vanilla. Stir and mix well till everything comes together into a smooth consistency.
  • Chill the cream cheese mixture in the fridge till needed. 
  • Preheat the oven to 175C.
  • In a large mixing bowl, beat the butter and sugar till light and creamy. 
  • Crack in an egg at a time, making sure it is well combined before adding the next one.
  • Add in the vanilla extract and mix well.
  • Next shift in half the amount of cake flour, baking powder and salt. Combine well.
  • Then add in all of the buttermilk and again mix well.
  • Add in the oat flour and combine, then lastly shift in the rest of the cake flour and stir well to combine.
  • Sprinkle in the Chia seeds at this point if you are using and stir to mix it in evenly.
  • Line the muffin cups and scoop about 1/3 amount of the cake batter in cupcake or muffin liners.
  • Then scoop about 1 tsp amount of cream cheese mixture right in the middle of that cake batter.
  • Then sprinkle a few chunks of cut up strawberries over the cream cheese. Then cover all this with another 1/3 amount of the cake batter.
  • Making sure all these does not fill up more then 80% of the cupcake or muffin liner.
  • Repeat till all the liners or tray are filled. Sprinkle some coarse brown sugar over the top for a nice sparkle.
  •  Bake in the preheated oven for 15-18 minutes till the top is golden brown and the cake tester comes out clean.
There you have it guys! For all those that has been bugging....sorry asking me for this recipe, hahaha! Just kidding! Happy baking ya! Oh wait!
How can me miss out this all important picture of how the cake look inside! Crisp on the outside and yet creamy on the inside. Not too sweet, just right with a slight tang from the fresh strawberries inside. You won't taste the Chia seeds at all if you are worried. It just add a tiny bit of crunch to every bite. ;) Hope it has tempt you enough! Thanks for staying with me and let me know how it turned out for you. ;))

Have a good one all! Cheers!

Sunday, June 30, 2013

Nonya Fried Rice - MFF featuring Penang

Looks like I am not slacking after all, haha! Coming up with another post 2 days later...even I am surprise with myself, haha. Cutting a little close to the dateline...but better not doing it at all right? (self comforting) Anyway, this last post for this month is Nonya Fried Rice which I again adapted from out dear Phong Hong, thanks so much my friend! 
I have to say this is indeed a very delicious and flavorful dish! Really different from your usual fried rice. :P Most of the "punch" comes from the dried shrimp and fresh sweet prawns, yummy! To think that I didn't add much seasoning to that big pot of fried rice. So delicious! I followed Phong Hong's recipe pretty closely this time, here is my copy of it.

Ingredients for Nonya Fried Rice (Serves 4)
1 tbsp garlic, minced
3 large eggs, lightly beaten and seasoned with 1 tsp soy sauce and a dash of pepper
2 tbsp vegetable oil
5 tbsp vegetable oil
5 shallots, sliced thinly
4 garlic cloves, minced
50g dried shrimp, soaked and chopped finely
150g prawns, shelled and deveined
3 dried shitake mushrooms, soaked till soft and sliced thinly
1 tsp chili paste (I added so little because of my kids)
3 cups of cooked rice, cooled or overnight

Seasoning:
1 tbsp light soy saucce
1 tbsp oyster sauce
1/4 tsp salt
2 tsp caster sugar
a few dashes of pepper
1/4 tsp dark soy sauce

Garnish:
Thinly sliced spring onions
Fried Shallot crisps
  • Heat up the wok and add the oil. Once the wok is hot enough, add in garlic and stir till aromatic.
  • Add in eggs and fried till golden brown. Break it up with the spatula into smaller chunks. Dish up and set aside.
  • Add the 5 tbsp oil at medium low fire. Add in the garlic and shallots and stir fry till aromatic. 
  • Add in the minced dried shrimp and sliced mushrooms and continue to cool till fragrant again.
  • Then add in the fresh prawns and cook till it turned pink. 
  •  
  • Add in the cooked rice, followed by the seasoning. Stir everything together till all the rice is coated with the seasoning and even colored.
  • Lastly add in the fried egg and stir in well. Dish up and garnish with spring onion and fried shallots. Serve while still hot. Enjoy!
 It looks so ordinary, but the taste is extraordinary! Simply heart this, even my family was all praised, haha! Am so glad I still managed to attempt this even it was so last minute, haha!

Okay, will again submit this to this month's Malaysian Food Fest Penang Month hosted by Alan of Travellingfoodies.

okay folks, have a great start next week!
Cheers!