Saturday, January 31, 2009

Dual Birthday Celebration

Yes, another birthday celebration. In fact it's 2 dear friends of mine in Malaysia whom share the same birth dates, haha, what are the odds to that right?! ;D But this celebration was long overdue since all of us were too busy with CNY and other important family matters. Well, better late then never right?

I was pretty excited about it and have been thinking on making a yummy birthday cake for them, i.e. Mocha Chiffon Cake. However I did not have any coffee essence or rum at hand, and due to CNY season, the bakery supply stores were not open. So I thought perhaps make something more refreshing and with the ingredients I have. *sorry gals, should have prep the ingredients way ahead!!* Anyway, I decided to make Orange Chiffon Cake with Cream Cheese White Chocolate Orange Frosting. I know...sounds very "orangy", haha!

I used the Orange Chiffon cake recipe from Prima. And since the recipe online wasn't very clear, here's the steps I took in making this cake.

Ingredients for Chiffon Cake:
120g Top Flour
1 ½ tsp Baking Powder
1 large Orange
3 Egg Yolks
50 ml Corn Oil
4 Egg Whites
¼ tsp Cream of Tartar
100 g Castor Sugar
Pinch of Salt

Method:
  • Mix corn oil with 50g of caster sugar. Add egg yolks into the mixture and whisk till well blend.
  • Add grated orange rind and 50ml of freshly squeezed orange juice, mix well.
  • Sift Top flour, salt, baking powder into the egg yolk mixture and mix till incorporated.
  • Beat egg whites until foamy, add cream of tartar and the remaining 50g of caster sugar and beat till stiff peaks.
  • Preheat oven to 180°C. Grease cake pan and dust with flour, knock out excess.
  • Add 1/3 of the egg white to the flour mixture and gently fold in to mix. Then add the remaining egg whites in 2 patches of 1/3 and fold in gently to prevent deflating of the egg whites.
  • Pour batter into prepared cake pan and baked in oven for about 30 minutes or till cake tester comes out clean.
  • Let cake cool completely in cake pan. Then gently remove cake from pan and cut cake width wise and place in refrigerator till needed.
Ingredients for Frosting:
1/4 cup (2oz/62.5g) unsalted butter, room temperature

1/2 lb (250g) cream cheese, room temperature
5oz (157.5g) white chocolate, melted and cooled
Juice of 1/2 an orange
1 tsp vanilla essence
Food coloring (optional)

Method:
  • In a bowl, using a hand mixer, cream butter and cream cheese together on medium speed till thoroughly mixed.
  • Pour melted white chocolate in and mix at low speed until fully combined.
  • Beat in the orange juice and vanilla essence.
  • Add desired food coloring and mix till color is uniform. (optional)
Assembly of Cake:
Sliced wedges of 1 orange (see picture below)
  • On one of the cake slice, spread 1/4 of the frosting on it.
  • Place orange wedges on top, as many as you prefer.
  • Place the other cake slice on top and start to ice the cake with the remaining frosting.
  • Leave about 4 table spoon worth of frosting for extra piping and decoration purpose if desired.
Although it's not the best tasting cake I have made for my friends so far, but I was glad they managed to finish the whole cake even after our delicious dinner @ Pasta Zanmai. ;) Thanks girls for a wonderful evening!

A snapshot of a slice of the cake before I devour it, haha. ^o^

Good Friends are like Your Favorite Warm Drink
They warm you up when you need them the most.

Thursday, January 22, 2009

Crisp Taro(Yam) Cookies & holiday break

When I happen to come across this Crsip Taro Cookie recipe, I just couldn't resist trying them out myself. Taro cookies, cool! Personally I like the taste of taro, mallow and slight sweetness to it, it's perfect for both deserts and savory dishes. And so far the Chinese new Year cookies that I made are all traditional ones, why not give a new cookie recipe a try! Furthermore the taro I bought a couple days back is still sitting in the refrigerator, giving me all the more reason to do it, heehee. :D So thanks for sharing this recipe, Happy Flour!


It's a relatively easy recipe to work with and so is the dough. :) Make sure to use fresh yam to obtain maximum flavor. :) When the cookies are done baking in the oven, your whole kitchen will be filled with this delicious yam fragrance, so nice! But note that you do not underbake these cookies, it will not taste good, make sure they are golden brown before you remove them from the oven.
This time I used these mini cookie cutter which is originally for Easter, so you might be wondering how come there's shapes like chicks and eggs, heehee. Overall the taste of the cookie was crisp, slight sweet and flavorful. Well my MIL likes it, so I guess it's already a good recipe to keep, haha. :D Before I finish up this post, I would like to make a small announcement to all you followers and readers out there. I will not be able to blog for awhile. Reason being that I will be going back Singapore for New Year Holidays and immediately following 2 weeks vacation in California. Yes sunny California, have not gone back there for 2 years now....my 2nd home. ;) Actually I'm quite sad that I won't be able to blog & cook for awhile since it's quite a therapeutic thing for me to do.
Anyway, I will still be checking my blog now and then, so feel free to drop a comment. ;) You never know, I will still be posting all the interesting stuff while I'm on my trip, so stay tune. In any case, I will officially be back again in mid February, so for the time being, I wish with all my heart that everyone out there a Happy Lunar New Year!
新年进步,身体健康
一切顺利, 幸福美满

Tuesday, January 20, 2009

Chocolate Brioche Crossiants

I have always love croissants... the rich buttery taste, flaky crust on the outside and soft bread on the inside. Good on it's own or with some delicious spread...yummy! Thinking about it even gives me the "tingles", haha. ;)

Actually I was due to bake a birthday cake for a dear friend today. However something turn up and I had to hold off baking the cake, which gave me some time to bake these delicious chocolate Brioche Croissants! So perhaps I have my friends to thanks for allowing me to have time to bake this yummy croissants for my family. ;)
Brioche and croissants? Two in one, even better right, haha. For the benefit of those who does not know what is brioche, it's a yeast dough, a cross between pastry and bread. It's rich in butter and eggs, just a little sweet, pullable - a gentle tug, and the bread stretches in long, lacy strand, a fine texture. :)
I happen to come across this recipe from CookingBread.com and was intrigued on how it uses brioche recipe to make the croissants. Hence I decided to give it a go, but made some changes to it, here's my version of the recipe:

Ingredients for Brioche:
325g bread flour
1/2 cup lukewarm milk
3 tbsp caster sugar
2 tsp active dry yeast

2 eggs
1 tsp salt
150g unsalted butter, room temperature
10 to 12 Chocolate truffles, or 10 to 12 ounces of semisweet chocolate

Method:
  • Dissolve the active dry yeast into the lukewarm milk and let stand till foamy, about 5 minutes.
  • In a large mixing bowl, sift 1 cup bread flour & sugar into it. Then add the lukewarm milk mixture and stir well.
  • Lightly beat the eggs and add into the flour mixture. Then add the rest of the bread flour and salt in and mix until it comes together into a soft dough.
  • Knead for 5 minutes and then add the soft butter and continue to knead till it's not too sticky and the dough pulls away from the side of the mixing bowl. This takes about 20 minutes of kneading, so use a bread mixer if you have one.
  • Place dough in oil bowl and let proof for 4hrs.
  • Note: For steps on how to roll the dough into croissants, please refer to the original recipe link for a pictorial steps. Also I used chocolate truffles instead of lemon pie filling...since I love chocolate. :)
  • Preheat oven to 180°C.
  • Let croissant doughs proof for another hour, then brush surface with egg wash.
  • When oven is ready, bake bread for 20 minutes or until golden brown on the surface.
Nothing beats a warm croissant for breakfast...looking forward to breakfast tomorrow already! Haha. ;D I would say this is a much easier recipe to make compared to traditional croissant recipe, so give it a try, it's really good! But I have to watch it though, CNY is coming and eating all these high calories goodies isn't gonna help me fit in my new cloths, haha!

Saturday, January 17, 2009

Pineapple tarts

Finally, I got some time to bake another of my favorite Chinese New Year Cookies, Pineapple tarts. To me, Chinese New Year just does not seem right without them! I remember when I was young, I would always bug my mom to buy them from her friend whom made very good pineapple tarts.

This time will be my second time baking these goodies. I remembered the first time I make pineapple tarts, it was only a small batch and it turn out a flop, haha. The pineapple filling was made from scratch and it was not sweet enough. Furthermore the pastry was not buttery and soft...*sigh*

Well, I learn my lesson, so this time round I decided to buy ready made pineapple filling from a bakery supply store and use a good pastry recipe. ;) The result....not too bad if I say so myself, heehee. :D The pineapple filling is sweet and tangy, which balance well with the buttery and soft pastry. Yum-ooo! :O
I got this recipe from Lily's Wai Sek Hong food blog, which apparently she got it from The Best of Singapore Cooking. After reviewing it, I think it's worth a try.:) Thanks for sharing Lily! However I did made some changes to the recipe, like I did not add any yellow food coloring to the egg wash....that is why it looks lighter in color.

For variety purpose, I made 2 kinds of pineapple tarts, open face and roll up type. Personally I like the roll up type better, the shape allows better balance in the taste.

Since I have so much pineapple filling, I was quite generous on it. Hope I don't get complains that's it's too sweet, haha. ;) I guess the challenge next time I make these goodies would be to make the pineapple filling myself. :)

All nicely packed in tubs again...another new year baking task accomplished.
Felt totally satisfied ....hope the tasters will be too, haha.;D I'm sure you all out there noticed nowadays New Year cookies are getting more expensive and some just does not suit your taste buds. :-P So why not try making some yourself today for your families and love ones, I'm sure they'll appreciate it. ;) Hey, food usually tastes better when it's homemade and shared...good luck! Have a Prosperous and a Yearful of Love and Happiness

Thursday, January 15, 2009

Chocolate Chips Oatmeal Cookies

I have 3 cookie "monsters" in my household; my husband and my girls of course. So I'm always looking for good cookie recipes. This particular one that incorporates oatmeal in but it's not the usual chewy texture, it's actually crisp and slight chewy when it cools. And of course, not forgetting our family favorite ingredient, chocolate, haha. ;)
It's also a better snack for my girls to bring to school then those store bought food. I got this recipe from one of my favorite bake site; www.joyofbaking.com. But I made some modifications to it, so here is my version, feel free to double the recipe:

Ingredients:
150g quick oats
170g unsalted butter @ room temperature

100g light brown sugar
120g plain flour

1/2 of a large egg

1 tsp vanilla essence

1/2 tsp baking soda

1/2 tsp cinnamon powder

1/2 tsp salt

60g good quality chopped chocolate chunks
Italic
Method:
  • Cream together butter and brown sugar in large mixing bowl till creamy and well mixed.
  • Add vanilla essence and half of the egg and beat well till incorporated.
  • Sift together, flour, salt, cinnamon, baking soda together and add into the butter mixture and mix well.
  • Add quick oats and chopped chocolate and stir till all blended.
  • Line a baking pan with parchment paper and preheat oven to 180°C.
  • Using one teaspoon amount to make smaller cookies and allow 2 inch space allowance when placing the cookie on pan since it spreads when bake.
  • Bake cookie @ 180°C for 12 to 14 minutes. Let cool on rack.
Keep in air-tight container and it will stay crisp for at least 3 days. Next time I would add chopped macadamia nuts to add more texture to it. ;)
Don't you want one of these!! Get baking now...it's really good with a glass of cold milk. ;)

Moooooo....got milk?

Wednesday, January 14, 2009

Soft Raisin Milk Loaf

I have been wanting to bake this Milk Loaf recipe (adopted from Hokkaido Milk Loaf) for the longest time. With some 65°C TangZhong (湯種) left over from my Sweet corn loaf recipe, I decide to bake myself a Raisin Milk Loaf. I was pretty much inspired by all those fellow bloggers that made the Hokkaido Milk Loaf. And since I don't have any Hokkaido Milk around, I shan't call mine a Hokkaido Milk loaf, haha. :D

When the loaf come out from the pan, I have only one comment..."My goodness, so soft!!" I literally having a hard time getting the loaf out from the pan. (I did grease the pan pretty well) I didn't know how to place it down so it won't be "dent"! You might see the some part of the bread being "compressed". Perhaps I didn't bake long enough for the crust to form? *sigh* But what I have is what will do. :-P Not the pretties loaf around, but it sure taste soft and yummy!

Ingredients Raisin Milk Loaf:
Set A:
500g bread flour
15g caster sugar
5 g active dry yeast

100ml fresh milk
90g Tang Zong
100ml fresh heavy cream
1 large egg white

10g unslted butter @ room temp
Set B:
1 large egg white
75g od caster sugar
5 g of salt
2g of active dry yeast

30g milk power
Set C:
10g of unsalted butter @ room temperature

1 cup of dried raisins, soaked in warm water for at least 20 minutes

Method:
  • In the large bowl, mix all ingredients of Set A together. Knead together until form a soft dough. Cover with saran wrap and let proof for 2hrs.
  • After 2 hrs, punch down the dough.
  • Mix all of Set B ingredients together in another bowl until well incorporated. Add it into the proofed dough and knead well.
  • The dough will be very sticky, but using a rubber scrapper, slowly knead on a clean surface with little flour to help until the dough is not sticky. At this point, add the 10g butter in and continue to knead. To test for doness, pulled the dough and it forms a thin membrane, almost see through.
  • Separate the dough into 4 equal portions. And roll out dough and spread raisins on surface and roll dough up in swiss roll form. Place it in bread pan and repeat with the other 3 portions. Let proof for another 1.5hrs.
  • Preheat oven to 180°C. When oven is ready, bake bread for 35 minutes.
A shot of the soft bread inside..when gently pulled apart....
I guess the next time round, I would try baking the bread alittle longer (I remove the loaf from the oven earlier by 5 minutes, because I saw the darken surface on top). But overall result was satisfactory. :) Try it out when you have some time to spare! ;)

It's really good on it's own, since there's raisins. But a spread of cold butter will make it even yummier! ;)

Tuesday, January 13, 2009

Kuih Bangkit

Wow, time sure flies, it's approximately 10 days to Lunar New Year! Didn't we just have our Christmas celebration? Okay, that means I need to hustle to get all my new year cookies done soon! This time round, I'm making my husband's all time favorite NY cookie, Kuih Bangkit. Frankly speaking I don't really fancy it much, because it's hard to find a good store bought one. Meaning most of the time, it's either too hard & crunchy or doesn't even melt in your mouth. :-PSo I was a little worried about attempting to make this cookie. And hence I decided to make a small batch first and decide from there how should I modify the recipe. I searched online and found a fellow blogger with this great recipe. This recipe specifically state that coconut cream is highly recommended, so I bought fresh grated coconut and squeezed the juice out. Then I let juice stand in the fridge for 1hr and use the coconut cream on top.

The cookies that turned out on my first attempt was a little crunchy and doesn't really melt in the mouth. I suspected I added too much Tapioca flour into the dough during the kneading and shape cutting process. Since the dough is really soft and it's kind of hard to cut out with the cookie cutter, but must remember to resist adding more flour!
So on my 2nd attempt, I doubled the recipe amount and was really careful not to mix too much flour into the dough. Just enough to make it pliable and not too sticky. And the end result was just what I expected, a little crunch on the outside and the cookie just melt in your mouth!

In conclusion, even if you have a great recipe at hand, you have try it out to make sure you get the best end result. Also a note, I probably will do away with some sugar, if I were to make some more with this recipe...perhaps 1 tbsp less.

All nicely packed in mini tubs to be given away. Hope my friends and family will love these cookies....most importantly my hubby loves them too. ;)

Gong Xi Fa Cai

Sunday, January 11, 2009

Sweet Corn Loaf

Every time we go back Singapore, my girls will always ask for this Corn loaf from Gardenia. They love the sweet fragrant soft bread and eats it plain or spread with peanut butter for breakfast. :)

And since they only sell it in Singapore, it seems like a treat to them whenever we buy them a loaf. And when we come back to Malaysia, we cannot find any corn loaf on sale around here. I guess the harder to get the more they wants it...*sigh*. So I decided to take up this challenge in making them a sweet corn loaf today.

I have also been reading so much about this bread making method, call 65°C TangZhong (湯種) (This fellow blogger has a detail explanation of this method, check it out). Apparently this style of bread making yields a softer and fluffier texture and also longer lasting bread too! (wow right!) So with dual challenge, trying a new bread recipe and a new bread making method. Worried at first but the end result was as promised. :)
I have chosen to use Del Monte thick Corn Soup this time. It comes in a card box form of 350ml, not in a can. I bought it in Singapore NTUC. Feel free to substitute any brand of corn soup you like. :) I will not be including the 65°C TangZhong (湯種) recipe here, please refer to link for it. Okay for those interested in getting your hands on my corn bread recipe, here it is:

Ingredients:
350g bread flour (plus a little for kneading if too sticky)
1 tbsp of milk power
1/2 tsp salt
5g of active dry yeast
80ml of warm water

55g of caster sugar

80g of Tang Zong

150ml of Del Monte Corn Soup
30g of unsalted butter @ room temperature


Method:
  • In the bowl, add warm water and yeast, stir to mix and let stand till foamy, about 5 minutes.
  • Sift bread flour, milk powder, salt into a mixing bowl. Add sugar, Tang Zong, yeast mixture, corn soup and mix well to form a soft dough. Let rest for 10 minutes.
  • Add butter to dough till incorporated and knead dough for another 15 minutes and let proof in oiled bowl for 90 minutes.
  • After 90 minutes, punch down dough and knead dough till it's not too sticky (resist adding too much flour, else the dough will be tough) and able to roll into swiss roll style.
  • Placed the dough into greased baking pan to proof till it fills up at least 80% of the pan. Check out my new nifty bread pan below with the lid. No more saran wrap. :) Size of pan is 12cm by 25cm.
  • Preheat oven to 180°C. When oven is ready, bake bread for 30 minutes (if without lid), till the surface of bread is slight golden brown.
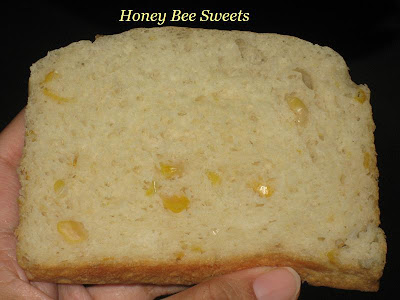
A close up snap shot of a slice of the corn bread. Can see the specs of sweet and still crunchy corn inside the bread. :) The bread is indeed light and fluffy, worth the extra effort put in. ;) I guess the ultimate test will be my girls tasting them tomorrow breakfast. *fingers crossed*

Even though I know in some way my loaf will not be as good as those from Gardenia, but nothing beats homemade right? Seeing the picture above, I have to say "Not too shabby!", haha!

Saturday, January 10, 2009

Chocolate Marble Bread with Ganache

My little ones has been bugging me to bake a cake for them. So I searched through my recipe booklet and found this quick loaf bread. Okay, the name may sound a little misleading, it's not yeast bread we're talking here but a cake loaf. I would say this is close to butter or pound cake but slightly less butter in it. I found this recipe in Martha Stewart website.

It's relatively easy to make so I thought why not give it a shot. By the way, I half the recipe using a mini loaf pan instead. Feel free to make the whole recipe.

After you have went through making the cake batter, you should note that there are basically four steps that needs to be followed to get the marble patterns in the cake and also assembling the ganache on it.
  • Step A: Alternating the white and chocolate batter. I did chocolate, white and chocolate again. Lastly stir gently using a table knife in the middle of the pan to create some patterns. Put in oven and bake.
  • Step B: Let cake cool complete in the pan itself before adding the chocolate ganache.
  • Step C: Spread ganache evenly over the cooled cake. (Mine was not done nicely, so it's not so smooth on the surface) Place whole cake in pan to refrigerator to set the ganache.
  • Step D: Remove cake from fridge, then from the pan. gently remove the parchment paper.
Let the cake get back to room temperature before you cut and serve, else the ganache might crack. And the cake tastes more soft too.

Hope you all that tried making this Marble cake will enjoy it as much as my girls did. :)

Friday, January 9, 2009

Tang Yuan & Sweet Potatoes in Red Bean Soup

I have to say this dish was inspired by both by my mom and my Mother-in-law. Why MIL? Well, when my family & I were back in Singapore last month, she made this delicious desert for us. The Tang Yuan was really tender, slight chewiness to it and it goes perfectly well with the red bean soup. It's these kind of deserts that reminds me of home and family. ;)

Why my mom? Well, when she went Hokkaido, Japan for vacation a couple months back, she bought me a packet of their Hokkaido Red Beans. We all know how the Japanese love their red beans. And you can imagine the quality of these red beans. To show you the difference of Hokkaido red beans and normal local red beans, click and see the picture below:

The Hokkaido red beans are shiny, uniform in shape and size, like little jewels! Sorry if the picture does not justify that. Even after I boil it for 1 hr, it still remains in it's original shape, not mushy or cracked like normal red beans. But when you bite into it, it's all soft and melt in your mouth, how great is that! ;) But of course you can use normal red beans for this dish, it's still tasty. ;) So here's the recipe for those interested:

Ingredients For Red Bean Soup:
150g of red beans
1 pandan leaves, tied with a knot in the middle
2 thin slices of ginger
50g of chopped Gula Melaka, to your own preference (or granulated sugar)
200g of Japanese sweet potato, peeled & cut into big chunks (optional)

Method:
  • Wash and rinse red beans and put in a boiling pot. Add pandan leave and 250ml of water or enough to cover the beans and start boiling.
  • After 45 minutes, add Gula Melaka to the red bean soup and continue to boil till tender.
  • Add sweet potatoes and boil for another 8 to 10 minutes. (optional)
Ingredients Tang Yuan:
100g Glutinous Rice Flour
1/2 tsp of confectioner's sugar
4 tbsp to 6 tbsp of cold water (depending on the texture of your dough)
A drop of food coloring of your preference

Method:
  • Mix all ingredients together in a bowl and knead to form a soft and non-sticky dough.
  • Divide dough into 3 equal portions and add a drop of food coloring if desired. Knead the dough till color is uniform through the dough.
  • Pinch off a small dollop of the dough (about 1 tsp) and roll it into a small ball with the palms of your hands. (see below)
  • At this point you can refrigerate the Tang Yuan if the red bean soup is not ready. If red bean soup is ready, add Tang Yuan and boil for 5 minutes.
It's such a healthy desert, (if you don't add too much sugar). It really warms you up on cold days...not that there's a lot of cold days here in this tropical city, haha. ;) But it's still nice to have occasionally....try it! ;)

Actually I made this especially for my dear hubby, it's his favorite. Hope it's up to his standard. ;)