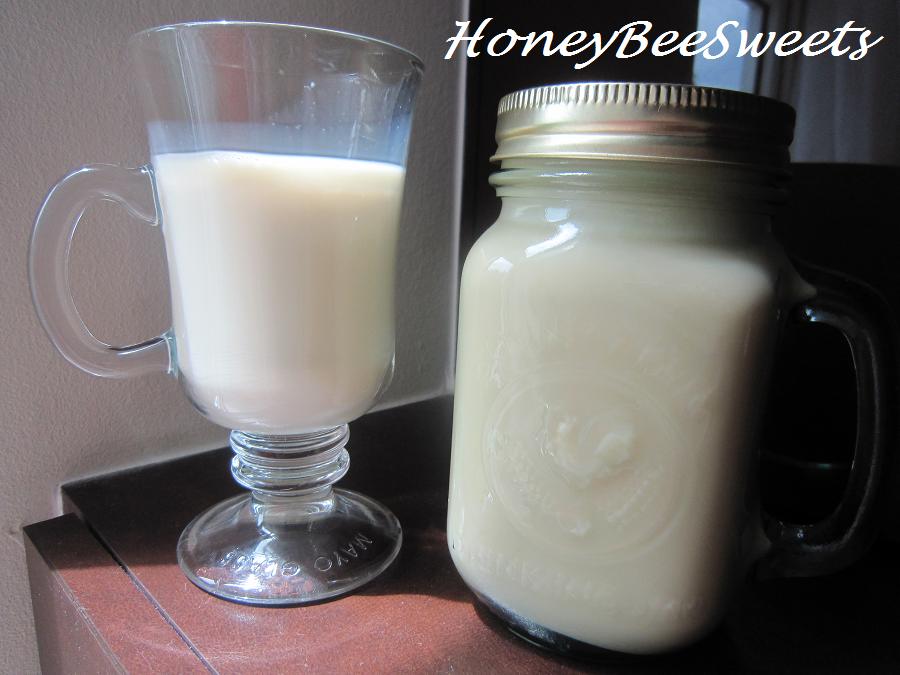
Showing posts with label drink. Show all posts

Monday, November 14, 2011

Steamed Flower Tofu and Pear Soup with ChuanBei (川贝雪梨汤)

Today I'm posting 2 healthful recipes which I am sure anyone can benefit from it. As I have mentioned before, my family loves eating tofu dishes. So I am always on the look out for good recipes. And just the other day, I happened to spot this recipe from Wendy's which pretty much had me when I saw the word steam tofu, lol! Steamed Flower Tofu, as the name implies, it's pretty to look at plus its healthy because it is steamed. Not forgetting it's so easy to whip up!
I made some changes to the recipe, so this "flower" will actually look different from Wendy's. :) I changed the mushroom at the center to Century eggs instead and I omitted the fake crab meat as well. I used Century eggs because personally I think its texture blends more nicely to this dish instead of the dried mushroom. :) I omitted the crab meat because I didn't have any when I make this. :)

I will be posting my version of the recipe for easy reference in future. Thanks to Wendy for sharing her recipe. :)

Ingredients for Steamed Flower Tofu: (Serves 4 adults)
2 century eggs, peeled, sliced into 6 -8 wedges per egg
4 slices Ham, sliced into strips
2 beaten fried egg, cooled and sliced into strips
1 silken tofu (250g)
1 egg
salt and pepper to taste

Method:
  • Line the steam bowl with heat resistance cling wrap, get ready the steamer.
  • Line the century egg wedges in the center of the bowl in a circular manner.
  • Then line the ham and egg strips along the wall lining of the bowl as well,, alternating each ingredient.
  • In a bowl, mash the tofu and egg with some salt and pepper and mix till well combined.
  • Pour the tofu mixture right in the center of the bowl.
  • Fold down the sides of the cling wrap to tug in the edges of the ham and egg strips.
  • Place in the steamer and steam at medium high for 20 minutes. Let cool for 10 minutes before flipping out on a plate.
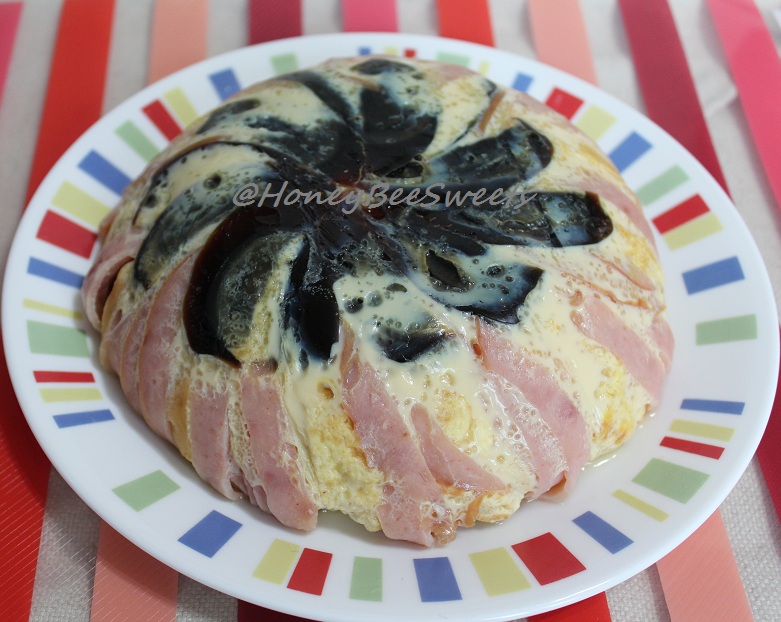
How easy is that?! It has already become my family favorite, I already made it twice and planning to make it again this week. :D Do try it, it's very good!

The second recipe is call Pear Soup with ChuanBei (川贝蜜枣雪梨汤). Okay, let me clarify, this is a sweet drink but a savory soup that you serve during dinner time. It's medicinal purpose mainly is to remove heat, stop coughing and clear phlegm. How I came about knowing this soup was that my husband loves to order it at Hong Kong airport whenever we transit there. He said he had it before way back at a Hong Kong restaurant in San Francisco and likes it very much. After realizing this, I was pretty determine to find out how to make this drink. Luckily, I found it in a soup recipe book call "The World of Nourishing & Fine Soups"!

Ingredients for Pear Soup with ChuanBei (川贝蜜枣雪梨汤) (makes about 2 cups)
12g chuanbei (川贝)
1 snow pear (雪梨) (mine was from Taiwan)
4 candy dates (蜜枣)
some cane sugar
300ml water ( original calls for 100ml only...too little!)
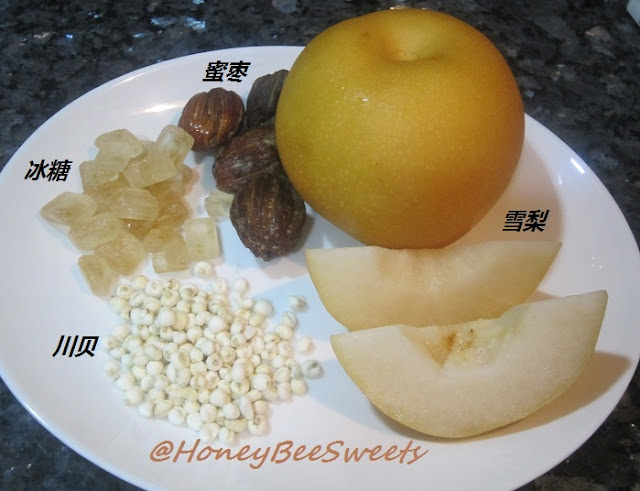
Cut pear into halves and remove core. Put all the ingredients into stewing pot, pour in water and cane sugar, stew for 2 hours. Serve when still warm. Chill is very nice too but might defeat the purpose of removing phlegm and cough. no?
This soup is actually quite pleasant to drink, whether served warm or chilled. Even my kids like it, since it's sweet and has no herbal taste at all. But do note that there are several grades of Chuanbei that you can purchase, some can be as expensive as S$24 per ounce! I bought the normal grade is S$8. :) If you are tired of drinking the usual barley or chrysanthemum drink for cooling, try this one, I'm pretty sure you'll like it.(^_^)

Okay, got to go for now. You all have a good week ahead! Cheers!


Wednesday, February 16, 2011

Birthday Cakes

It has been quite a busy week for me right after CNY. I got 2 birthday cake orders to fill so I was literally stuck home making birthday cakes and doing house chores the whole time. ;P Frankly speaking, I like it! (not the chores part of course!) I feel honored to take this all important job for making someone's birthday just a little more special. :) The first order came from a neighbor whom has requested me to make birthday cupcakes for her daughter. After some discussion, it was decided on garden theme. So here it is:
If you ask me, this is 60% fun, 40% hardwork. :) I love playing with fondant, so when my neighbor asked for it, I jump to the opportunity! Lol! Even though it does take up time for the moulding, but with proper time planning, everything will fall into place nicely. :) Furthermore, cupcakes are much easier to handle rather then a whole cake. :P
Comparing this with my previous fondant cupcakes for my kid's birthday, this is definitely a much easier one. :) I made the usual chocolate butter cake, piped buttercream tinted with leaf green over it and top off with the fondant "insects", wordings and flowers. :)
I do hope the birthday girl and her friends love these cupcakes. :) Happy Birthday Jade!

The other order I got was from my husband's office. I guess the primary reason why this order came about was from my Root Beer Chocolate Chunk Cake. Apparently the birthday gal loves to drink Coke and so her thoughtful husband took the initiative to order a Coke Chocolate Birthday cake to celebrate her birthday. :)
As I did mention in my previous post, the root beer taste was not evident so I suspected it was gonna to be the same even if I switch it to Coke. Furthermore I had to change the recipe to sponge cake rather then pound cake but still using Coke as the base fluid ingredient. Reason is simple...who uses pound cake for birthday cakes?!
I have adapted the technique "分蛋式海绵蛋糕" from my new cookbook collection; 孟老师的美味蛋糕卷. It is a little different from your usual chiffon method, but supposedly more soft and yet stays fluff without deflating. However since I needed to incorporate Coke into the cake, it got a little more tricky even though I have tried that technique before. Well, a baker's gotta do what a baker's gotta do...just bake!
It's good that the chocolate cake still turned out decant. *phew* However, even though as much Coke as I've added to the recipe, the Cola taste wasn't that evident. :P I even soaked a couple tablespoons of Coke onto each layer of the sponge cake! Oh well, I did what I could, I just hope the birthday girl wasn't too disappointed about it. :P Anyway, hope you have a great birthday celebration! :)

I won't be sharing this recipe since I did modified the original recipe from
孟老师的美味蛋糕卷. I will post up another Swiss roll recipe with this technique soon, so stay tune if you're interested. :)

Okay, thanks for staying on to read my post. But I gotta go now. :P Hope you all have a great remaining week! Cheers~!


Friday, January 14, 2011

Milk Tea Bread Loaf

If you read my blog often, you know I am a bread "addict", whether to bake or to consume, lol! So I am always on a look out for a good bread recipe. It so happened that I came across this great bread recipe book call "Natural Breads Made Easy" (Chinese is "天然麵面包") at the library a week back. Boy am I hooked! I merely tried 2 of the recipes and I am completely sold and determined to own a copy of the book myself. FYI, I just bought the book a couple hours ago online, hahaha! To show you a little proof of my great found "treasure", I present to you my first attempt, Milk Tea Bread Loaf!
It might just appear to you this is just like any ordinary old plain white loaf. But no no no...this is red milk tea infused (红茶) tender soft bread loaf. :) I followed the recipe to the dot except for the part which he requires me to add tea leaves into the dough. I figured the 2 small person in my household would dislike the overly strong tea scent. So I avoided it but it still has a faint tea scent because of the red tea concentrate I added in. :)
The main technique adapted in this book is the "17-hour low temperature" pre-ferment dough. This method evidently yields a much more moist, chewy, yeasty and a longer shelf life bread. I guess the best way to get my point is to actually make it yourself! So here is the recipe:
Note that original recipe calls Earl Grey Milk Tea Bread. Instead of brewing a pot of Earl Grey tea, I took the shortcut and used the red tea concentrate I have in my fridge. Here is a pic of the concentrate which I got from MEIDI-YA in case any of you are interested. :)

The following recipe makes up to 2 loafs of 8"X4.5"X5" loaf tin.

Ingredients for Milk Tea Bread:

Pre-ferment Dough:
464g bread flour
265g water
7g fresh yeast (I used instant active yeast)
7g sea salt (I used table salt)
13g skim milk powder

Dissolve the yeast in water. Add bread flour, sea salt, skim milk powder and knead until soft. Cover the dough in cling wrap or a big zip log bag. Refrigerate to let it prove for 17 hours.

Note: The dough will expand in the fridge. So whatever container you put the dough in, do give some allowance for growth.

Main Dough:
199g bread flour
27g skim milk powder
7g sea salt (I used table salt)
80g sugar
80g beaten egg
80g milk tea concentrate *
7g fresh yeast (I used instant active yeast)
66g unsalted butter, room temperature
13g ground Earl Grey tea leaves

*Note:I used the above packet tea concentrate. But if you want to brew your own tea, here is the formula: 20g of Earl Grey tea leaves brewed in 133ml hot milk for 15 minutes. Strain and use.

Method:
  • Knead all ingredients of the main dough together, except the butter. Add pre-ferment dough piece by piece. Knead after each addition until soft and smooth. Add butter. Knead until stretchable consistency.
  • Put the dough into a big bowl. Cover with cling wrap and let it prove for 30minutes till double.
  • Divide the dough into 6 equal portions. Flatten each portion with your hands to drive the air out. Roll it into square shape, cover and let rest for 20 minutes before shaping.
  • Flatten the dough to drive the air out. Roll each out into a rectangular sheet with a rolling pin. Fold about 2cm from both sides towards the center and roll it out again. Roll the dough up like swiss roll (the width should be the same as the tin) and out them into the mould. Repeat for the rest of the dough portions. Cover with cling wrap.
  • Let it prove for about 45 minutes or until the dough has risen to 80 to 90% of the depth of the loaf tin. You can either cover the lid or bake it open top like mine. If open top, brush with egg wash. Bake in 175C for 30 to 35minutes.
It looks kind of plain without adding in the ground tea leaves. But the softness and deliciousness compensate for the looks, hee. :D Furthermore, if I replaced the milk tea concentrate with full cream milk, it will just be a nice milk loaf too. :)

Once the loaf was out of the oven and I had taken a few shots, my hubby and I gobbled up a few slices immediately! Freshly baked bread...who can resist that? Plus this bread's texture is really good, soft with slight chewiness and a nice crusty outside. :) You guys gotta try this, trust me. :) Besides the ingredients are simple too. :)

Okay all, got to go catch my Zzzzs. :) Hope you all have a nice relaxing weekend. Cheers!

Tuesday, November 30, 2010

Homemade Soy Milk & Vegetarian Soy Milk Whole wheat Bread

I have always wanted to make soy milk at home. Call me silly, but I always thought that it requires a soy milk machine or something to blend the milk out. Well, I was so wrong, lol! Great thing Wendy posted the recipe for making soy milk and the 'mystery' was gone, yippee!! It didn't take me long to buy a pack of soy beans and got to make fresh soy milk...at home! :) You must be thinking why bother with so much trouble if soy milk is so darn cheap outside. Well, it's hard to explain, but being able to make it yourself is fun! And furthermore, I know I am able to churn out more stuff with the soy milk later too. :)) Exciting!
And after making the soy milk myself then I realize that it's so darn easy to make it!After tasting my homemade soy milk, I am hooked! Think I will never buy another box of soy milk at the grocer ever again, lol! Up from the point I knew how to make it, I've already done it thrice! Which is all within this month, lol! As tempted as I already am, I still did not make the tofu with the soy milk. Why...somehow I always have some store bought tofu / egg tofu in the fridge (I always have tofu in stock since my family love tofu) I guess that should be all the more reason I should make tofu at home. Well, perhaps next month another post yah?

Recipe adapted from Wendy's blog
Ingredients for Soy Milk:
150g soy beans
750ml water + 750ml water
2 to 3 knotted pandan leaves

Method:
  • Soak the soy beans overnight or at least 8hrs. Throw away the soaking water. Use your fingers to loosen the skin of the beans. Then using a sieve to scoop it out. If it doesn't bother you, you can skip the step of removing the skin. But it is known that the skin of the beans can cause joint pains.
  • Put all the beans into a blender with 750ml water at high speed. Blend until very fine, for about 2 minutes.
  • Pour the blended beans puree into a fine sieve bag and press to extract the soy milk into a pot.
  • Place the soy mixture into the blender again and repeat the blending process with another 750ml water, then extract milk to the pot.
  • Add a couple of knotted pandan leaves into the pot and start boiling the soy milk. Keep a watchful eye over it as it over boils and flows out very rapidly. Serve warm or chilled.
I made quite a bit so I divide half of the soy milk to add different sweetening syrup. One was with plain white sugar and the other was with gula melaka. However I didn't like the gula melaka version since the taste was a bit off and over powering.
But after chilling it for a few hours in the fridge, it was still acceptable. Although I still recommend using plain white sugar if you like the traditional soy milk taste. I like mine chilled and having it with something savory like carrot cake or simply just bread (soy milk bread) is a breakfast bonus. Yum!!:)
Talking about bread, I bet those that follow my blog would not be surprise that I will make soy milk bread, lol! Being a soy milk fan, it does make sense to try out making bread from it. :)) Furthermore, I did see some bloggers out there already attempted that...so it should be pretty good. ;) Let me correct it...it's not good, it's great!
Ingredients for Vegetarian Tang Zhong “湯種" Soy Milk Bread:
Starter dough (“湯種"):
250ml fresh soy milk (you can use store bought sugar free ones)
50g cake flour

Main dough:
200g of starter dough
420g bread flour
80g wholemeal flour
1 tsp salt
1/2 tsp instant active yeast
45g caster sugar
240ml fresh soy milk (you can use store bought sugar free ones)
40g vegetable oil
30g butter @room temperature

Method:

  • Mix all dough ingredients except for butter together in a large mixing bowl to form a soft dough. Place on work area to knead or mixer to do the kneading. Knead the dough till it is not sticky, about 20 minutes.
  • Add the unsalted butter in and continue to knead till the dough is shiny and elastic. To test if the dough is ready, pull a small piece off and stretching it with your fingers. If dough is very elastic and pulls to almost see through without breaking, then it's done.
  • Place dough in a greased bowl and cover with plastic wrap and allow to proof for at least 90 minutes to 2hrs.
  • Once it's doubled, punched out the air and divide the dough to 65g portions, roll round and cover to let rest for 10 minutes before shaping.
  • Fill the dough with any desired filling. Let proof for another 20 mins, brush with egg wash. Bake @ 175C in a preheated oven for 15 to 18minus till golden brown.
The first time I made these soy milk bread, for fillings I used black sesame paste, chocolate paste and cream cheese with dried cranberries. Some left over dough were used to make mini hot dog buns. The second time I made soy milk buns, I used red bean paste and also a small raisin loaf, upon request by my girls. :)
There is a nice evident smell of soy milk in the buns and loaf which I really like. ;) I like eating the raisin loaf the best as it can be enjoyed without any spread, but with nice sweet compliments from the raisins and still able to taste the soy milk in it. :) However, if you are not a fan of soy milk, feel free to substitute it with plain milk, it'll taste real good too. :)

A picture to show the softness of the soy milk buns. :)) What best is it's vegetarian and it's wholewheat too! Hope this post can get you really motivated to make some soy milk and breads at home. :) It's really worth every ounce of effort. :) I know for sure that I will be making more of these, perhaps trying out black beans next time, that would be really interesting! So stay tune folks!

Have a good week ahead all! Cheerios!

Friday, April 9, 2010

Strawberry Chiffon Cupcakes & Papaya Milkshake

I guess to some people renovating their house can be a pretty exciting thing. It's like giving your house a face lift. Gone with the old and here to stay are the new. :) New furniture, new appliances and even to some extend, new ambiance to your living space. Okay, fun aside, there is A LOT of work involve here. You need to scout for a good contractor, walk through with them the quotations, calculate if it's not over-budget. Also driving to most of the furniture and Electronic stores and hunt for new appliances and furniture. You have to choose your sink, your Kitchen forcet, curtains blah blah blah, you know what I mean. Basically my main concern is a good oven and a trusty stove top, so for other stuff, I'm pretty much like "Not bad can already". But again, I am building my home...who doesn't want a nice place to stay in?! Anyway, I am just in the beginning of it all, so it'll be quite awhile before I can seat back, relax in my nice cosy home and blog away. :P

Today I have again went on to bake one of my girls' favorite, strawberry cake, specially Strawberry Chiffon Cupcakes. Sounds so much like the Strawberry Muffins I did a month back (I even used the same paper cup liners! Lol!) But in fact they are quite different, because this time is chiffon cake, much lighter and fluffier in texture. :)

This recipe is really a keeper and I would recommend it to anyone who loves Strawberry. I would definitely make this for my daughter's birthday this June since she love it so much. :) So far she has already 2 cupcakes and has already requested to bring one to school tomorrow. :)

Ingredients for Strawberry Chiffon Cake (makes 10 to 12 muffin size cakes)
180g all purpose flour
1 tsp baking powder
1/2 tsp salt
170g unsalted butter, room temperature
200g caster sugar
1 tsp vanilla extract
140g strawberry yogurt
4 egg yolks
4 egg whites
1/2 cup fresh strawberries, cut into small chunks + 5 more cut into half for deco

Method:

  • In a large bowl, sift together the flour, baking powder, salt and set aside for later use.
  • In another large mixing bowl, cream together the butter and 1/2 of the sugar till light and fluffy. Add in the 4 egg yolks and vanilla and mix well.
  • Then add 1/4 of the flour mixture in and stir well, follow by adding 1/3 of the yogurt. Alternating the flour and yogurt to the mixture till everything is incorporated in.
  • Preheat the oven to 180°C.
  • In another bowl, beat the egg whites till frothy. Then continue to beat at high speed but at the same time, gradually adding the remaining sugar in. Beat till the mixture is stiff peaks.
  • Gently fold the whites in 3 separate portions into the batter till everything is combined. Do not over mix. Then lastly fold in the strawberry chunks.
  • Scoop the batter into the prepared paper cup liners and top with a strawberry half in desired.
  • Bake in the oven for 20 to 25 mins. Insert tester to make sure it comes out clean before removing the cake from the oven. Let cool on rack before serving.

The brown tops has a nice crunch to it, the inside is soft and fluffy with moist strawberry chunks plus a pleasant strawberry aroma. :0

I made a mini loaf to test the texture of the cake and it is still soft and yummy. ;) BTW, this loaf is already all gone!Yup, I made papaya milkshake too. I dropped by Blessed Homemaker's blog and saw her post on making this delicious drink. It so happen there was slices of papaya sitting in the fridge, so I thought why not?! Frankly speaking I have not drink it for the longest time! It was sweet & refreshing yet creamy, nice!

Doesn't this look like a great breakfast you can wake up to? Mmm...maybe with some cheese omelet would be perfect, heehee. :P Come to think of it, will be playing badminton tomorrow morning! Haven't played badminton for more then a decade! Wish my strokes are not all messed up, lol! Anyway, hope my body won't be aching too much this weekend...still need to shop around for the house. :P Have a good weekend you all!