Showing posts with label pandan. Show all posts

Sunday, September 6, 2015

My Mother's 2015 birthday cake

Another year, another birthday. There are 7 basic birthday cakes that I have to bake every year. Hubby's and my parents, plus hubby and the two kiddos. Note that I say basic....there are miscellaneous ones that pops up occasionally as well. I believe there are many home bakers like me out there that has the same duty yearly. Don't get me wrong, I love baking for these important people in my life. But sometimes it can get pretty challenging when it comes to trying to please a big group of people. Some like it hot, some like it cold, some like it in the pot 9 days old...yeah. :P So after cracking my head, I finally made the decision to go with a totally new flavor which I have never attempted to use in a birthday cake. Pandan Gula Melaka. Specifically, the cake consist of Pandan Gula Melaka cake, sandwich a layer of light cheddar cheese cake (to counter the sweetness) and frosted with Gula Melaka mascarpone cheese frosting and lastly coated the sides with shredded coconut cooked with gula melaka syrup. 

It never occurred to me to bake a coconut or pandan or Gula Melaka flavoured cake for my parents. It was always the obvious choice of fruit flavours. I guess I have to start somewhere right? After the whole cake was assembled, I definitely see parts where I can improve on. For starters, I can replace the mascarpone cheese with cream cheese instead , which will be more stable at room temperature, though might taste more jelut. :P 

I will still be posting this up for my own future references. If you would like to try this recipe, please bare in mind that it is my first time baking this as well, so please keep an open mind. And if you want to substitute certain ingredients, please go ahead by all means, but remember that the results might not be the same as mine.

Ingredients for Gula Melaka Pandan Ogura cake (makes an 8")
Pandan milk extract
6 pandan leaves, snipped
80 ml evaporated milk
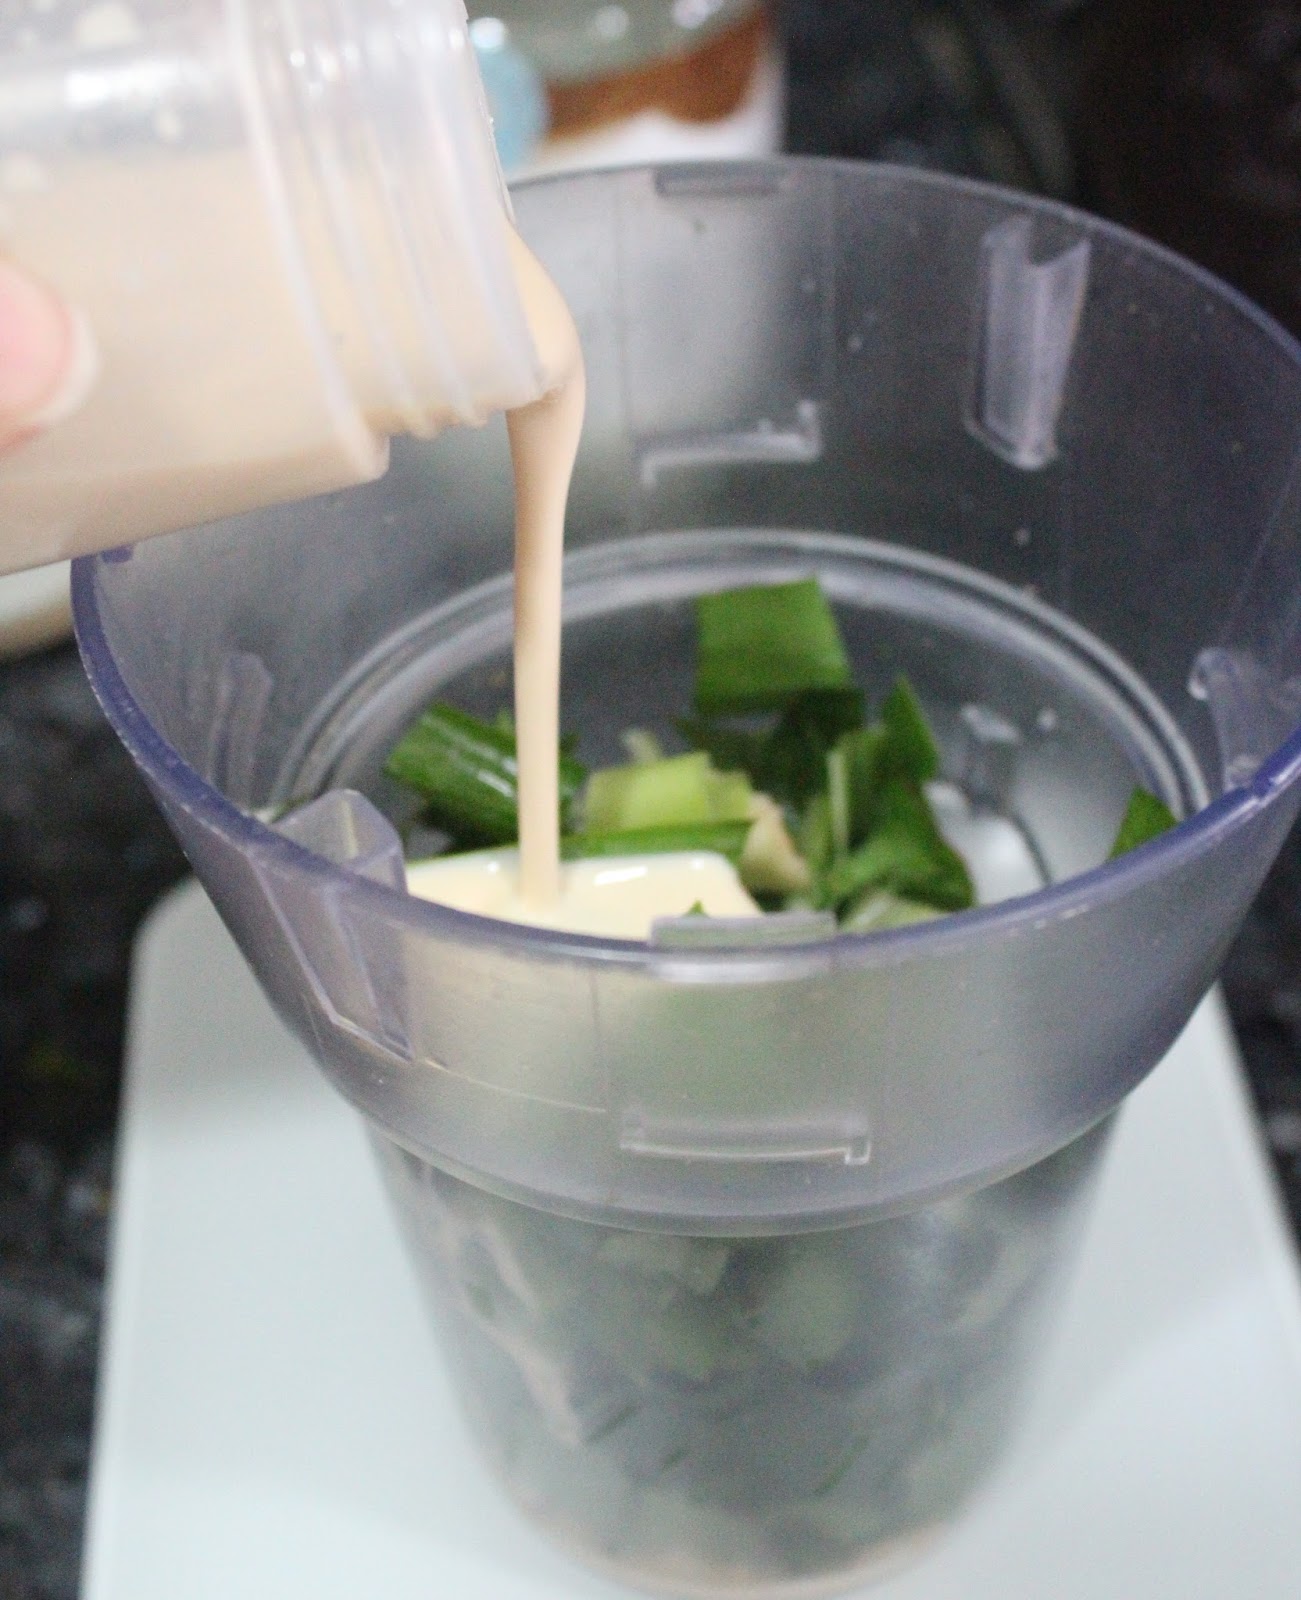
  • Snip the pandan leaves into smaller pieces and add evaporated milk together into the blender container.

  • Blend these two ingredients together and sieve through a fine gauze cloth. Reserve the mixture for later use.

Egg yolk Batter
60 g gula melaka +20 ml water 
  • Cook these two ingredients together till the Gula Melaka is completely melted and mixture is slightly thicken. Set aside to cool slightly to be used later.

5 egg yolks (~70-73g)
20 ml coconut oil
80 g cake flour
  • In a large mixing bowl, add in the egg yolks in. Follow by the pandan milk extract and the coconut oil.

  •  Whisk well to combine all the ingredients. Then add in the warm melted palm sugar syrup. It is important that it is still warm. Once it cools down, it will become thicken and very difficult to blend into the egg yolk mixture.
  • Lastly, sift in the cake flour and whisk it well so that all is well combined and smooth.

Egg white Batter
5 egg whites (~160-165g)
70 g caster sugar
1 tsp freshly squeezed lemon juice
  • Preheat the oven to 155C with a water bath set up inside the oven. Grease and line with parchment paper a 8" by 3" round cake pan.
  • In a large mixing bowl, add in the egg whites. Beat the whites till foamy. Gradually add in the sugar as it continues to beat at medium fast speed. Add in the fresh lemon juice before you add the last of the caster sugar in. 


  • Continue to beat till stiff peaks. 
  • Gently fold in the whites to the egg yolk mixture in 3 separate portions. Do not overfold and deflate the whites.
  • Pour the batter into the prepared pan. Wrap the base of the pan with thick aluminium foil if it is the removal base type.


  • Bake in the preheated oven with the water bath for 55-58 minutes till the tester comes out clean or the cake springs back when gently pressed.
  • Once baked, remove from the oven and let cool for 5 minutes before inverting it to cool. It is NORMAL that the cake shrinks a little when it slowly cools down, so please don't freak out.
Yay! No cracks! I guess the low temperature and the water bath helps. And loving that nice colour tone. 

As for the cheddar cheese cake, I merely halved the recipe that I usually baked which you can find the recipe here. I baked it in a 8" by 2" round cake pan this time round also in the water bath at 155C.

Ingredients for Light Cheddar Cheese Cake

3 slices of Cheddar Cheese
50 ml fresh milk
50 g unsalted butter 
3 egg yolks
3 egg whites (preferably cold, place in fridge after separating)
50 g caster sugar 
50 g cake flour
  • For instructions and steps on how to bake this, please hop over to here
  • Slice the Pandan Gula Melaka cake in two equal thickness discs. Let the 3 cakes discs cool completely while you prepare for the frosting.
Gula Melaka Mascarpone Cheese frosting (to frost an 8" by 4" round with 3 layers cake)
60g Gula Melaka finely chopped
2 tbsp water
500 g mascarpone cheese
  • In a saucepan, heat up the water and chopped Gula Melaka. Cook the mixture until all the palm sugar has melted. Let cool.
  • In the mixing bowl, add the mascarpone cheese in and beat it till light and smooth.
  • Slowly drizzle the warm Gula Melaka mixture into the whipped cheese.
  • Whip the mixture again till smooth and creamy. Bare in mind mascarpone cheese is lighter then cream cheese. So if you opt to use mascarpone cheese, please prepare to handle a much softer frosting. Else you can always go with cream cheese, which is more stable in room temp but will be more dense in taste.
  • Chill the frosting in the fridge for at least an hour before use. 
Assembly of the cake
Gula Melaka grated coconut for deco:
100 g finely chopped Gula Melaka
5 tbsp water
250 g grated coconut (I used Heng Guan brand)
I used Heng Guan brand because it was readily available at the supermarket. But if you have access to freshly grated ones, go for it.
  • In a saucepan, again heat up the palm sugar and water till the sugar melted completely.
  • Add in the grated coconut and stir in to cook and let it slowly absorb the palm syrup.
  • Let the coconut mixture cool completely and then chill in the fridge till you are ready to use it.
  • Place the first layer of the cake on the cake board which you will be using. Remember to line the sides with parchment paper which can be removed after frosting.
  • Frost about 1/5 of the palm sugar cheese frosting on the first layer. Spread it evenly over the top.
  • Place the light cheddar cheese cake layer over the top.
  • Trim off the baked brown top. Personally I feel it doesn't give a soft mouth feel if I leave the "crust" on the cake. But if you like it, by all means, leave it on.
  • Next, spread another 1/5 of the cheese frosting over the trimmed surface.
  • Lastly, place the 2nd Pandan Gula Melaka cake over. Again, you can trim away the crust on the cake or leave it on. I choose to trim. :) Then frost the whole cake with the rest of the cheese frosting. Notice that the frosting is not very smooth...not sure why it is slightly cuddling. But I suspect is the fat separating. Anyway, do try to work fast as the mascarpone cheese is rather unstable in room temp.
  • Once the cake is nicely frosted, let it chill in the fridge for an hour. Once it is cold enough, bring it out and coat the sides with the Gula Melaka shredded coconut. Make sure to give it a light squeeze every time you grab some shredded coconut.
  • Once done, chill in the fridge for at least an hour before serve. Enjoy!

The cake turned out great. It was fragrant, soft and delicious. Everyone in the family enjoyed it. Only someone complained the gula melaka shredded coconut was a wee bit sweet, else it was all compliments. Yay! And most importantly, my mum likes it too.  
Another shot of that last slice I salvage from the birthday party haha. :P Love the natural colour from the pandan and the soft texture of this yummy cake. Frosting was light and yet creamy sweet to satisfy anyone. :9 

If you ever do try this out, let me know how you like it. ;)

Happy baking guys!

Friday, June 5, 2015

Simply Pandan Loaf

This is the 3rd Pandan bread recipe on my blog. Well, as I always say, you can never have too much of a good thing...especially bread. :) And since this recipe is much simpler from the Pandan Kaya Twist Loaf and Pandan Kaya Loaf with crumble topping, it is very much what the title says...Simply a Pandan loaf. You can add on them nicknacks you desire on the bread after it is baked. ;) For now, lets get on with the basics, baking that pandan bread.


Ingredients for Pandan Loaf (makes a 5X4X9")
Pre-fermented dough
250g bread flour
160ml water
3g instant dry yeast
1g salt
  • Knead everything together till it forms a soft pliable dough. No need to be smooth. Divde dough into 50g or100g portions depending on your needs and let chill in fridge up to 12 hours. Alternatively store in freezer up to 3 months.
100g predough
1 large egg
110 ml pandas water

  • Snip 10 pandan leaves, (preferbly old pandans that are much darker in green) into smaller pieces. Then place then in a blender with 150 ml water, blend at high speed for a couple minutes. Mixture will be chocky and thick. Squeeze through a cloth sieve. Let mixture sit in the fridge for 4 hours to a day. The thicker pandas solution will decand to the bottom. Carefully drain off the top water, leaving about 100-110 ml of the mixture left.
400 g bread flour
45g caster sugar
2 g salt
5 g instant active yeast
20 ml organic coconut oil

20 g unsalted butter, room temperature
  • In a mixer bowl, add in all the above ingredients excpet the butter. Knead at medium speed till it becomes very elastic and pulls away clean from the mixing bowl. This will take about 8-10 minutes with a couple minutes of break in between.
  • Once the dough is pulling away clean from the bowl, add in the room temperature butter. Continue to knead till it reaches window panel.
  • Let dough proof in a greased bowl, covered, till it doubles in size. Will take about 1 to 1.5hrs.
  • Just before you shape the dough, preheat the oven to 170C and grease the loaf pan.
  • Punch out the air and divide the dough into 3 equal portions, which is appromixmately 200 g  to 210 g each.
  • Flaten each poriton and roll into a rectangular shape. Then folding in  from the shorter side into a swiss roll form. Place the dough into the prepared loaf pan. Repeat for the rest of the dough. 

  • Cover and let proof till it reaches to 90% of the loaf pan. Feel free to brush some eggwash over the bread top, I usually don't. Then bake in the preheated oven for 28-30 minutes uncovered. 
  • Once bakes, remove from the oven and let cool in the pan for 5 minutes. The remove from the pan and let cool on the rack completely.

The addition of coconut oil makes it a whole world of difference! Super fragrant! I will totally add coocnut oil in all my pandan cakes next time here. :P


Whether it is the smell, the colour or the texture of this loaf, I am loving it to bits! I wish you can smell and taste it too ;)
I like mine with a good spread of kaya and some cold creamy butter. Yum!

Bought a bunch of stuff from this new online shopping website GoBuyLah.sg. And was so excited to find a new spice and nuts mini blender at a decent price. And that super cute HK digital weighing machine. And that quality organic coconut oil was perfect baking companion that will make your bakes super aromatic. ;)
Loving the fluffy texture...do try it out and let me know how you like it. ;)


Tuesday, August 7, 2012

Dreamy Soft Pandan Cake (香兰相思蛋糕 )

I am still stuck using my husband's laptop this week. Although his is much faster and better then mine, I still love my old laptop, haha! Anyway, hopefully my "old friend" won't quit on me again any time soon. :P I still have quite a few recipes in my old laptop that I want to post up...hopefully can get them up soon. So at the moment I can only share with you all those I made over the weekend. This particular recipe is probably one of the more popular ones now in the blog sphere; it's none other but "相思蛋糕" . If you ask me how to translate this...in correct term, it is call "lovesick cake", hahaha! But you know after I ate this cake, I know why it is called that! It is really very soft and dreamy, you'll love it so much that you probably get lovesick for it, heehee. :D
I was contemplating whether I should make vanilla versus pandan flavor. I went with the latter because it has been ages since I last baked anything with pandan. :P I used all natural pandan extract and thus the cake look kind of light in the shade of green.
I spread a generous layer of vanilla buttercream in between the cake and it tasted even better! It simply just melts in the mouth. :) ~Dreamy~

This lovely recipe comes from Siewhwei. Many bloggers out there has already gave this wonderful recipe a try and rave good reviews. So what are you waiting for? Hehehe..

I've reposted the recipe here for easier reference with minor changes made:
Ingredients for Soft Pandan Cake (香兰相思蛋糕 ) (makes 7x7 or 8x8 square)
Egg yolk batter
65g vegetable oil
80ml coconut pandan mixture (See Note *)
1/4 tsp salt
100g egg yolk (mine was approximately 6)
1 whole egg
65g superfine flour (I used Prima top flour)

Note* = I blend 6 spears of pandan leaves with 120ml of coconut milk. Then I squeeze out the milk mixture. Reserve 80ml for the batter.


Egg white Batter
200g egg white
70g caster sugar
1 tbsp corn flour
  • In a large mixing bowl, beat the egg yolks, whole egg, salt, coconut pandan milk mixture together till well combined.
  • Sift in the flour and mix well till no visible lumps. (set aside and cover)
  • Preheat the oven to 160C. Prepare water bath in the oven. Grease and line parchment paper a 8x8 square cake pan.
  • In the mixer bowl, add in egg white and beat till foamy. Then gradually add in the sugar and continue to beat till soft peaks. Then add in the corn flour and continue to beat till stiff peaks.
  • Gently flour in the egg white mixture to the egg yolk mixture in 3 separate portions and do not deflate the batter.
  • Pour batter into the prepared cake pan and bake in the preheated oven for 50 mins in water bath.
  • Remove from oven when the tester comes out clean and let cool on rack before slicing.
This soft and dreamy cake almost melts in your mouth once you take a bite...really really nice. I am already planning to bake this again using the yuzu powder that Sonia gave me, heehee. ;))
Have a great day and Happy 47th Birthday to Singapore!! ;D

Thursday, October 27, 2011

Pumpkin and Pandan Xi Pan (南瓜和班兰喜粄)

I am sure many Singaporeans like me are not very familiar with this kueh call Xi Pan (喜粄). When I saw this Hakka Xi Ban (客家喜粄) both in Reese and Wendy's blog, I was totally intrigued. I have never tasted it before since its not so common here in Singapore. And since it is the kueh theme this month, I figured why not make some to try it out. And since I couldn't decide which recipe to go for, I adapted both Reese and Wendy's recipe, but with the same starter dough. Not wanting to make it plain, I added pumpkin and pandan to enhance the flavoring.


Since I like my kueh with more flavorings, I fill them with roasted ground peanut and sweetened coconut filling. And I am glad I did, since the Xi Pan itself is only slightly sweetened, so with the filling is definitely a nice compliment.

Ingredients for Pumpkin and Pandan Xi Pan (南瓜和班兰喜粄)
Starter Dough:
180g cake flour
150ml water
1 tsp instant active yeast
Mix all the ingredients together and let it proof for 6 to 9 hours. I placed mine in an air tight container in a fridge overnight.


Main Dough for Pumpkin Xi Pan: (makes about 6)
120g pumpkin, peeled, steamed and mashed
70g glutinous rice flour
30g cake flour
1/4 tsp baking powder
50g caster sugar
2 tbsp cooking oil

Peanut filling:
150g roasted ground peanuts
30g confectioner's sugar
2 tbsp cooking oil to bind
Combine everything together and set aside for use later.

Method:
  • Combined starter dough with sugar and baking powder and mix well.
  • Add in the remaining ingredients and knead till dough is smooth. Brush some oil on the surface and let proof for 3 hours, covered.
  • In the meantime, cut out some banana leave square and brush them with a little cooking oil.
  • Once proofed, punch out the air and divide dough into 50g portions. Roll them flat and place a teaspoon full of the peanut filling. Wrap and seal tightly. Roll round and press gently down on to the prepared banana leave so it is like a flat disc. Repeat till all the dough is used.
  • Let the shaped Xi Pan rest for another 20 minutes before steaming.
  • Steam them for 10 minutes at medium low heat, remove and let cool before serving.
Main Dough for Pandan Xi Pan: (makes about 6)
50g cake flour

75g glutinous rice flour
62ml water blend with 5 strips of pandan leaves, strain and reserve only the liquid
60g caster sugar


Coconut Filling:
1 tbsp brown sugar
75g gula melaka, chopped small
1 tbsp water and 1 knotted pandan leave
150g grated coconut
1 tbsp sago soaked in 2 tbsp hot water for 10 minutes

In a heat proof sauce pan, add brown sugar, gula melaka, water and pandan leave and gently boil till the mixture thickens. Add grated coconut and stir till the coconut soaks up all of the sweet syrup. Add in the sago and water and stir till mixture is thick and no visible liquid. Let cool before use.

Method:
  • The steps will be exactly the same as the pumpkin version. But instead of adding peanut filling, add coconut filling instead.
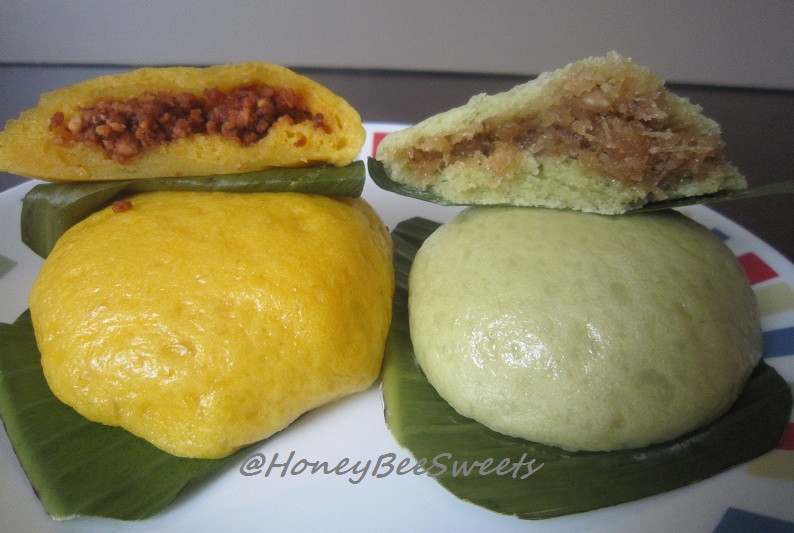
Not sure why, but my pandan Xi Pan turned out better then the pumpkin ones. One batch of my pumpkin ones kind of "deflated" a little after steaming....suspect its the steaming water dripped over it or something. :P Only a couple of them were decent enough for pictures. :P
As you can see from the picture, once the pumpkin kueh's been cut using a knife, it shows how gummy the texture is. But if torn like the pandan one, it still shows a little of the fluff texture. Personally not too fond of the gummy texture....much prefer the bao more then this. ;P
Part of the reason why I made this was to bring some for my mum, since she loves kueh, especially coconut filling ones. :)) She told me she hadn't seen and tasted Xi Pan before....guess it is really uncommon around here. :P Good thing she said it's pretty good...*phew*...or perhaps she just being nice, lol! Either way, I'm glad I give it a try, else I might not know how a Xi Pan taste like. ;)


Have a great coming weekend! Cheers All!

Sunday, October 9, 2011

Kueh Talam Cendol

It's been ages since I last made any kuehs in the house. It's no surprise as my kids aren't really fans of any nonya kuehs, except for kueh lapis. I came to know and taste Kueh Talam when I was in Malaysia which I had loads of fun making it together with a few of my good friends there. Although I have to admit I wasn't too crazy about kueh talam, but getting to make it sure brings back some fond and nostalgic memories of the fun days I spent with my friends in KL. I decided to make a little twist to the usual recipe and make Kueh Talam Cendol instead.
Personally I love cendol, very much. :) But because of the high sugar and coconut content, I try to minimize eating it. In fact I can't remember the last time I had a bowl! So it seems like the right timing to try out this new talam cendol to satisfy my cravings. :)
Okay, I admit, I suck at slicing the kuehs. But it's so delicate, its really no easy task! Even laying it nicely and taking the photos took me quite awhile to accomplish, not to mention to capture a decent shot. (^_^") So please close an eye when you view the photos, it'll some what look better, heehee.

Ingredients for Kueh Talam Cendol: (makes a 7"X7"X3" or 8"x8"X3" square pan)
Bottom Layer:
600ml thick coconut milk
400ml water
1 tsp salt
100g rice flour
40g green pea flour
60g caster sugar
250g cendol, drained
  • In a saucepan, add in all the ingredients except the cendol. Place it over the stove at medium low heat and stir constantly with a whisk.
  • Cook the mixture till it thickens, slightly thinner then condense milk consistency. Immediately remove from fire and pour in the drained cendol. Stir well and pour it into a greased prepared square pan. (either 7"X7"X3" for a taller version like mine or 8"X8"X3")
  • Place the pan into the steamer and steam at medium high heat for about 20 to 25 minutes till it sets.
Top layer:
120g rice flour
30g green pea flour
150g gula melaka, chopped into fine bits if using blocks
100g dark brown sugar
1/2 tsp alkaline water
1000ml thin coconut milk (400ml thick coconut milk + 600ml water)
  • In another saucepan, add in all ingredients in and heat over medium low heat.
  • Cook till the mixture thickens as well, slightly thinner then condensed milk consistency. Pour the mixture over the already set cendol layer.
  • Steam again at medium high heat till the top layer sets, about 30 minutes.
  • When done, remove from steamer and let cool completely before slicing. Or you can chill the whole block for 2 hours before slicing it to get nicer cuts. (Don't make the same mistake as me. :P)
Although the gula melaka scent was not as strong as I wanted it to be, it still turned out to be quite a tasty kueh with a well balanced taste. The bottom layer is slightly salty with the sweet gula-coconut scent on top. Although the top layer is a little softer then the bottom, it some how balanced it off giving it a different textured taste in the mouth. Even my"not-too-keen" on kueh kids also had a slice each. ;)

Overall quite an easy desert to whip up. And there are also quite a number of ways to incorporate different ingredients into it, like Tapioca, glutinous rice and even sweet potatoes! Do try!


Okay, gonna keep this post a short one. Will be posting a little less in the coming 2 weeks as I'll be busy with my kid's birthday & exam. Hope you all had fun and thanks for staying tune!

Saturday, September 3, 2011

Black Sesame Paste Chiffon and Pandan Chiffon

School holiday has finally arrived...a much awaited one. Funny how it sounds like school holidays are like my personal break times. :)) No early mornings and chauffeuring for a week is indeed a nice break. Anyway, I am looking forward to have some time to bake moon cakes which has been on my mind for the past week. :P Plus a good friend will be dropping by my place for a visit this week....some quality "girly" time, lol! Hopefully more will come end of the week as well, fingers crossed. :)

Today will be posting 2 chiffon recipes which I find them pretty yummy. :) First up is Black Sesame Paste Chiffon Cake. Notice I said "paste" because I didn't use black sesame powder for this recipe, simple as that. My family has been helping me get black sesame paste from Taiwan since its quite $$$ here in Singapore.
I chance upon the recipe from 我的厨房乐园, which I was pretty intrigued by the usage of coconut milk in it. I trust that it'll be very fragrant plus the nutty aroma from the black sesame, should be good! :) And I was glad I did give it a try, thanks neyeeloh! Even my younger daughter whom is not fond of black sesame also gave praises to it. Anyway, here is the modified version of the recipe:

Ingredients for Black Sesame Paste Chiffon Cake: (fills a 21cm or 22cm tube pan)
Egg yolk batter:
5 egg yolks
20g caster sugar (my black sesame paste has some sugar added, so I reduced a little here)
1/4 tsp salt (if you are using box coconut milk, you can reduce it to a pinch)
64g cake flour
60g black sesame paste
1 tsp baking powder
50ml vegetable oil
100ml coconut milk

Egg white batter:
6 egg whites
80g caster sugar
1/4 tsp cream of tartar

Method:
  • For egg yolk batter: In a large mixing bowl, add in egg yolks, caster sugar and salt and beat till it doubles in volume and the sugar has melted. (~4 to 5 minutes)
  • Add in black sesame paste, coconut milk and vegetable oil and mix well till combined. Then sift in the cake flour and baking powder into the yolk mixture and stir well till no visible flour.
  • Preheat the oven to 175C.
  • For egg white batter: In a large mixing bowl, beat the whites and cream of tartar at high speed till foamy. Gradually& slowly add in the caster sugar while its beating. Once the whites reaches stiff peaks, reduce the speed to lowest and let it stir for another 20 sec before switching it off. This step will help stabilize the bubbles.
  • In 3 separate portions, fold the whites into the yolk batter. Then pour the batter into the tube pan and bake for 28 to 30 minutes or till the tester comes out clean.
  • Once you remove the tube pan from the oven, immediately invert it to let it cool completely before removing the cake out from the pan.
This is actually my 2nd attempt baking a black sesame chiffon cake. The first time was pretty much a failure as the cake was quite dry. :P But this one turned out moist, soft and fluffy with a nice nutty sesame aroma. :) But I have to admit I totally suck at unmoulding chiffon...no matter how many time I did it, it's almost always with parts of it torn. *sigh*

I wonder if I replace the coconut milk with evaporated milk or half and half, will it still taste as good? I guess the only way to find out is to bake it out myself. :P

With the balance of the coconut milk, I decided to bake a Pandan chiffon. This recipe which I came up with was pretty good and I thought why not just post it up to share.
See what I mean about the unmoulding? *sigh sigh* Luckily the cake turns out heavenly soft and very yummy. :) Anyway, here is the recipe I came up with:

Ingredients for Pandan Chiffon Cake: (fills a 23 or 24cm tube pan)
Egg yolk batter:
3 egg yolks
40g caster sugar
1/8 tsp salt
8 pandan leaves, washed and cut into small strips
100ml coconut milk
50ml fresh whole milk
40ml vegetable oil
108g cake flour

Note: Blend the pandan strips together with the coconut milk and milk. Got this tip from Gertrude of Kitchen Snippets. Then sieve the greenish mixture through a fine sieve. Yes, NO pandan extract is needed.

Egg white mixture:
6 egg whites
75g caster sugar
1/4 tsp cream of tartar

The method will be similar to the steps above.

This recipe uses more egg whites and I reduced 1/3 of the coconut milk to using fresh milk. It is still very fragrant but i know it's a much healthier version.
As you can see, the chiffon is really soft and nice. I like it a lot! Will bake with this recipe again next time when I crave for pandan chiffon again. Do try it if you are interested and love pandan chiffon. :)

Got to go folks, hope you have a nice weekend and school holiday break!