Showing posts with label Kuehs. Show all posts

Sunday, February 1, 2015

Kueh Pai Tee (easy version)

I am on the roll with local delights lately. :) There is my recent post of the delicious Curry Mee, followed by the Soon Kueh. And now I am making Kueh Pai Tee. Well I strongly feel keeping the local food heritage alive is important. So being able to cook and share this with everyone, in a way we help preserve what our forefathers have handed down to us. :) And in turn we can hand down to more people. Share the love, share the food ya? 

Though I did make some short cuts of not making the cups myself, I feel we do need to start somewhere right? Plus these cups are readily available in major grocery stalls like Cold Storage and NTUC at a reasonable price. I bought mine for 30 cups at S$10.40 at Cold Storage. Crisp and delicious! It stayed crispy for a good hour and held up the filling really well. I would totally buy again next time haha! Anything to make the busy mummy's life easier!

But, if you die die must make the Kueh Pai Tee shells yourself, try out this recipe from my fellow blogger Alan. 

Else, let's get on with my easier version shall we? And here is what we need:
If you want to add red carrot, by all means. If you want to add ground peanuts, feel free to! As I mention, this is a quick version which you can whip up in an hour's time. 

Ingredients for Filling: (enough for 30 cups)
1.5kg jicama (aka Bang Guan), peeled and shredded
4 cloves shallots, chopped
2 cloves garlic, chopped
2 tbsp dried shrimp, soaked and minced


150-200g fresh mini shrimps (I didn't want to use normal ones because it will too big and overwhelming, and thus "ruining" the whole Kueh pai Tee crispy texture.

handful of wolf-berries/Goji (not shown here and it's optional, added for extra sweetness and colour, its good for your eyes!)
  Seasoning:
2 tbsp oyster sauce
1 tbsp light soy sauce
1/2 tsp chicken powder 
1 tsp sugar
1/4 tsp white ground pepper
1/4 cup water

Cilicuka sauce (Shermay's , highly recommend! It is halal certified, non GMO, no artificial flavoring and no MSG!)
30 store bought kueh pai tee shells 
2 hard boiled eggs, cut into small cubes
some washed parsley or cilantro leaves for flavor and garnish 
  • In a large cooking pan, add 2 tbsp oil over medium low fire. Add in garlic and shallots. Cook till soft and aromatic.
  • Next add in the minced dried shrimp and cook for another 3 minutes till slightly toasty.
  • Next add in the shredded jicama / Ban Guan and the water. Stir fry a little and then add in the seasoning to the mixture.
  •  
  • Combine well and cover the mixture and cook for 5-6 minutes over medium low fire till the jicama is soften. Off fire and dish out the filling. Sprinkle in the rinsed goji and combine. Set aside to cool a little for use later.
  • For the small shrimps, wash and devine them. Then place them in a steamer to cook for 3 to 5 minutes at medium fire till they turned pink. Set aside for use later.
  •  
  • Once you get all the filling and topping ready, you are ready to fill those shells and enjoy the kueh pai tee!
  •  
It ain't rocket science when it comes to filling these babies... 
My little kiddo was really excited about having this for dinner and eager helped me filled the cups. You first off fill the cups with the jicama mixture, then top it off with chopped egg and the mini shrimp. Then add a cilantro for good measures haha. You can fill them up and enjoy all in one shot or alternatively, make one at a time as you eat...to enjoy the crispiness to the max heehee.

Remember to top it off with Shermay's Cilicuka sauce to add that extra "oumph" and kick in the flavor. :9 I am in love with their Cilicuka sauce which is spicy, tangy and a hint of sweetness, a perfect condiment not only for thie Kueh Pai Tee, but also in many local cuisine like carrot cake and chicken rice, yum!

If you are interested to try it out, do drop by TANGS at Orchard on the Feb 1st 2014 from 11am to 8pm for a tasting. But if you can't make it down that timing, don't fret. This Shermay's Cilicuka sauce will be available in TANGS from now onwards. :) Each bot cost S$9.90. 
This is indeed a fun and easy meal to prepare for the family over a lazy weekend. Plus my kids had as much fun filling the pai tee cups as eating them! Kids.... :P I am sure an adult will enjoy these too!

So feel free to give this a try. :) Happy weekend all!

Saturday, July 5, 2014

Yam Kueh

So lately there has been a trend that new hispter cafes serving up local hawker food. I tell myself these kuehs must be super good since they are charging like double the price as of the hawker! But then it was not much of a difference...quite a disappointment. Seriously it is not a complicated dish, just make yourself la! I used to have an old post that links to my friend's blog, but I decided to post my own recipe this time hehe. :P Gonna keep this a super short post and get straight to it!


Recipe for Steamed Yam Kueh: (makes 10" round)
550g yam, peeled and shredded
4 tbsp dried shrimp, soaked till soft and minced fine
3 garlic cloves minced
6 cloves shallots sliced
oil for frying shallots
Chunks of pumpkin and yam, pre steamed (optional)

Batter
280g rice flour
70g tapioca flour
1120ml water
1/2 tsp alkaline water (optional)
  • Mix everything together in a large bowl and set aside for later use.
Seasoning:
1/4 tsp five spice powder 
1 tbsp chicken seasoning or 1 chicke  cube
white pepper and salt to taste
  • Heat up oil and fry the shallots till light golden brown. Scoop out from oil and over some paper towel to let cool for later use.
  • Add garlic and minced dried shrimp and cook at low heat till fragrant.
  • Add shredded yam and stir fry for a couple minutes. Then gradually add in ladles of batter in and cook at low heat.
  • Mixture will be lumpy and thick but it is ok. Just stir constantly and make sure the bottom is not burnt.
  • Set aside the steamer (at medium low heat) and round tin that has been greased.
  • Once all the batter has been stirred in, add in the steamed pumpkin and yam if you are using.
  • Scoop the mixture into the container and steamed for 40 to 50 minutes. Check if mixture is firm, else continue to steam for another 5-10minutes.
  • Make sure you let the kueh cool completely before slicing it to serve. Top with chopped green onion, fried golden shallots.
Instead of red chilli which my kids don't eat, I replaced it with goji, haha! But feel free to use red chilli of course to get that kick! And check out the chucks of pumpkin and yam inside! Yummy Yammy!

You know what's better then steamed Yam kueh? It is to pan fry it the next day after you have chilled it firm overnight in the fridge! Okay that's another post haha! May add pictures of that later heehee!

Have a great day guys!

Saturday, June 29, 2013

Muah Ji (Steamed Glutinous Rice Kueh with peanut)

Okay, as promised, I came up with another post to submit for this month's MFF blog event. But I do have to apologise to many of my readers and IG friends out there for being patient with me during this period. I must say I really have been neglecting my blog. *sigh* I will try my best to post up all those recipes that you saw me made but not posted. However I foresee that it will get "worst" as the school starts in this second half of the year. Oh noooo! Lol! Anyways, the faster it comes, the faster it goes! ~happy thoughts, fingers crossed please~

Back to today's post! I possibly have made one of the easiest recipes for this month! It Muah Ji or Muar Chee, whichever way you call it. It is simply steamed glutinous rice kueh chunks tossed in sweetened ground roasted peanuts. I cannot remember when was the last time I made this! Why? Lol! It is so yum! I remember having it in Penang a few years back and it was really really good! Why Singapore's or mine not as awesome?! Lol! I guess we just have to make do don't we!?
 
Oh yes, I love my ground peanuts slightly chunky, haha! Love the chewiness with the combination of crunchiness as well, noms! I can eat this all day, haha!

I adapted the recipe from the book "Agnes Chang's Hawker Delights", one of my favourite cook books I turn to when I want local delights! I did made some changes to it as I am not as fan of whole sesame seeds, I omitted it. Here is my version of this delicious treat:

Ingredients for Muah Ji (Serves 2)
For the kueh
250g glutinous rice flour
375ml water
2 tbsp fried shallot oil 
(fried shallot oil is obtained by frying the sliced shallots in oil until golden brown)

Ground Peanut coating
250g peanuts, roasted at 180C for 10-15 minutes, skinned and ground in blender
60g confectioner's sugar
  • Mix all of the kueh ingredients together in a large bowl till it is smooth and no lumps.
  • Prepare a steamer at medium fire. Grease an 8" round steaming pan and pour the kueh mixture in. Steam it for 30 to 40 minutes till it solidifies.
  • Once done, remove from steamer and brush some shallot oil over the surface to prevent it from drying out. Let cool before cutting it.
  • In another mixing bowl, add in ground peanuts, confectioner's sugar and mix well. 
  • Using a sharp kitchen scissors, cut up the cooled steam kueh into small bite size and drop them into the peanut mixture. Coat it well so that it is not sticky. 
  • Pile the coated pieces of muah ji in a bowl and sprinkle some more ground peanuts over it. Enjoy!!

All so simple and yet all so delicious! I can have the whole thing all to myself! Nom nom nom, hahah! Feel free to half the recipe if you like. And this is best eaten on the day you make it.

I am happy to submit this to Malaysian Food Fest Penang Month hosted by Alan of Travellingfoodies.

okay folks, have a great weekend!
Cheers!


Monday, December 31, 2012

Fried Purple Sweet Potato Balls (炸紫薯QQ球) and Happy 2013!

Hi my dear readers and fellow bloggers! It's already the last day of 2012! Hope everyone is all ready for the arrival of the new year. Well, to me, last day of 2012 is just another ordinary day really. No no late night parties nor clicking champagne glasses today. Actually I can't ask for more but to spend the day quietly with my kids before the hectic school life starts again. ~Bliss~ I had promise them a game of monopoly later after my post and they are actually "eyeing" on me right now as I type, lol! I guess I will have to keep this a short one. :) So today I will be posting a very simple dish call Fried Purple Sweet Potato Balls (炸紫薯QQ球), in support to this month's MFF, featuring Pahang. ;)
I know the usual fried sweet potato balls are in a nice golden colour...but mine are just ehh....purplish-brown?! Okay, it probably seem like a bad idea to use purple sweet potatoes here...but I reckon why not break from the norm? It won't hurt to be a little more adventurous no?
Since there was quite a number of recipes out there for this simple desert, I had to decide what kind of texture and mouth feel do I really want to achieve here. When I saw Gert's recipe, I knew her's was THE one I would want to try. Gert's version has included glutinous rice flour which result in a mochi like texture which I think will be pretty delicious and unique! However I did made some slight changes to it as I didn't want it to be too chewy, I reduced the glutinous rice flour. Plus I omitted the shredded coconut since I didn't have any and I prefer without it too. Here is my version:

Ingredients for Fried Purple Sweet Potato Balls (yields about 50-60 balls)
450g peeled and steamed purple sweet potatoes
150g glutinous rice flour
100g cake flour
30g corn flour
100g caster sugar (Original calls for 120g)
Vegetable oil for frying
caster sugar for coating (optional) 
  • In a large mixing bowl, mash the still warm sweet potatoes together with the sugar. Add in the rice flour, cake flour and corn flour and mix well. Knead everything together until it comes together to form a soft pilable dough. 
  • If the dough is too wet, add a little bit more rice flour, if it is too dry, add a tablespoon of warm water. It shouldn't be sticky.
  • Weigh the dough into 15g each and roll round with your palms, continue till all has been rolled.
  • Heat up some vegetable oil for frying at medium low fire. Deep fry the balls till golden brown or purplish brown in my case, haha
  • Remove from hot oil and let sip over paper towels. 
  • Since my sweet potato balls were not sweet enough, I ended up rolling them in fine caster sugar after frying them. You can skip this can just add more sugar into the dough.
As you can see I rolled most of them in fine caster sugar. Well, I thought it will be sweet enough but too bad it turned out not so. But feel free to omit this if you don't have a sweet tooth like me, heehee. :D 
The texture of these balls was just as expected! Crunchy good on the outside and soft chewy interior was really yummy! I made this for a family BBQ gathering and it was very well received. ;) This is truly an "old-school snack" as my MIL love it the most, haha!

I am happy to submit this to this month's Malaysia Food Festival featuring Pahang with this post, hosted by Wendy from Table For Two...or more. Thanks again for hosting this month! :)

Before I sign off, I want to wish everyone out there a very HAPPY 2013 ahead! Although the new year may be full of new challenges, but I believe that as long as one puts their heart to it, each hurdle will just be another experience that will build a stronger you. So stay strong and healthy my friends! Peace!


Friday, September 28, 2012

Chocolate Vanilla Kek Lapis

Finally, finally, finally,....I have been wanting to do something for this month's Malaysia Food Festival which features Sarawak. So busy, what to do? But! I finally did it! Yay! Frankly speaking, I have little to no knowledge of Sarawak food heritage except that they make fantastic lapis cake. ;)) Actually I am not sure if this recipe I made pass the criteria or not, ...try first die later, lol! Introducing my post today....Chocolate Vanilla Kek Lapis!
I have been eying on several lapis recipes online, particularly Rima's from Bisous À Toi. Her lapis are ALWAYS perfect...seriously. So I trust that her recipe will turn out great. So I decided to take a recipe of hers and make some changes to it. :) Thanks Rima for sharing your recipes!
 I have no problem baking this, its the time involved doing it....3 long hours standing next to the hot oven....*faint*. It is truly a bake with love and patience. Note that my version has reduced the sugar level so feel free to increase it if you like yours sweeter. 

Ingredients for Chocolate Vanilla Kek Lapis (makes 8"x8"x3")
Egg yolk batter
250g unsalted butter, room temperature (I'll try salted next time)
130g caster sugar
14 egg yolks
4 tbsp condense milk

Egg White Batter
130g caster sugar
7 egg white
10g cornflour


Dry ingredients
150g Hong Kong flour (I used top flour)
40g Horlick
1 tsp baking powder
Flavoring
1 tbsp pure vanilla extract
1 tbsp chocolate emulco + 2 tbsp cocoa powder (valrhona) + 3 tbsp hot water - mix together
  • For the egg yolk batter; Beat the butter and caster sugar till light and fluffy. Then add the egg yolks one at a time, beat well to combine after each add. Lastly, add in the vanilla extract, stir well.
  •  
  • Add in sifted dry ingredients. Stir gently to combine everything. Set aside.
  • Preheat the oven to 180C at grill mode. Grease and line a 8"x8" square pan.
  • In a large mixing bowl, beat the egg white till foamy, then continue beating and add in the sugar gradually. Continue to beat till stiff peaks.
  • Add 1/3 of the white to the yolk and mix well. Then gently fold in the other 2 portions and be sure not to deflate the white.
  • Lastly, divide the batter into half. (I just eyeball, feel free to weigh it out. Or do what Rima did, bake all vanilla then chocolate or vise versa)
  • One portion of the batter, add in the chocolate flavoring mixture. Stir well.
  • Weigh out 100g (Rima did 70g) for each batter. Bake one layer at a time for 7 minutes and alternating the flavors. Give the cake a gently press all round when it comes out of the oven. Then add on the next layer. 
  • The last layer, bake at 170C normal oven mode (both top and bottom heat) for 10-12 minutes.
 If you look closely, I think the heat was a wee bit too strong and my most bottom layer got dried up. So after trimming the sides, I had to trim off the most bottom layer so as to remove that dry crumbly taste. My 12 layer becomes 11.*haiz*
My impression of lapis cake is it's greasy...perhaps those I ate from store bought are. But I was very please that mine turned out perfect, no greasy / oily feel on the hands or in the mouth. 250g butter for a 8"x8" square pan ain't that much if you ask me. The chocolate flavor is more prominent then vanilla, which is no problem for me because I love chocolate!

Actually I have to thank my BIL for sending over a tray of 30 eggs over a couple nights back. If its not for those big pretty eggs (which I have no room in my fridge), I wouldn't have bake this lapis cake, hahaha! 

My family love this cake, chocolaty, nice texture and not too dense, since it did use the egg separation method. Next time I would love to try out with Mocha flavor, should be yummy! 

I am proud to submit this to this month's  Malaysian Food Fest, Sarawak Month hosted by Sharon of Feats of Feasts. Thanks Wendy for the invitation! ;)

 Okay, got to run...am so late! See you all soon!

Thursday, October 27, 2011

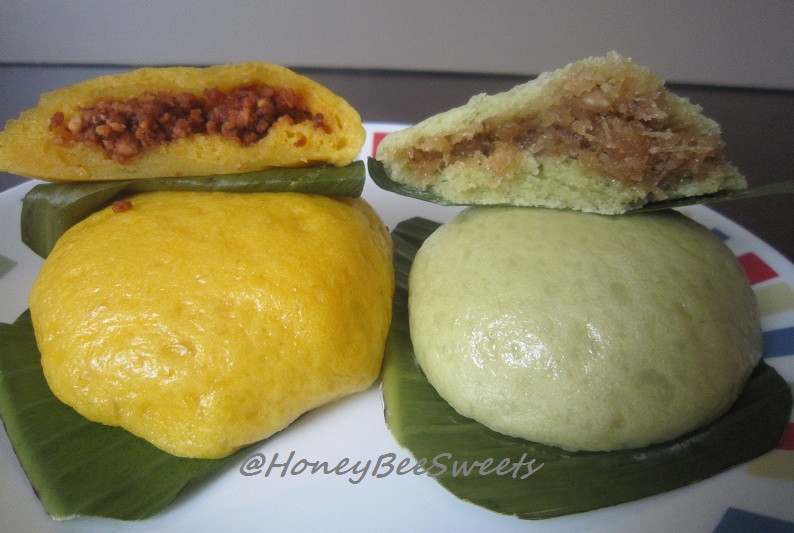
Pumpkin and Pandan Xi Pan (南瓜和班兰喜粄)

I am sure many Singaporeans like me are not very familiar with this kueh call Xi Pan (喜粄). When I saw this Hakka Xi Ban (客家喜粄) both in Reese and Wendy's blog, I was totally intrigued. I have never tasted it before since its not so common here in Singapore. And since it is the kueh theme this month, I figured why not make some to try it out. And since I couldn't decide which recipe to go for, I adapted both Reese and Wendy's recipe, but with the same starter dough. Not wanting to make it plain, I added pumpkin and pandan to enhance the flavoring.


Since I like my kueh with more flavorings, I fill them with roasted ground peanut and sweetened coconut filling. And I am glad I did, since the Xi Pan itself is only slightly sweetened, so with the filling is definitely a nice compliment.

Ingredients for Pumpkin and Pandan Xi Pan (南瓜和班兰喜粄)
Starter Dough:
180g cake flour
150ml water
1 tsp instant active yeast
Mix all the ingredients together and let it proof for 6 to 9 hours. I placed mine in an air tight container in a fridge overnight.


Main Dough for Pumpkin Xi Pan: (makes about 6)
120g pumpkin, peeled, steamed and mashed
70g glutinous rice flour
30g cake flour
1/4 tsp baking powder
50g caster sugar
2 tbsp cooking oil

Peanut filling:
150g roasted ground peanuts
30g confectioner's sugar
2 tbsp cooking oil to bind
Combine everything together and set aside for use later.

Method:
  • Combined starter dough with sugar and baking powder and mix well.
  • Add in the remaining ingredients and knead till dough is smooth. Brush some oil on the surface and let proof for 3 hours, covered.
  • In the meantime, cut out some banana leave square and brush them with a little cooking oil.
  • Once proofed, punch out the air and divide dough into 50g portions. Roll them flat and place a teaspoon full of the peanut filling. Wrap and seal tightly. Roll round and press gently down on to the prepared banana leave so it is like a flat disc. Repeat till all the dough is used.
  • Let the shaped Xi Pan rest for another 20 minutes before steaming.
  • Steam them for 10 minutes at medium low heat, remove and let cool before serving.
Main Dough for Pandan Xi Pan: (makes about 6)
50g cake flour

75g glutinous rice flour
62ml water blend with 5 strips of pandan leaves, strain and reserve only the liquid
60g caster sugar


Coconut Filling:
1 tbsp brown sugar
75g gula melaka, chopped small
1 tbsp water and 1 knotted pandan leave
150g grated coconut
1 tbsp sago soaked in 2 tbsp hot water for 10 minutes

In a heat proof sauce pan, add brown sugar, gula melaka, water and pandan leave and gently boil till the mixture thickens. Add grated coconut and stir till the coconut soaks up all of the sweet syrup. Add in the sago and water and stir till mixture is thick and no visible liquid. Let cool before use.

Method:
  • The steps will be exactly the same as the pumpkin version. But instead of adding peanut filling, add coconut filling instead.
Not sure why, but my pandan Xi Pan turned out better then the pumpkin ones. One batch of my pumpkin ones kind of "deflated" a little after steaming....suspect its the steaming water dripped over it or something. :P Only a couple of them were decent enough for pictures. :P
As you can see from the picture, once the pumpkin kueh's been cut using a knife, it shows how gummy the texture is. But if torn like the pandan one, it still shows a little of the fluff texture. Personally not too fond of the gummy texture....much prefer the bao more then this. ;P
Part of the reason why I made this was to bring some for my mum, since she loves kueh, especially coconut filling ones. :)) She told me she hadn't seen and tasted Xi Pan before....guess it is really uncommon around here. :P Good thing she said it's pretty good...*phew*...or perhaps she just being nice, lol! Either way, I'm glad I give it a try, else I might not know how a Xi Pan taste like. ;)


Have a great coming weekend! Cheers All!

Sunday, October 23, 2011

Loh Mai Chi (糯米糍)

In case any one of you have no idea what is Loh Mai Chi(糯米糍), it is actually slightly sweetened glutinous rice kuehs encasing sweeten roasted ground peanuts. The kueh is pretty similar to mochi texture, but its softer and probably much more sticky due to its higher ratio of water. And because of that, it is very hard, at least to me, to make this kueh. I kept telling myself as I was shaping and wrapping the peanut fillings; Why did I get myself into this "sticky situation"?! Lol! So naturally, I didn't do a good job making these...almost a quarter of them ended up badly wrapped and into my mouth!! Well at least they still taste good. ;)

As you can see, these balls are not exactly picture perfect but trust me, they are the most presentable ones I made, lol! I only made half the recipe, so it only yields about 12 balls, not a lot of room for practice if you know what I mean. :P
I got this recipe from the book "Agnes Chang's Hawkers' Delights", one of my favorite kueh / local delights cookbook. :) But I think next time I might reduce the amount of water added so that it won't be that sticky to handle. :P But again, the texture is really soft and nice....

Ingredients for Loh Mai Chi (糯米糍): (makes about 24)
250g glutinous rice flour
500ml water
80g sugar

Filling:
500g toasted peanuts, skin removed and grounded
100g toasted sesame seeds, grounded (I omitted this)
150g icing sugar, sifted

Mix everything together until well combined.

Flour for coating:
500g rice flour (I used only 200g)
The book suggested to fry the flour till very dry and then let cool. But I just microwave 3 times at high for 1 minutes.

Method:
  • Skin: Mix all the ingredients until well combined. Pour into a greased steaming tray and steam with medium heat for 45 minutes (I only steamed 20 minutes) until cooked.
  • Leave to cool and pour into the rice flour for coating. Then using a greased scissors, snip it into 25 equal portions.
  • Take a portion of the cooled kueh and flatted into a disc. Place a teaspoon worth of peanut filling in the center and wrap it up by sealing the ends properly.
  • Then coat it again with the rice flour before putting it into small paper liners.
Because the peanut filling is a like a loose pile(no oil or water added), its so hard to place it neatly and seal the dough. So when I see how nicely some of the fellow bloggers made these yummy kueh....envy envy! I guess the only way is to make them again and practice more!
I love this shot, a generous amount of peanut filling...I like! If you are a peanut lover like me, you have got to make this. It's like peanut filled mochi, nice! :D You know if you can't shape it like you want it, just snip up the kueh and roll them in the ground peanuts and eat them like Muah chi, haha! I bet it's equally good. ;)


Okie dokie, got to go. Hope you all have a great week ahead! Cheers!

Wednesday, October 19, 2011

Purple Sweet Potato and Pumpkin Ang Gu Kueh II

After seeing so many wonderful kueh posts from fellow bloggers, I felt that I have better put up my Ang Gu Kueh post before it becomes "stale", heehee. (^o^) Its funny that I was actually planning to make it way before knowing about this month's theme. Have been craving for some lately. And I know it will bring back some fond memories of the day which I first made it with my dear friend Reese back in KL. :) Thanks for such a great recipe Reese! Using that recipe, I made pumpkin kueh with mung bean filling and purple sweet potato kueh with yam filling.
Its so unlike me to pass on not making peanut filling for the kueh. But due to time constraint and not wanting to spend so much time in the kitchen rather then with my kids, I just settled with mung bean and yam filling this time. *sigh* Hopefully I will get some time after the exams to make a big batch of roasted ground peanuts!
But of course the mung bean and yam filled ones are still delicious, so no worries there. :) I have added the recipe here for my easy reference in future:

Ingredients for Pumpkin & Purple Sweet Potato Ang Gu Kueh:
Mung Bean Filling:
250g mung bean, soaked for at least 2 hours
130g caster sugar
4 to 5 tbsp vegetable oil

Drain the mung beans and discard water. Place the mung beans in steamer and steam at medium high fire for 20 to 25 minutes till soft. While still hot, add in the caster sugar and oil and mash in well. Once the sugar has melted, blend the mixture till smooth and let cool completely before use. You can make this a day ahead and chill in fridge or freeze them if you make it more then 3 days ahead.

Yam Filling:
250g yam, steamed and mashed
120g caster sugar
1 tbsp skim milk powder
3 to 4 tbsp cooking oil

Similar to above mung bean filling method.

Kueh skin using Pumpkin / Purple sweet potato:
200g steamed and mashed pumpkin / sweet potato
300g glutinous rice flour (I used 10g more for pumpkin skin)
1 tbsp rice flour
2 tbsp caster sugar
3 tbsp cooking oil (I used 4 tbsp for sweet potato skin)
200ml water (I used an extra tbsp for sweet potato skin this time) 
  • In a large mixing bowl, knead all the ingredients together and gradually adding the water as per needed. The dough should be a soft pliable dough but not stinky.
  • Cover the dough and let rest for 20 minutes.
  • In the meantime, rinse the banana leaf with hot water and dab dry it. Cut out oval shapes slightly bigger then the kueh size. You will need 24 for this recipe. Brush with some vegetable oil on the surface.
  • Divide the dough into 24 portions and roll round. Then take one portion and place about 1 heaping tbsp of filling in the middle, then wrap and seal nicely. Place in the mould which is slightly dusted with rice flour and press down with some pressure.
  • To unmould, knock on the side of the table and let the kueh gently fall out on to your palm. Place kueh on cut out banana leaf and into the steamer. Repeat till all the kuehs are moulded.
  • Steam at medium high heat for 10 minutes. Brush some cooked oil over the surface of the kuehs to prevent sticking.
I only made half recipe for each root vegetable but was enough to satisfy me, heehee. :D I love both filling! Good thing I didn't make peanut ones, else I would be eating way too much, lol!

Okay, got to go. Hopefully will post something up again real soon. Take it easy all. Cheers!

Sunday, October 9, 2011

Kueh Talam Cendol

It's been ages since I last made any kuehs in the house. It's no surprise as my kids aren't really fans of any nonya kuehs, except for kueh lapis. I came to know and taste Kueh Talam when I was in Malaysia which I had loads of fun making it together with a few of my good friends there. Although I have to admit I wasn't too crazy about kueh talam, but getting to make it sure brings back some fond and nostalgic memories of the fun days I spent with my friends in KL. I decided to make a little twist to the usual recipe and make Kueh Talam Cendol instead.
Personally I love cendol, very much. :) But because of the high sugar and coconut content, I try to minimize eating it. In fact I can't remember the last time I had a bowl! So it seems like the right timing to try out this new talam cendol to satisfy my cravings. :)
Okay, I admit, I suck at slicing the kuehs. But it's so delicate, its really no easy task! Even laying it nicely and taking the photos took me quite awhile to accomplish, not to mention to capture a decent shot. (^_^") So please close an eye when you view the photos, it'll some what look better, heehee.

Ingredients for Kueh Talam Cendol: (makes a 7"X7"X3" or 8"x8"X3" square pan)
Bottom Layer:
600ml thick coconut milk
400ml water
1 tsp salt
100g rice flour
40g green pea flour
60g caster sugar
250g cendol, drained
  • In a saucepan, add in all the ingredients except the cendol. Place it over the stove at medium low heat and stir constantly with a whisk.
  • Cook the mixture till it thickens, slightly thinner then condense milk consistency. Immediately remove from fire and pour in the drained cendol. Stir well and pour it into a greased prepared square pan. (either 7"X7"X3" for a taller version like mine or 8"X8"X3")
  • Place the pan into the steamer and steam at medium high heat for about 20 to 25 minutes till it sets.
Top layer:
120g rice flour
30g green pea flour
150g gula melaka, chopped into fine bits if using blocks
100g dark brown sugar
1/2 tsp alkaline water
1000ml thin coconut milk (400ml thick coconut milk + 600ml water)
  • In another saucepan, add in all ingredients in and heat over medium low heat.
  • Cook till the mixture thickens as well, slightly thinner then condensed milk consistency. Pour the mixture over the already set cendol layer.
  • Steam again at medium high heat till the top layer sets, about 30 minutes.
  • When done, remove from steamer and let cool completely before slicing. Or you can chill the whole block for 2 hours before slicing it to get nicer cuts. (Don't make the same mistake as me. :P)
Although the gula melaka scent was not as strong as I wanted it to be, it still turned out to be quite a tasty kueh with a well balanced taste. The bottom layer is slightly salty with the sweet gula-coconut scent on top. Although the top layer is a little softer then the bottom, it some how balanced it off giving it a different textured taste in the mouth. Even my"not-too-keen" on kueh kids also had a slice each. ;)

Overall quite an easy desert to whip up. And there are also quite a number of ways to incorporate different ingredients into it, like Tapioca, glutinous rice and even sweet potatoes! Do try!


Okay, gonna keep this post a short one. Will be posting a little less in the coming 2 weeks as I'll be busy with my kid's birthday & exam. Hope you all had fun and thanks for staying tune!

Sunday, December 5, 2010

Sweet Potato Fatt Goh with Japanese Black Beans

This is really a long overdue post. I believe I made this close to a month back. But it is not surprising since last month was again a busy month for me. Actually, this is an all original HoneyBeeSweets recipe, something that was created out of inspiration from the local eateries here in Singapore; Sweet Potato Fatt Goh with Japanese Black Beans. Well I happened to be at Bugis Junction the other day and was walking around it's food court area. There was this store that was selling fatt goh, pretty special ones mind you, but I can't remember the name of the store. :P Anyway, I got really inspired after seeing these pretty steamed cakes and vowed to try making something similar at home. So here it is:
Frankly speaking, I cannot remember the variety of flavors that was selling at the store there. So I just came up with my own version, and it turned out great! ;)) Any interested bakers out there can try this recipe, but since this is my first time making this, I can't guarantee that you will have similar results, heehee. But should be alright. :))

Ingredients for Sweet Potato Fatt Goh with Japanese Black Beans: (makes 12 muffin size)
200g steamed sweet potato (preferably Japanese)

400g plain flour
225g caster sugar
3 tsp baking powder

1 tsp salt

225ml evaporated milk
2 large eggs

60ml vegetable oil

1 can Japanese black beans (you can substitute with Azuki red beans)


Method:
  • While the steamed sweet potato are still warm, cut into large chunks and place in the blender along with the caster sugar, eggs, corn oil and evaporated milk. Blend at medium speed till smooth.
  • Prepare the steamer at medium high heat.
  • In a mixing bowl, add flour, baking powder and salt. Pour the blended mixture into the flour mixture and mix well.
  • Scoop the batter into paper lined steamer cups to 3/4 full. Place about 4 to 5 black beans on top and transfer the cups into the steamer .
  • Steam for a good 10 to 12 minutes till the tester comes out clean. Remove from steamer and let cool on the rack before serving.

The texture of the Sweet Potato Fatt Goh is fluffy and light..much to my preference. The black beans gives a slight salty, sweet flavor to the cakes, a pretty nice combo. In case you are wondering, I got the Japanese black beans from Daiso...it comes in a small purple can. ;)
If you do try this out, let me know how it turns out for you. ;) Also note that you can replace the evaporated milk with full cream milk, the taste should not differ much. Anyway, hope you all will like this recipe. ;)) This is definitely a healthier breakfast compared to your usual stored bought fried food don't you agree? :)
Before I finish off this post, I want to share a nice news. I got a pleasant surprise when I was doing my usual blog visiting yesterday. I got 2 new awards! All thanks to dear Kristy from My Little Space for passing these lovely awards to me. ;) Very nice of Kristy to think of me. She's is such a versatile and dynamic cook with loads of yummy recipes. So do go visit her blog when you get the chance. Guarantee there won't be a dull moment browsing through her recipes. :)
Besides being honored in receiving these awards, I am also much motivated to be a better food blogger for my dear readers. Thank you all for the support! Will try my best to post more delicious and unique recipes for all to share.

Have a great week ahead all!