Wednesday, June 30, 2010

Salmon and Spinach Quiche

I am sure there are days when you feel like you want something different for dinner. I'm not talking about ice cream and pizza, lol! I was thinking in the line of pies and quiches. It's definitely not your usual rice and dishes meal, something that you would make to surprise your family. :) For me, I love pies and quiches period. But since I didn't have any left over roast chicken to make chicken pot pie, quiche was the next best thing. And furthermore I get to "sneak" a few healthy ingredients like Salmon and spinach into it. My girls were delighted and enjoyed the quiche very much, not knowing that all those good nutrients that comes along with it. :)
I always enjoy the creamy, meaty filling encased in a buttery, flaky pie crust, the combo is unbeatable. ;) Furthermore, there are so many ways of incorporating different ingredients into a quiche, from simple cheese, leeks, ham and even crab meat, yum! Think of the possibilities, lol! :D
In fact this dish can be served during dinner parties, reason being some of the steps can be done a couple of days ahead, so really no hurry when you need to serve it on that very day, just assemble and bake, vola! Okay, here is the recipe:

Ingredients for Salmon and Spinach Quiche:
1 pie crust recipe:

1.25 cup (140g) all purpose flour
125g cold butter, cubed
1/4 tsp salt
1/2 tsp sugar
2 to 4 tbsp ice cold water

250g Salmon fillet (no skin)
1 pack spinach, about 200g, washed and removed stems
2 shallots, finely minced 1 garlic, finely minced
1 leek, washed and sliced thinly
3 large eggs
2 cups of half and half ( I used 1 cup heavy cream & 1 cup full cream milk)
1/4 cup freshly grated Parmesan cheese
salt and pepper to taste


To make the Pie Crust:

  • In a large mixing bowl, add flour, salt and sugar and whisk well together. Add in the cubed cold butter and rub in till the mixture resemble bread crumbs.
  • Gradually add in the ice water, 1 tablespoon at a time till the mixture can just able to come together. Do not add too much water as it will become sticky and the crust will not be that flaky.
  • Pour the dough out on a lightly floured surface and pressed together to a a dough. Wrap in plastic wrap and place in fridge to chill for at least an hour. This can be done 2 days ahead.
  • Preheat the oven to 180°C and take out the chilled dough. Place on a lightly floured surface and roll into a round disc of about 13 to 14 " in diameter. (I am using 10" pie pan)
  • Place the disc on the lightly greased pan and gently tug in the sides. Crimp sides if desired. Poke some holes at the base of the pie dough with a fork. Then place a piece of parchment paper over it and some baking weights (either beans or rice)


  • Bake in the oven for 20 to 25 minutes till light in color and golden brown on the edges. If the edges brown too fast, wrap the sides with aluminum foil.
  • Cool on the rack till needed.
To prep Salmon and spinach:
  • Season the fillet with salt and pepper. Using a small sauce pan, place a bay leaf or some slices of leek, some peppercorns, 1/2 tsp olive oil and 1 cup of water. Bring this to a simmer and add the salmon fillet in. Simmer for 10 to 12 minutes till the fillet is cooked through. Remove the salmon and flake it. Set aside till needed.

  • Bring a small pot of water to a boil, add the spinach leaves in and boil for 1 to 2 minutes. Remove leaves and transfer into cold water to stop the cooking. Drain after 5 minutes and squeeze out all the liquid, as much as you can. Then chop up the spinach finely and set aside for later.
Assemble:
  • In a pan, add in 1 tbsp olive oil and heat up at medium low fire. Add garlic, shallots and leeks, cook till soft, about 5 mins. Remove from heat and set aside for later.
  • Preheat the oven to 180°C.
  • In a small mixing bowl, gently mix together the salmon, spinach and cooked leeks. Then place this mixture into the pie crust, distributing evenly.
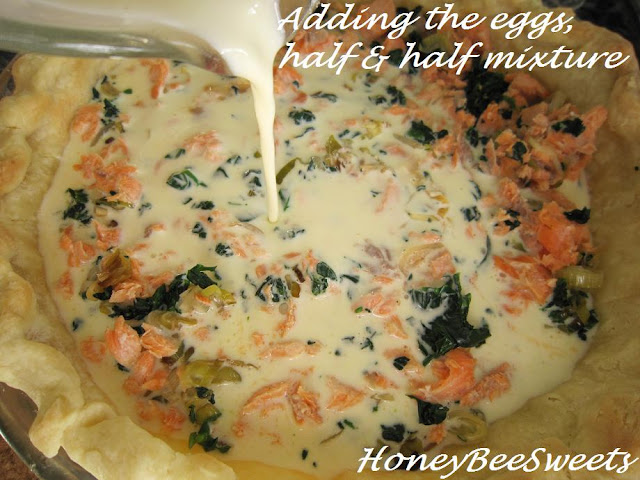
  • Crack the 3 eggs into the half and half, add salt and pepper to taste and mix well. Gently pour egg mixture over the filling in the crust.
    Lastly sprinkle the Parmesan cheese all over the top.
  • Bake in the preheated oven till the top is golden brown, about 45 to 50 minutes.
  • Let quiche cool a little before slicing into it. Left overs can be reheated at 140°C for 10 minutes.

I have a small slice left over and it still was good after I heated it up in the oven. So no problem in making more I guess. ;) Rushing for time, just be sure to prep the pie crust and filling ahead. ;) Hope you all will give this recipe a try...healthy, delicious and not your usual dinner. Enjoy baking!

Saturday, June 26, 2010

Oreo Swiss Roll

I love Swiss Roll, and my relationship with it goes way back to my early childhood. :) Memories of me asking my mum to buy it from the bakery store is still vivid. My favorite is the multi-colored roll with simple buttercream inside. I will bite each colored square at a time and savor the moment every time, lol! Nah, not that adventurous to attempt making this rainbow Swiss roll as yet, since it does require lots of prep work in tinting and careful piping. In fact, the kinds of possible flavors for Swiss roll is countless! This time round I chose to make yet another new family favorite, Oreo Swiss Roll...super yummy! But please be warned...the looks of this roll can be quite ugly...simply because I did not know how to beautify the cake with all them Oreo crumbs...looks almost like soil, lol!
Looks kind of messy right, hahaha! But trust me when I say this is good, especially if you like Oreo (and Swiss Roll), you cannot, I repeat, cannot miss this. :) Looks can be deceiving, so just ignore the mess and chuck it in your mouth...it'll be heavenly there after. :D
Warning: Eating this delicious cake will get you hooked for more...so prepare to make more! Okay, enough jabbering, here is the recipe:

Ingredients for Oreo Swiss Roll:
Set A:
21g Valrohna cocoa powder (you can use any kind you prefer)
32g vegetable oil

Set B:
203g whole egg
32g egg yolk
180g caster sugar
21g light corn syrup
1g salt

Set C:
106g cake flour
1g baking soda
21g fresh milk

Filling:
100g crushed Oreo cookies (without the cream)
200ml fresh heavy cream, whipped

Topping:
125g crushed cookie crumbs and chunks

Method:
  • Heat up the vegetable oil in the microwave for 45 seconds to 1 minute, do not over heat. Then add cocoa powder into the heated oil and whisk till well blended.
  • Add all of Set B into a large mixing bowl and beat mixture till thick and triple in volume, also known as ribbon stage.
  • Preheat the oven to 180°C and grease & line a baking tray of 10" by 12" with parchment paper.
  • Sift the flour and baking soda twice and gently fold into the egg mixture. Do not over beat, else the mixture will deflate.
  • Mix the milk into the cocoa mixture, stir well and add in to the batter and fold in gently without over mixing it. Pour the batter into the prepared baking tray.
  • Bake in the preheated oven for 10 to 12 minutes or till the cake tester comes out clean.
  • Once baked, remove from oven and let cool on rack completely.
  • To prepare the filling, simply whip the cold cream till it thickens and add in the crushed Oreo cookie crumbs, stir well and chill till needed.
  • To assemble, spread 2/3 of the filling on the cake surface and leaving a border of 2 inches uncovered for easier rolling up later.
  • Roll up the cake in to a Swiss roll and wrap tight in plastic wrap or wax paper. Chill it in the fridge till it is firm enough to hold up, about 1 hour.
  • After 1 hour, remove the cake from the fridge, unwrap and spread the remaining 1/3 of the filling all over the cake. The sprinkle the reserved Oreo cookie crumbs all over the cake or gently press on the sides to cover the cake. Chill and slice to serve.

I like the cake both room temperature and chilled. But chilling it was like eating Oreo ice cream cake...so good. :)
The cake is soft and fluffy and the cream is rich, not too sweet, a decadent desert to share with everyone. :) After taste tested this, my SIL is going to order one log from me for a gathering she's attending.
Don't hesitate, just make it. What I suggest if you do not have much time at hand, simply break up the steps, making the filling a day before, and making the cake the next day. Trouble or not, it is worth it all. :) I can be sure you and your family will enjoy it very much. Happy Baking!

Thursday, June 24, 2010

Classic Blueberry Scones on Father's Day

It's already 4 days past Father's Day, but I think I best post this up to share with everyone. As we know Father's Day is a day that is not as celebrated as us mummy's day, I feel we should still show our love to our dads how much we appreciate them. :) Since I had the excuse of being too busy with my work lately, I decided to just make something real simple for my husband. Something that he loves of course....scones. :) I thought it would be so nice to surprise him in the morning with the smell of lovely blueberry scones...one of the simple joys of life! I got this great recipe from one of my latest cookbook "A Passion for Baking" by Marcy Goldman. However I did made some changes to the original recipe from fresh cranberries to blueberries. :)
I was a little skeptical initially, but turned out the scones were out of this world...a must try! The crusty outside and the soft creamy inside was a heavenly combination! And when you bit one mouth, the juicy blueberries counters the texture of the scones and making it moist, and just right, so each bite simply just melts away...yum! :O
I intended to serve these scones with some butter and jam...but it was so good, we ate it all up just as it is! :) I have to say, besides my favorite cream scones, this is probably the best scones recipes I have. :) Can't wait to try them out? Here is the recipe:

Ingredients for Classic Blueberry Scones:
3 cups all-purpose flour
2/3 cup sugar
1 tsp salt
1 tbsp baking powder
3/4 cup unsalted butter, cut into small chunks
2 large eggs
1 tsp vanilla extract
1/3 to 1/2cup heavy whipping cream
1 cup of fresh cranberries / blueberries

Finishing touches:
Whipping cream
sugar for sprinkling on top

Method:
  • Preheat the oven to 200°C and line a baking tray with parchment paper.
  • In a large mixing bowl, whisk together flour, sugar, salt and baking powder together.
  • Add butter chunks and mix in with your finger tips till it resembles bread crumbs.
  • Make a well in the center and stir in eggs, vanilla and cream to make a soft but firm enough dough.
  • Gently fold in the blueberries. Then knead the dough briefly on a lightly floured surface and pat down into a large round disc. Dough should be 1 inch thick.
  • Cut into 2.5" or 3 " circles and place then on the prepared baking pan. Brush top with cream and sprinkle some sugar on top.
  • Bake in the preheated oven till scones are lightly browned around the edges, about 15 to 2o minutes.
I know I will make these scones again, especially since daddy and my girls loved them so much. :) Furthermore it was real easy to make! So don't wait any longer, go get some blueberries and make them for breakfast tomorrow...you'll love it....I guarantee it. :D Got to go now, will catch up with you all again soon. Take care & Happy baking all!

Sunday, June 20, 2010

Another year older

It seems all too fast, but my elder daughter has again grown a year older. Time sure flies! It seems just not too long ago when I made that Powerpuff girl cupcakes and fondant cake for her 6th birthday. I remember vividly that powerpuff girl cakes took me 3 days to complete...burning midnight oil to mould the figurines etc. This time round, it took me less then a day,...I even took a break and went out with my sister to have coffee and chit chat at the nearby cafe! Please don't be mistaken, I'm not trying to boast here. It's just that I realize simplicity can be a form of beauty too! Looking back at the amount of effort I pile into making her last birthday cake makes me amaze of my own patience. :P I guess maybe I had a helper then...now I am on my own. :P With the time constraint, I had no choice but to make a "simpler" cake for her....and here it is:
You must be wondering why I had not prepare way ahead for this...why push to the very day to make it. I was tight down with the new house and family gatherings that's why. :P Sadly I have much lesser time to bake like I used to back in Malaysia....not to mention blogging. But I try not to stay away for too long though. ;)
If you look carefully, there are imperfections all over the cake...but I could not really "beautify" it any further since I had already invited the rest of the family over for a cake cutting session. So I just handed in as is! :) Just close one eye....lol!
I made 2X8 inch round cake pan plus a 6 inch round for this. There was some left over batter which I made it into cupcakes; my girls gobbled up moments after it came out of the oven! Moulding the figurine was fun...but I wish I had more time to make a nicer one. :P
For the cake recipe, I used the same chocolate cake in my husband's birthday cake last year. I like the moist chocolate cake but still "sturdy" enough to hold up the fondant. As for the filling, I got lazy and used simple heavy cream whipped with powered sugar & vanilla extract. Turns out it worked just fine! *phew*
Check out the layers inside *sorry...a wee bit messy here*. Just fresh whipped cream and strawberries sandwiched between layers of dark chocolate cake...as what my girl had requested. :) I am glad that she loves this cake and most of all everyone enjoys eating it (can't say about the fondant though, lol!) I hope next year I won't have to rush like mad again making my girl's birthday cake! Hope you all enjoyed viewing this cake as much as I have made it. Last but not least...Happy Sweet 7th Birthday to my DD!

Tuesday, June 15, 2010

Anniversay Dinner @La Folie

Just Friday, I had the opportunity to attend a lovely wedding from my husband side of the family. Frankly speaking, it's been years since I last attended a wedding dinner and I actually had a good time. Reason was moments during the dinner I was actually brought back to the sweet memories of my own wedding. :) The opening walk down the dinning hall, filling the pyramid of champagne glasses, grand toast on the stage with our family and friends. Although it's been so long, it still fresh in my mind how wonderful it has been. Back to the wedding I attended, I had a pleasant surprise!. It was the gift for the guests...I almost felt that it's made for me, lol!
Sweet isn't it? I'm lovin' it! Let me write out the engrave words : A heap of love; A spoonful of affection; A dash of tenderness; A pinch of joy. :) I guess all these do contribute to a good marriage, agree? If you haven't notice, the spoons are in the shape of a heart, so cute. With this new tool, I hope my bakes will be baked with more love and care. :)

Incidentally, it's me and my husband's wedding anniversary this month. We are fortunate enough to celebrate our anniversary during our recent trip in California at a nice French restaurant call La Folie in downtown San Francisco. This is a lovely restaurant that we have already been 3 times and still enjoy every time we dine there. Although the last time we dine at La Folie was about 7 years ago, I still have fond memories of the food I had there.
The restaurant ambience was nice and romantic. I actually made reservations weeks ahead and they gave us a nice window table. :) The servers were really friendly and patient, which made the whole experience better.
May I add that the french loaf was super yummy! The crunch when you tear into it was like a music to my ears! ;D Wish I am able to make such delicious loaf next time. :)
We were first served a couple complimentary starters from the chef (how nice). The first one was this Wagyu Beef Tartar served like a crostini style. Taste? Not bad. :)

Next complimentary starter was this Whipped pastis egg contains a poached egg yolk topped with a strip of chive and a dollop of sherry vinegar-whipped cream. The cream topping is drizzled with a touch of maple syrup and garnished with fleur de sel. I like this one...perhaps because I love the taste of soft boil egg But with the rest of the flavors combined...super-yum!

My husband ordered this Hudson Valley Fore Gras, meaning goose/duck liver in plain English. That gamey taste is actually quite good plus the soft, smooth texture makes it slowly melt in your mouth, excellent. :)

For me, the actual liver is a wee bit overwhelming for me. I much prefer the pate version., so I ordered the above If you ask me how it taste like....I would say "it taste like butter, fore gras butter!"
My main entree is Butter Poached Lobster over English Pea Ravioli, topped with shaved Asparagus and almond salad. It is very good! I love the lobster together with the pea ravioli...it compliments each other very well.
My hubby ordered Lobster and Morel Mushroom Risotto in Asparagus and Lobster broth. It's so good too! The creamy risotto is so flavorful!

This small little dish containing Hibiscus ice shavings over cardamon pana cotta. It's actually a palette "cleanser" before our desert arrives...interesting. But the Hibiscus is like Ribena but more on the sour side. The pana cotta was silky and blends well with the citrus shaving.

My husband's desert, Valrohna Chocolate bread pudding with Champagne Sabayon (the sauce) and petite Strawberry Sorbet sandwiched between 2 caramel squares. I give it an 101 score....love the strawberry sorbet....so creamy even though it's sorbet!
My Warm Bittersweet Chocolate Fondant cake...reminds me of mine, that is why I ordered it to taste the real thing! It is indeed heavenly! The soft gooey inside the fondant plus the creme anglaise sauce was perfecto! However the brandy cured dried fruits were a bit strong for me...good thing my husband devour them, lol!
Some sweet bites to end the meal...compliments from the chef again. I enjoyed it all so much! If only I am not so full...I would have gone for more food! Wonder if the head chef is taking in any apprentice, lol!

Overall I felt pampered and satisfied....an excellent dinner with my best man....what more can I ask for, for our wedding anniversary?! If you do go by San Francisco downtown, check out La Folie...I am sure they will not fail to impress you.

La Folie website

2316 Polk Street, San Francisco, CA
(located between Green & Union)
415-776-5577 e-mail: lafoliep@aol.com


Meant to put up a recipe at the end of this post...but after looking at this super long post...I thought better not! I promise I will put up in my next post soon...thanks for coming by with me to La Folie! You all have a great week ahead!