Showing posts with label fish. Show all posts

Thursday, December 4, 2014

Cheesy Baked Fish with Savory Egg Custard

As a SAHM, besides worrying about the kids' well being, I am constantly, yes constantly thinking of what I should cook for my family. Be it breakfast, lunch or dinner, I'm cracking my head to come up with quick and easy meals to fill those empty bellies. You're probably thinking "Just Da Bao please!" But I am weird I admit, I couldn't get myself to feed my kids those outside food! Too much seasoning, too oily and seriously you know what they put in it to make it taste that good haha! Well occasional weekend dine out is okay with me, but I do try my best to cook daily for my family.

Today's easy one pot dish is kind of a fusion between a quiche and a frittata. Not quiche because no pie crust involve...good, less work involve, heehee. Not exactly a frittata either because I am using less egg and a lot more ingredients, thus you can't serve them in slices. Just a simple dish that contains all the necessary carb, protein and even dairy needed to make all balanced and healthy meal.

Let see what we need:
Okay, I ain't gonna lie...I am just showing off my new Jamie Oliver Glazed Terracotta Casserole Dish. That blue...love! A good cook needs good tools..I live by that rule haha! Got this lovely bakeware from Tangs! Have you checked them out after they reopened their doors after renovations? I just love shopping at their home appliance and bake / cook ware section!
  
Ingredients for Cheesy Baked Fish with savory egg custard :(Serves 3-4)
1 broccoli head, cut into bite size (weighs about 250g)
300g white fish, cut into large chunks (I used Tilapia)
3 eggs
200ml fresh milk
4 strips bacon, but into smaller pieces
3 medium potatos
2 tbsp ketchup
1 cup Mozzarella cheese 
salt and pepper to taste
A good casserole dish for baking this dish.
  • Season the fish fillet chunks with salt and pepper. Preheat the oven to 180C.
  • Heat up the cooking pan, no need oil, add in the bacon and cook till fat has been rendered out and golden crisp. Remove from pan and let drain on paper towels.
  •  


  • Remove the pork fat and add in a tbsp of fresh cooking oil at medium low fire. Add in the potato chunks and cook the potatoes till slightly golden on the outside. Dish out and again drain on the paper towel.
  •  
  •  Next cook the fish on the pan and just for awhile to get it slightly golden brown on the outside. 

  •  Lastly, you steam boil the broccoli pieces. You heat up a pot with only a centimeter worth of water inside. Then place the broccoli pieces inside and let it steam boil for a good 5 minutes, then dish out.

  •  Now in a mixing bowl, crack the 3 eggs in and add in the milk and ketchup. Mix well and add in a pinch of salt and few rounds of fresh ground peppers.

  • Add 3/4 of the egg mixture into the Casserole dish.

  • Then place all the ingredients in, that's the broccoli, fish fillets, potatoes and bacon.

  • Then you add in the remaining egg mixture and top it off with mozzarella cheese. Then send it into the preheated oven and bake for 20-25 minutes till top is golden brown.

  • And the aftermath....yummeh

  • Serve it while it is still hot...with toast or even pasta. :9
Oh that Jamie Oliver dish just baked beautifully! I am so gonna try using it to bake a Christmas roast later! :9
A quick and easy meal you can whip up in an hour. You are welcome to change the fish to chicken too. Anything that you family fancies. Just bare in mind that a good dish requires a good cook/bake ware. Grab yours at Tangs now! Tangs is located at heart of Orchard and VivoCity, happy shopping!


Tuesday, April 1, 2014

Tangy Orange Fish Fillets


Hi folks! Good to be back again posting! I am here in support of this month's theme "Orange" in Little Thumbs Up April event. Glad that my dinner dish was a little more useful then just filling my family's tummy haha! So here is the dish : Tangy Orange Fish Fillets

I opted to use fish instead of chicken or pork since I am trying to get my kids to eat more fish (brain food, haha) But bare in mind you can use any kind of white meat for this recipe, it should work just fine.
Ingredients for Tangy Orange Fish Fillets (Serves 3-4)
3 whole fillets of white fish(I used Tilapia this time) ~300-400g
2 large Navel Orange
2 ginger slices
1 garlic clove minced
Seasoning:
1/4 tsp salt
1 tbsp apple cider vinegar (or plain works too)
2 tsp sugar
Thickening coat:
1/2 tsp salt
1 tsp Chinese cooking wine
2 tbsp beaten egg
2 tbsp corn flour
2 tbsp water + 1 tsp cornflour (Thickener) 
  • Cut the fish fillets into smaller piece, set aside.
  • Zest the two oranges and set the zest aside for later use. Then slice out thin slices from the center of both the oranges for garnish purpose (optional)
  • Juice both the oranges, remove pulp. Add seasoning into the juice and mix well. Then add in the fish fillets and let it marinate for a good 30 minutes before use.
  • Remove the fish fillets from the OJ(reserve aside) and add the thickening coat ingredients together with the fish in another mixing bowl.Combine till all the fish is nicely coated.
  • In the wok, add in 3 to 4 tbsp cooking oil and set at medium fire. Lightly pan fry the marinated fish fillets on both sides and remove from wok.
  • Remove oil leaving only about 1 tbsp of cooking oil. Add in minced garlic and ginger slices, cook for a minute.
  • Add the reserved OJ & orange zest and cook for awhile till it starts to bubble. Add 2 tbsp water+1 tsp corn flour mixture into it. Stir till it thickens slightly. Add the fish fillets back in to the gravy and gently toss to coat.
  • Remove the fish fillets from wok and onto a serving plate. Garnish with reserved oranges slices, serve while still hot.
 
This dish in my opinion might not be as tasty as sweet and sour fish, but still it is much easier to prepare and healthier! Less sugar, salt used and no deep frying of the protein as well. But the tangy sweet flavor still satisfy one's craving haha! Yummy!
Another close up shot of this yummy dish. Best served with a bowl of steamy rice. :P Hope you all will try this out! Have a good evening all!


I am happy to submit this post is linked to the event, Little Thumbs up organised by Bake For Happy Kids, and My Little Favourite DIY, hosted by Ann of Anncoo Journal at this post.


Tuesday, January 22, 2013

CNY Bake: Multigrain Snake Buns

My, it's less then 20 days to Chinese New year!? Where did the time go? Didn't we just had a festive Christmas celebration last week? Well, nothing wrong with my sense of time, but it sure feels like last week, lol! I guess most of us home bakers are frantically baking the new year cookies in preparation for the celebration and to give away as well. As usual, I baking the pineapple tarts, almond cookies etc etc. But since there is a blog event over at Sonia's in lieu of CNY, I decided to join in the fun. :) I made snake buns! Lol, sound creepy and unappetizing isn't it. No worries, no snakes are harmed in the making of these buns. :P Haha...
 
 I know, not exactly snake looking buns...but you can imagine soft sticky dough ain't exactly that easy to mould either. :P But I had loads of bun making them! Haha, like a big kid with "play dough"!
 This dough recipe is actually similar to the one I used for my healthy cinnamon buns I baked last week. But instead of the red bean, red dates & black rice trio puree combo, I used almond, oats and walnut puree instead. I will still post the recipe here for easier reference.

Ingredients for Healthy Cinnamon Buns (recipe by HoneyBeeSweets)
420g bread flour
105g five grain flour (you can sub this with rice flour)
50g caster sugar
6g salt
7g instant active yeast
170g almond+walnut+oats puree
160ml fresh milk
200ml water (+- 10 ml ; add as per needed )  
30g unsalted butter

Filling:

mini smoked sauages
tuna mayo (1 can of chunky tuna, drained and mixed with 2-3 tbsp mayo, 1/4 tsp salt, 1/2tsp sugar, pinch of pepper)
some red beans for eyes 
  • In a large mixing bowl, add in all the ingredients except the butter. Stir and mix till everything comes together to form a pliable dough.
  • Continue kneading till the  dough becomes elastic and pulls away from the side of the bowl and not sticky anymore.
  • Add in the butter and continue to knead till it reaches window stage. 
  • Place the dough into a greased bowl and cover to let proof for 1.5-2hrs till it doubled in size.
  • Punch out the air and divide the dough into 40g and 50g portions. (Note:  I made at least 12 of these snakes buns. But you can make less and use the rest of the dough to make a loaf)
  • First take the snake body, so take a 50g portion and roll flat into a rectangular shape:
  •  
  • Roll it up lengthwise and seal the edges nicely. Then roll the whole thing into a coil to look like a snake body:
  •  
  • Next, make the snake head. Cut the sausages into 3 length wise and cut the tip to make it look like a snake tongue. Then wrap the sausage with the 40g dough portion like a drumstick shape. Then place the head over the coil dough:


  • Repeat till all the dough portions has been used up. Let proof for 30-45minutes covered. Preheat the oven 175C while waiting. Brush egg wash if desired.
  • Place 2 red beans on top of the head to make it look like it's eyes.
  • Bake in the oven for 15 minutes until golden brown. Enjoy!

Seems a little complicated, but I guarantee you that you will have loads of fun making this. Get your kids to involve too to make it a bonding project! How cool is that?
You can use any bread dough recipe you are comfortable to work with. The one I'm using can be a little sticky and require more kneading time. But the next photo will proof that it is all worthwhile, haha!
Feel free to use another kind of puree if you don't fancy nuts. And you can also reduce the recipe into half to make a smaller manageable portion. :)

I am happy to submit this fun post to Sonia's blog event :Chinese New Year Delights 2013 新春送礼. Have you submited yours? Do join in the fun! Thanks Sonia for hosting this! :)

Have a great week ahead everyone! And happy baking all!!


Saturday, September 15, 2012

Lazy Weekend Meal; Salmon Miso Cream Pasta

Weekend is here again and it will be quite an exciting one for me and my family since we have visitors from overseas coming today. It's actually a close friend of mine whom I had the pleasure to know when I was staying in KL. In fact, she is the first friend I know when I was there! Our friendship didn't dampen even when I had moved back to Singapore for more then 2 years now. Really hope we can cherish and enjoy this friendship as long as we can, because it is not easy to find one as we all know. Looking forward to seeing them later!

Lately, I've fallen in love with this new chef (MASA), eh..specifically his cookbooks, haha! I found the first copy, "Joy of cooking at MASA's place" at the library and from then on, I just couldn't stop looking at the book! It's simple Japanese cuisine, taught step by step with simple ingredients that you can find. So in today post, I'm showing you all an easy pasta dish from his book, Salmon Miso Cream Pasta. It's sort of an infused Jap-Italian dish, super nice. Whether you like it for lunch or dinner, I am sure it will satisfy your appetite. ;)

Ingredients for Salmon Miso Cream Pasta (Serves 3-4)
400g spaghetti
2 fillets of salmon, approximately 400-500g
1 tbsp butter
5-6 garlic, sliced thinly
12-14 asparagus, washed and trimmed the tough part
4 medium Portabella, sliced thin (brown button mushrooms can be used as replacement)
2 tbsp miso paste (any brand you prefer)
400ml heavy cream for cooking
freshly ground black pepper and salt to taste
shredded nori for deco (optional)
  • In a saute pan, add the butter and heat up at medium low heat. Add the salmon and pan fry till golden brown. Should not take long, probably 5 minutes, depending on your salmon piece size.
  • Once the salmon is cooked, remove from the pan and let cool for 5 minutes. Then flake the fish, remove bones and skin if there is.
  • In a big pot, boil some water for cooking the spaghetti. Cook the pasta till al-dente and drain out. Set aside for use later.
  • To make the miso cream sauce, heat the cream in the microwave oven for a minute and then stir in the miso paste. Whisk if needed till well combined.
  • In another pot, add in 1 tsp oilve oil, and saute the garlic slices till fragrant. Then add in the asparagus, cook for a minute then add in the portabella. Stir for a while till the mushrooms have wilted a little. Pour in the miso cream mixture and stir till well combined. Lastly, add in the flaked salmon and stir well.
  • Add in the pasta as before you are serving, stir till well combined and dish up and eat while it is still warm. Bon appetit!
A simple yet delicious meal to prepare for your love ones. The salty miso mellows out with the cream and it also brings out the sweetness of the asparagus. It all went well with the musky taste of the portabella mushrooms...simply divine! My girl whom is not too fond of asparagus, ate up the whole plate with no complains and said it's the best pasta ever, lol!

Hope this post will inspire you to try it out and cook for your dear ones this weekend. ;) Cheers!

Thursday, August 30, 2012

Ikan gerang asam

I am swamped! Literally...with too much work. :P I guess I have myself to blame. It usually happens when I can't blurt out the word "No" ( in the most polite way of course). If you know what I am talking about, it's taking up bake orders from friends and neighbours. The funny thing is I made myself promise not to take any more big orders this year, and there I go again breaking it like nobody's business. :P Although I did find it fun taking up these bake challenges, but again the time involved can be so demanding on me. Anyway, I have just delivered off today's order and hoping to catch a breather. I am not even gonna start on the back logs I have for these few weeks. *haiz* :P
Back to today's post, I have again took up the challenge in cooking yet another traditional noyna dish, Ikan Gerang Asam. For an all Chinese girl like me that has never (except this time) attempted cooking a nonyna savory dish, the very name of this dish itself can be a little intmidating, hahaha! Since I had some belimbing left after cooking Sambal Belimbing Prawns, so why waste it, make something delicious of course!
I read through Wendy's and Alan's ikan gerang asam recipe and incoroprated them together to make my dish. :)) So thanks very much guys!
Ingredients for Ikan Gerang Asam: (Serves 4 ppl)
Spice Paste:
3-4 tbsp dried chilli paste (refer here)
8 shallots, peeled and cut half
3 cloves of garlic, peeled
3 candlenuts
1 lemongrass, the inner white portion, 4" from the base
1/2 thumb size of tumeric, peeled & sliced
1/2 thumb size of galangal, peeled and sliced
1/2 tsp belacan
  • To prepare the spice paste, place all the above ingredients in a spice blender and grind till become a smooth paste. Set aside for use later.
400g mackerel
2 tbsp tamarind paste, mixed into 400ml water, seeds removed
10-15 okra (lady's fingers), head removed and cut half
1 tomatoes, sliced to 6 wedges
1 small egg plant, cut into wedges
6-8 belimbing, cut half
2-3 kaffir leaves
4 tbsp cooking oil
Salt and sugar to taste
  • In a large wok, add cooking oil and heat up at medium fire. Add in the spice paste and saute till fragrant, about 5 minutes.
  • Then add in the tamarind water mixture and bring to a boil. Then lower the fire to low and gently slide in the mackerel and simmer for a minute.
  • Then add in the sliced vegetables and cook for another 4-5 minutes. Off the fire, then cover and let rest for 5 more minutes. Dish up and serve while still hot.
This is actually not a diificult dish to cook. All you need is gather the right ingredients and ta-lah, a homey noyna dish right in your kitchen! I am pretty happy with this dish. The taste is awesome, spicy, sweet and slight sourness which hits the right spot! Delish! Had it with loads of steamy rice and it was goooood! :))
Thanks again for the inspiration Alan! I can proudly say I am no alien to noyna dishes from now on, haha!
I am happy to submit this post to Malaysian Food Fest, Melaka (August) hosted by Yummylittlecooks and organized by Wendy of Table For 2.....Or More. Thanks for hosting ladies!
Signing off now to get a well deserve rest. Have a "early" great weekend all!

Tuesday, May 15, 2012

Honey Wholewheat Loaf and Tuna Cheese Buns

The kids' mid-year exams are finally over and I finally have a breather from all that hectic revisions (almost sounds like my exam!). I guess I am just a typical stay-home mum that always worries about their kids' work more then they do! Anyway, school work aside, I'm glad I get to do my regular bakes and bread is definitely one of them. I must say I have a weakness for bread, and if I have to survive on one food and one food only, I would choose bread, hahaha!

Today's bread recipe was done a month back and now I finally got the chance to post it. I must say this wholewheat bread recipe is really good, and I have already made it twice! ;) Not only is it healthy, it's one of the softest wheat bread I have made. ;)
I found this wonderful recipe from a book I found in the library call "吐司麵包的烘焙技術". A Japanese publication, translated in Taiwan which consist of so many wonderful bread loaf recipes. I literally spent hours studying it. ;)) I've ask my brother to purchase this book for me from Taiwan...can't wait for it to arrive! (^o^)

This recipe calls for a starter dough which needs to be chilled up to 12 hours. So do a little prep work will be good. I actually left this starter dough in my fridge up to 36 hours the 2nd time I bake it and it was still good. ;)
I have made slight changes and portion the ingredients to my needs. Here is the recipe:

Ingredients for Honey Wholewheat Loaf (Using Starter Dough technique):
Pre Dough:
60g whole wheat flour
60g bread flour
120ml water


Mix all of the above ingredients together till well combined. Store in an air tight container and chill the fridge up to 12 hours.


Main Dough:
All of the above starter dough (there is no need to let it reach room temperature)
360g bread flour
8g instant active dry yeast
8g salt
40g sugar
20g honey
12g milk powder
210ml milk
30g butter, room temperature

Filling:
A can of tuna, drained and mix with some mayo, 1 tsp powder sugar, 1/4 salt & 1/2 pepper
3 slices of cheddar cheese
  • Knead all ingredients of the main dough together, except the butter. Add pre-ferment dough piece by piece. Knead after each addition until soft and smooth. Add butter. Knead until stretchable and pass the window panel consistency.
  • Put the dough into a big bowl. Cover with cling wrap and let it prove for 30minutes till double.
  • This recipe is enough to make a 9X5 loaf and 5 buns. So weigh out 600g for the loaf and the rest of the dough, divide into 6 equal portions. For the loaf portion, divide into 3 equal portions of 200g. Flatten each portion with your hands to drive the air out. Roll it into square shape, cover and let rest for 5 minutes before shaping.
  • For Loaf: Flatten the dough to drive the air out. Roll each out into a rectangular sheet with a rolling pin. Fold about 2cm from both sides towards the center and roll it out again. Roll the dough up like swiss roll (the width should be the same as the tin) and out them into the mould. Repeat for the rest of the dough portions. For the buns, shape them to whatever shape you desire. Then fill the buns with the tuna filling and seal nicely. Cover with cling wrap.
  • Let it prove for about 30-45 minutes or until the dough has risen to 80 to 90% of the depth of the loaf tin. You can either cover the lid or bake it open top. Omitted the egg wash if you want to make it a vegetarian version. Bake in 175C for 30 to 35minutes for the loaf and 13-15 minutes for the buns.
Even with the addition of wheat, this loaf was surprisingly soft, even on the following day. My kids down it happily, not knowing the wholesome goodness packed in the bread. ;)

I made some tuna cheese buns as well. But after it's out of the oven, I realized I should have used those pizza topping cheese instead of the regular sliced cheddar cheese...it's way too "toasty" looking. :P
A shot to further convince you to try out this healthy recipe. ;)) Try it and you will know wholesame can be tasty too. ;) Hopefully I would be able to post up more recipe from this wonderful recipe book. If you are bread lover like me...stay tune! ;D


Have a great week ahead all! Cheers!

Wednesday, June 30, 2010

Salmon and Spinach Quiche

I am sure there are days when you feel like you want something different for dinner. I'm not talking about ice cream and pizza, lol! I was thinking in the line of pies and quiches. It's definitely not your usual rice and dishes meal, something that you would make to surprise your family. :) For me, I love pies and quiches period. But since I didn't have any left over roast chicken to make chicken pot pie, quiche was the next best thing. And furthermore I get to "sneak" a few healthy ingredients like Salmon and spinach into it. My girls were delighted and enjoyed the quiche very much, not knowing that all those good nutrients that comes along with it. :)
I always enjoy the creamy, meaty filling encased in a buttery, flaky pie crust, the combo is unbeatable. ;) Furthermore, there are so many ways of incorporating different ingredients into a quiche, from simple cheese, leeks, ham and even crab meat, yum! Think of the possibilities, lol! :D
In fact this dish can be served during dinner parties, reason being some of the steps can be done a couple of days ahead, so really no hurry when you need to serve it on that very day, just assemble and bake, vola! Okay, here is the recipe:

Ingredients for Salmon and Spinach Quiche:
1 pie crust recipe:

1.25 cup (140g) all purpose flour
125g cold butter, cubed
1/4 tsp salt
1/2 tsp sugar
2 to 4 tbsp ice cold water

250g Salmon fillet (no skin)
1 pack spinach, about 200g, washed and removed stems
2 shallots, finely minced 1 garlic, finely minced
1 leek, washed and sliced thinly
3 large eggs
2 cups of half and half ( I used 1 cup heavy cream & 1 cup full cream milk)
1/4 cup freshly grated Parmesan cheese
salt and pepper to taste


To make the Pie Crust:

  • In a large mixing bowl, add flour, salt and sugar and whisk well together. Add in the cubed cold butter and rub in till the mixture resemble bread crumbs.
  • Gradually add in the ice water, 1 tablespoon at a time till the mixture can just able to come together. Do not add too much water as it will become sticky and the crust will not be that flaky.
  • Pour the dough out on a lightly floured surface and pressed together to a a dough. Wrap in plastic wrap and place in fridge to chill for at least an hour. This can be done 2 days ahead.
  • Preheat the oven to 180°C and take out the chilled dough. Place on a lightly floured surface and roll into a round disc of about 13 to 14 " in diameter. (I am using 10" pie pan)
  • Place the disc on the lightly greased pan and gently tug in the sides. Crimp sides if desired. Poke some holes at the base of the pie dough with a fork. Then place a piece of parchment paper over it and some baking weights (either beans or rice)


  • Bake in the oven for 20 to 25 minutes till light in color and golden brown on the edges. If the edges brown too fast, wrap the sides with aluminum foil.
  • Cool on the rack till needed.
To prep Salmon and spinach:
  • Season the fillet with salt and pepper. Using a small sauce pan, place a bay leaf or some slices of leek, some peppercorns, 1/2 tsp olive oil and 1 cup of water. Bring this to a simmer and add the salmon fillet in. Simmer for 10 to 12 minutes till the fillet is cooked through. Remove the salmon and flake it. Set aside till needed.

  • Bring a small pot of water to a boil, add the spinach leaves in and boil for 1 to 2 minutes. Remove leaves and transfer into cold water to stop the cooking. Drain after 5 minutes and squeeze out all the liquid, as much as you can. Then chop up the spinach finely and set aside for later.
Assemble:
  • In a pan, add in 1 tbsp olive oil and heat up at medium low fire. Add garlic, shallots and leeks, cook till soft, about 5 mins. Remove from heat and set aside for later.
  • Preheat the oven to 180°C.
  • In a small mixing bowl, gently mix together the salmon, spinach and cooked leeks. Then place this mixture into the pie crust, distributing evenly.
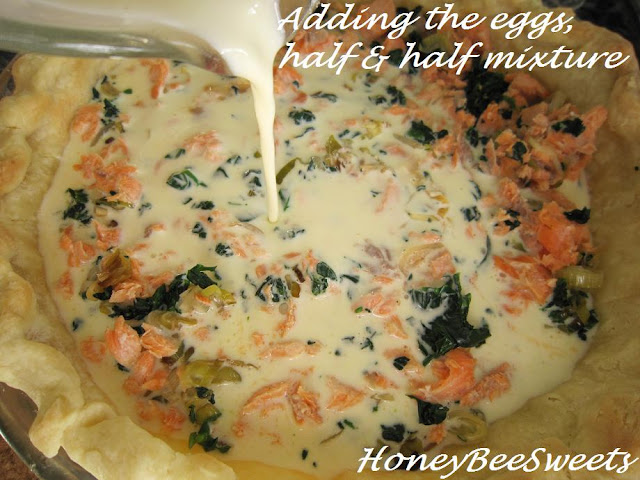
  • Crack the 3 eggs into the half and half, add salt and pepper to taste and mix well. Gently pour egg mixture over the filling in the crust.
    Lastly sprinkle the Parmesan cheese all over the top.
  • Bake in the preheated oven till the top is golden brown, about 45 to 50 minutes.
  • Let quiche cool a little before slicing into it. Left overs can be reheated at 140°C for 10 minutes.

I have a small slice left over and it still was good after I heated it up in the oven. So no problem in making more I guess. ;) Rushing for time, just be sure to prep the pie crust and filling ahead. ;) Hope you all will give this recipe a try...healthy, delicious and not your usual dinner. Enjoy baking!