Tuesday, March 29, 2016

Bacon Onion Fried rice & Scotch eggs

Since I am getting quite a number of requests for both the Bacon Onion Multigrain Fried rice & All Beef Scotch eggs recipes, I decided to just post it up here. And since this is again unplanned, I won't be able to post up any step by step photo, all will be in words. :P

This menu was made ahead for my kid to pack to school. I figured something more substantial since the kid always has late lunch and this meal will last her all the way to 7pm. Anyway, do let me know if you have any questions about the recipe.


Recipe for Bacon Onion Multigrain Fried Rice (Serves 2-3)
1.5 cups multigrain rice cooked and cooled (preferably overnight)
4 strips bacon
1 large onion, peeled and finely chopped
2 garlic cloves, peeled and minced

1/2 tsp chicken powder
1/2 tsp salt
1 tsp sugar
  • On a heated pan (no oil please), add the strip of bacon and cook till golden and crisp up. Drain on paper towels and let cool. Once cooled, cut into small bit using kitchen scissors or knife.
  • Drain away half of the bacon fat. In the same pan over medium low fire, add in the chopped onions and cook till slightly soften and translucent.
  • Add minced garlic and continue to cook till fragrant. 
  • Next add the cooked multigrain rice and seasoning, stir to toss the rice to mix with the onion. 
  • Just before dishing up, toss in the bacon bits and toss well to mix. Set aside for now.


Recipe for All Beef Scotch Eggs (Makes 3 or 4, depends on egg size)
3 large eggs, washed 
200 g ground beef meat
1 medium onion, peeled and chopped 

1 tsp soy sauce
1 tsp mirin

Seasoning
1/2 tsp freshly ground black pepper
1/2 tsp sea salt
1/2 tsp sugar
1/2 hondashi powder (hondashi  is smoked and dried fish called the Bonito)
1 tsp corn flour
1 tbsp water

2 tbsp plain flour
1 cup cooking oil for frying


  • In preheated pan, add 1 tbsp cooking oil over medium low fire. Next add in the onion and cook till slightly soften. Add in the soy sauce and mirin, continue to cook till soften and light brown.
  • Dish up the onion mixture and let cool.
  • In a mixing bowl, add in all the seasoning and the cooled onion mixture. Use your hand to mix in everything. Then let it marinate for a good 30 mins before use.
  • In the meantime, boil the egg. In a pot of rolling boil water, add the 3 eggs carefully in. Cook for 5 mins and 30 seconds and quickly dish out and place in ice water to stop the cooking.
  • Once the eggs has cooled, peel the eggs shells away.
  • Divide the marinated beef into 3 equal portions and wrap it carefully around the cooked eggs. Pan nicely so it is evenly shaped.
  • Preheat some frying oil in a pan over medium fire. Dust some plain flour on the beef eggs and gently lower it into the frying oil. Repeat till all 3 eggs are cooking in the oil.
  • Turn the eggs so that it is cooked evenly on both sides. Shouldn't take more then 6-7 mins. Remove the eggs and drain on paper towels.
  • Serve Scotch eggs with bacon onion rice, enjoy!


Happy cooking everyone!


Monday, March 28, 2016

Ginger Tart with Lemon Mascarpone Cheese Tart

Seems to me that lemon tarts are such a hit in most cafes / bakery shops nowadays. That tangy sweet, perk me up lemony curd in that buttery crumbly tart is a winning combo. I too am a fan of tarts, be it chocolate or fruity kinds, it is always such a treat to have. #MajorLove

But to pay for $8 - $9 a piece is quite a "painful" affair...well at least it is to me. Thus I rarely indulge in such treats, in fact I only visit cafes for good coffees and croissants nowadays (is this an age thing?) 

So while I was shopping at IKEA the other day, I happened to see their DROMMAR Pie dish going at only $9.90. What a deal! And truth be told, my current one at home which I lugged back from California 3 years back is beginning to rust. *sigh* No thanks to the humid weather here! 

So it really didn't take me long to decide to buy that pie pan home of course. It also didn't take me long to come up with this delicious idea of baking a lemon tart! Not just any lemon tart of course, Ginger snap pastry tart base with creamy lemon curd mascarpone cream cheese filling....yum!

This refreshing tart has gotta be the best bake of the year for me so far (OMG). Lemony curd mixed with creamy cheese that filled the buttery ginger snap tart base, I simply couldn't get enough of it. :9 Wish I can let you all try this! But I guess the next best thing would be to share this recipe and you can try it out yourself! Not complicated lah, I promise! Think of the multiple times of $9 you get to save each time you want to buy yourself a lemon tart at a cafe...that should motivate you haha!


There are basically 3 main "components" that you need to make in order to assemble this yummy tart. 
The butter ginger tart base, the lemon curd and of course the mascarpone cheese mix which will eventually be combined with the lemon curd. As for the equipment, you can get most of them in IKEA, easy to use and reasonable pricing too. ;)


Recipe for Chocolate Coated Ginger Tart Base (Makes a 31 cm or 12 ")

350 g PEPPARKAKOR gingersnap cookies from IKEA

100g salted butter, melted
100 g dark chocolate bar, CHOKED MORK
  • Using a blender, blend the ginger snap biscuits into fine crumbs. 
  • Pour the crumbs into a large mixing bowl, then add the melted butter to the biscuit crumbs and mix well till all coated with butter.
  • Line the DROMMAR pan base with a cut out round piece of parchment paper. Grease it.
  • Pour the crumb mixture into the prepared tart pan, spread it out and press down neatly with the sides as well.


  • Chill in the fridge for 30 minutes. When ready to bake, preheat oven to 180C. The bake the ginger tart base uncovered for a good 14-15 minutes, where the top will be slightly darker then before. 
  • Once you remove the tart base from the oven, break chunks of the dark chocolate and place them over the warm tart like so.
  • Let the warmth of the tart soften and melt the chocolate. Once it is melted, you can quickly spread the chocolate out so it covers the base of the baked ginger tart. 


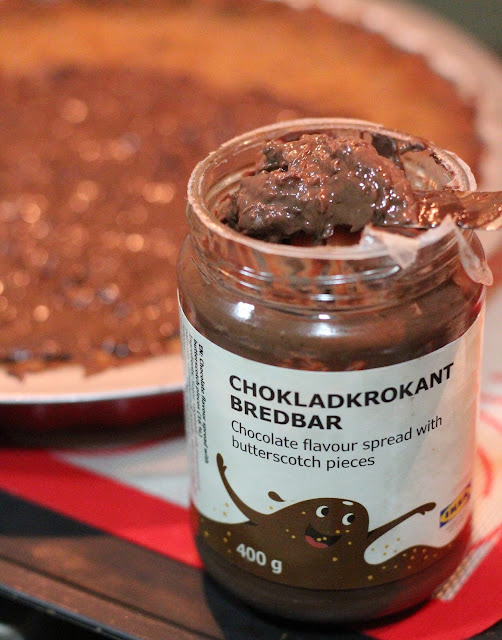
(Alternatively, you can use IKEA's Chocolate flavoured spread with butterscotch brittle bits ; CHOKLADKROKANT BREDAR ....I know the name is quite a challenge haha!) I actually used both in the end (still adds up to 100 g only)...it's so yummy! So DO NOT skip 
this step please, you will thank me for it. :)

  • Chill the tart base in the fridge till it is ready to be used. 
Recipe for Lemon Curd (Makes about ~300 g )
3 large egg yolks
1 large
180 g caster sugar
Zest of 2 large lemonsJuice of 2 large lemons
30 g salted butter

  • In a heat proof sauce pan, crack egg, add 3 egg yolks, lemon zest, lemon juice and whisk well over water bath (water not touching the base of the pan though).

  • Continue whisking the whole mixing over the double boiler (I used my steamer haha) and make sure you do not over cook it at high fire and curdle it. Keep a close watch  n the curd and whisk constantly. Cook at medium low fire.
  • Once the temperature reaches 160C, it is ready. Alternatively if you do not have any thermometer, just check for the texture and consistency. Dip your wooden spoon or spatular into the mixture. Run your finger across the back of the spoon to create a clear line.  If the curd is thick enough, then the line should remain clear.  If the curd is too thin, then it will run and disrupt the line. 
  • Add in the melted butter and stir in cautiously, but the curd shouldn't break. Chill the lemon curd in the fridge till needed.

Lemon Curd Mascarpone Cheese Filling (Fills a 31 cm or 12" tart)

250 g cream cheese (I use Philadelphia brand), room temperature
400 g Mascarpone cheese
80 ml heavy whipping cream
80 g powdered sugar
pinch of salt
160 g homemade chilled lemon curd


  • In a large mixing bowl, whip the cream cheese till creamy.
  • Add heavy cream and powder sugar and continue whipping at high speed till light and fluffy.
  • Next pour in the chilled mascarpone cheese and beat till all is well combined.
  • Lastly pour in chilled lemon curd and mix well till uniform and no visible lumps.
  • Pour the lemon cheese mixture into the chilled ginger tart base. Spread it out evenly and you can also use a spatula to create patterns.
  • Chill the whole tart for at least 2 hours before slicing and serving it.

This is such a delightful treat! I have been having this tart every day and we are almost finishing it... oh noooo. 

Those IKEA Ginger snap cookies used was surprisingly not overpowering and actually gives the tart an unexpected spice kick in each bite. I am so gonna use it again for my next tart bake! And see how nicely it sliced out without crumbling or breaking...perfecto.


That chocolate base coating also did help hold the tart base together, giving it an extra depth in flavour and of course awesome deliciousness. 


That luscious lemony cheese filling is so good! Perfect amount of lemon citrus flavour, perfect amount of sweetness and well perfect amount of cream cheese goodness. From the photo, you can tell the cheese filling is not too dense nor too light. Extra lemon curd to go with my tart slice please... Allow me to be indulge here...but I've died and gone heaven haha!


Check that out huh?! Hope all these tempting photos are good enough to lure you to try this recipe out. 


Do hop over to IKEA too to get the necessary equipment and ingredients you need for this recipe. You won't regret baking this...highly recommended. ;)

Have fun baking everyone!


Monday, March 21, 2016

Pumpkin Milk Buns (Chicky Buns)

It's rather sad that I have been so busy lately that I haven't got the time to bake any bread for the family. So I was so thrilled when I managed to bake some cute chicky buns in view of  the coming Easter!
To be frank, these buns are so easy to make! Using a simple straight dough method, these buns were ready in 3-4 hours. I filled them with potato bacon which turned out to be such a hit among the family. 

Recipe for Pumpkin Milk Buns (Makes about 12)
350 g bread flour
112 g peeled steam pumpkin
40 g caster sugar
5 g yeast
3 g salt
150 ml milk
70 ml water

30 g unsalted butter

Method:

  • Blend the sweet potato with the water till no lumps and uniform.
  • In the mixing bowl, add everything except the butter. Also add in the sweet potato water mixture.
  • Knead till not sticky and dough is pulling away from the side.
  • Add in butter and continue to knead till window panel stage
  • Let proof and double in size.
  • Once proofed, punch out air and shape in round balls of 40 g each. Let proof again
Potato Bacon filling: 
russet potato, peeled, cubed and steamed
2-3 steps of bacon
1/4 tsp salt
4 tbsp Japanese mayo
1/4 tsp Hondashi powder
2 tsp confectioner's sugar
  • Pan fry the bacon till crispy and drain them on paper towels. Crumble them into smaller bits and set aside for use later.
  • Once the steamed potato are out from the steamer, add in all the rest of the ingredients except bacon. Mash in slightly so as to mix the seasoning.
  • Lastly add in the bacon bits and set aside for filling in the buns.

Assemble the buns:
  • Roll the dough portions into a flat disc and place about 1 heaping tbsp of potato filling in the center. Seal and roll round. 
  • Repeat till all the dough portions are filled and sealed. Set aside to proof for 30 minutes. Preheat the oven to 165C about 20 minutes into the proofing.
  • Bake in preheated oven of 165C or 25-28 minutes. Low temperature is to prevent the buns from browning and to keep that golden yellow colour on the buns.
  • Once baked, remove from the oven and let cool completely before decorations (if desired)
  • Place thinly sliced round carrots in the middle of the dough and piped some meted chocolate on the buns to make eyes, feet and nostrils, as seen in the picture.
  • Repeat the same for the rest of the buns. 
Note that the filling choice is really up to your preference. You can even do chicken and potato curry, chocolate banana, cream cheese etc.

Hope you all will give this super cute and easy to bake recipe a try. Definitely kids can join in the fun too! Have fabulous easter weekend with these delicious buns!

Happy Baking All!

Wednesday, March 16, 2016

Blueberry Muffins (蓝莓松饼)

This was an impromptu bake after seeing my sister purchased some muffins from a so called healthy bakery. The muffins she bought claimed to be both delicious and contains ingredients that were good for the body. I took a bite and was so disappointed. :P Neither was it delicious, it was sugar loaded, so sweet! Healthy? Really? So I decided to bake some for her and my dad, since he too enjoys anything blueberry. Again this is another "extraction" from my IG and FB share, so bare with the short post. :)


Blueberry muffin (makes 10-12) 

150 g unsalted butter , room temp
135 g sugar
2 large egg
1 tbsp pure vanilla extract
250 g sour cream or plain yogurt
100 ml fresh milk
Zest of 1 lemon
300 g cake flour
1 tsp baking powder
1/4 tsp salt
150 g blueberries, fresh or frozen (if frozen, need not defrost)
  1. Preheat oven to 170C, prepare cupcake liners. In a large mixing bowl, beat butter and sugar till creamy. Add vanilla extract and lemon zest and continue to beat till fluffy.
  2. Add egg one at a time and beat till incorporate before adding another.
  3. Add 1/3 of cake flour, salt, baking powder in and mix well.
  4. Add all of sour cream / yoghurt in and beat till mixed in.
  5. Add another 1/3 flour in and mix well.
  6. Add in the milk and mix well again, then lastly add the last 1/3 flour in and incorporate till batter is smooth. 
  7. Lastly toss in blueberries and mix gently.
  8. Pour the batter into the cupcake liners. Bake in the preheated oven and bake for 15-18 mins or till the tester comes out clean.
Texture of the muffins were soft and creamy. Best with a cup of Jo or hot tea. I recommend using fresh blueberries, which somehow the fruits' prime condition contributes a juicier and sweeter flavour to the bake. But frozen is fine too lah. :)

Happy Baking!

Thai Minced Pork Basil (泰式猪肉碎炒罗勒) pat Krapao Moo Sap

I have decided to post up the recipes that I shared both on my Instagram (@Honeybeesweets.sg) and FB @HoneyBeeSweets Kitchen here as well. Most of which will only be a recipe with no pictorial steps but I reckon it will be for good record and future reference. Reason being I have family and friends whom ONLY reads my blog, thus it would only be fair that I share with them my daily recipes here.

Will start off with one of my dinner dishes from last night; Thai Minced Pork Basil (泰式猪肉碎炒罗勒) or better known as (pat Krapao Moo Sap).


Recipe for Thai minced pork basil


300 g minced pork1 bunch fresh basil3 peeled, minced garlic3 peeled, chopped shallots 


Seasoning1 tbsp soy sauce1 tbsp sweet dark soy1 tsp sugar1/4 tsp white pepper1 tsp fish sauce


4 tbsp water + 2 tsp corn flour (thickening agent)


1) In a preheated wok, add 1 tbsp cooking oil over medium Low fire. Add in the minced garlic and shallots in and cook till slightly soften.


2) Add in the minced pork and stir fry, break up the meat. Add in the seasoning and stir in well to cook.


3) Lastly add in 3/4 the basil and thickening agent and stir well.


4) Dish up and garnish with the rest of the basil and serve with rice and sunny egg.


Happy cooking all!


Tuesday, March 8, 2016

Nutty Oat Crumbles with Kinohimitsu Berry Mascarpone Cream

Ever wonder if there is a beauty product that you can enjoy as breakfast or even dessert? Something that you actually look forward having every day which not only helps beautify, it serves as a delicious treat. The idea of "consuming" a beauty product came about when I was introduced the "Total Glow Set" from Kinohimitsu. I had a taste of the delicious berry flavoured of Prowhite and UV Bright which inspired me to create something with them. Of course nothing wrong with having them straight, but why not make it even better?

"Total Glow Set" has 3 different beauty enhancing products; Prowhite, Be White and UV Bright, packed with all natural ingredients which not only helps brighten your complexion, it even boost the immune system to promote healthy liver for flawless and glowing skin. How great is that?

So I took the challenge of incorporating the Kinohimitsu's Prowhite into a simple daily bake; Nutty Oat Crumbles. A nutty and chewy concoction which can pair off perfectly with the berry flavours from Prowhite which I mixed with some mascarpone cheese. This crumble is such an easy and healthy treat which anyone can remake at home, for breakfast or just to snack on. Not only does it provide all the beauty goodness, but it is delicious and versatile that it can be incorporated into my daily meals.


So why this "Total Glow Set" from Kinohimitsu? Well, living in a tropical country like Singapore where we get strong sun rays almost 80% of the year, can be a rather challenging for fair skinned people like me. I would be lying if I say I am not concern about that unflattering "tan" or the appearing of new freckle spots. Often times busy moms like me just can't find that extra ounce of energy to deliberately avoid that afternoon strong rays since we run our errands regardless of the rain or sun. 

So when I come to know about "Total Glow Set" from Kinohimitsu recently, I was intrigued!

Kinohimitsu Total Glow Set helps protect and brighten skin from head to toe, it promises a radiant and brighter skin in just 14 days! It also provides our skin with protection against harmful UV rays, where our skin is well replenished with vitamins and anti-oxidants, giving you a fairer and smoother skin. And I knew I just need to follow the following simple steps to get the best results:

Step 1 : Morning dose of a bottle of UV Bright, before heading outdoor. UV Bright claims to provide up to 9hours of UV protection. [SHIELD]

Besides having Kinohimitsu UV Bright straight from the bottle, I also enjoy having it in my breakfast too. Here is how I did it:


For that breakfast Chia seed pudding, all you need is:
2 tbsp organic chia seeds
150 g low fat Greek yogurt
100 ml fresh non fat or low fat milk
1 bottle of Kinohimitsu UV Bright
Fresh fruits like berries
  • In a glass jar, mix chia seeds, milk and yogurt together. Stir well so that the chia seeds does not cling together into lumps. Let sit 5 minutes and stir again. Repeat for 3 times and finally after 3rd stir,  cover and place glass jar in fridge overnight.
  • In the morning, give the chia seed pudding a good stir. You will notice it is rather thick. At this point, add your bottle of Kinohimitsu UV Bright in and stir well. 
  • Top with some oat crumbles (optional) and fresh berries. Serve cold, enjoy!

Step 2 : Taking 1-2 capsules of Be White after lunch to help with skin brightening [HEAL]

Step 3 : After a light dinner, treat yourself to this delectable Nutty Oat Crumble with Kinohimitsu Prowhite Berry Mascarpone Cream, which helps lighten and eliminate spots at the same time.[PROTECT]
Let's get started on how to make this delicious and versatile Nutty Oat Crumbles with Kinohimitsu Prowhite Berry Mascarpone Cream. Note that this recipe makes up to 2 servings. I reckon best to make ahead and chill in the fridge and grab one when you need. So feel free to double up the recipe. 

Ingredients for Nutty Oat Crumbles (2 servings)

Recipe for Nutty Oat Crumbles
45 g organic rolled oats
20 g all purpose flour
30 g coconut sugar / brown sugar
1/4 tsp cinnamon
40 g almonds
Pinch of salt
50 g toast and roughly chopped almonds
38 g unsalted butter (For a more wholesome mix, use organic cold press coconut oil)
  • In a small pan, toast up the almonds on low fire till lightly brown. Remove from fire and set aside for use later.


  • In a large mixing bowl, add in oats, flour, brown sugar, salt and cinnamon in. Add in the almonds which you can roughly chop it or leave it whole.


  • Mix the dry ingredients then use your fingertips to rub the butter into the mixed dry ingredients with your fingers gently until it resembles coarse crumbs. 


  • Preheat oven at 170C. Grease the 2 ramekins. Spoon the oat crumbles into the ramekins. Be sure you do not to press the crumble mixture, leave it loosely piled. If you press it too hard, it might be hard to spoon out later. 


  • Bake the oat crumble for 15-18 minutes till it bubbles a little on the side and surface turned golden brown. Once baked, remove from oven and let cool completely before serving it with the berry mascarpone cream.

Berry Mascarpone topping (2 servings)

2 packs of Kinohimitsu Prowhite
100 g mascarpone cheese 
Fresh berries (raspberries / blueberries)
  • Weigh out the mascarpone cream cheese and pour in the 2 packets of  Kinohimitsu Prowhite in, mix together till well corporate. 


  • Once the Kinohimitsu Prowhite powder is mixed in completely, it should be smooth and luscious.You can also opt for Greek yogurt which will be perfect as well.


  • Chill in the fridge for 20-30 mins. When you are ready for this dessert, simply scoop over the berry mascarpone cream over the nutty oat crumbles.


  • Last touch up would be to add some fresh berries over and serve. Enjoy!
Now isn't this an irresistible dessert that is not difficult to whip up? Best part is that it contain that it provides all the beauty goodness for you! Do remember that the vitamins and minerals in Kinohimitsu Prowhite will not be destroyed or altered during this preparation process. Rather then mixing the powder in just plain water, I am pretty sure this is a WAY better way to enjoy it. Agree? 

I am sure many women out there are just like me, facing the inevitable "faith" of increasing facial lines and unflattering darkening spots. So being able to find a beauty regimen set like Kinohimitsu Total Glow Set to lighten up (literally!) the problem, I am more then willing to give it a shot! Considering we are not getting any younger each day, so a renowned and trusted product would be our best shot! Plus I have no time for IPL which can be rather time consuming and painful if you ask me!

Now with this new Nutty Oat crumble with Kinohimitsu Prowhite Berry Mascarpone Cream recipe, I look forward to having it daily. Crunchy toasted almonds, chewy oats with sweet buttery bite, paired perfectly with the fruity Kinohimitsu  Prowhite berry mascarpone cream, it's so addictive!

As I mentioned before, you can replace the mascarpone cream with greek yogurt to achieve similar result but healthier. Replace the butter with organic coconut oil too if you like. Note that you can make mix the Pro White powder to the yogurt right before serving, no problem.

GIVEAWAY ANNOUCEMENT
If you have taken part in my recent giveaway for a "Total Glow Set" from Kinohimitsu worth S$209, do head on over t@KinohimitsuSG on Instagram on the 11th March to find out who is the lucky winner! May lady luck be with you. ;)

For more information on the products in the "Total Glow Set" from Kinohimitsu, head on over here to read more about it and check out the promotional offers they are having now. Total Glow Set is available exclusively online on Kinohimitsu Singapore’s online store, (http://sg.kinohimitsu.com). Be White, UV Bright and Prowhite are available at all leading pharmacies, major departmental stores and retailers.

Have a great day ahead guys!
Happy baking, always


Disclaimer : This is a sponsored post from Kinohimitsu. I was given the "Total Glow Set" from Kinohimitsu to try out and to create a recipe. However, what I wrote here is solely my own opinion and I was not told what to write either.