Tuesday, August 30, 2011

Plum & Almond Frangipane Tart

Hi all, hope everyone is enjoying their holiday today, especially our Muslim friends. I want to wish them Selamat Hari Raya Aidilfitri! I too had a great day today, been spending some quality time with my dear family. Best of all, we went over to my mum's house for another nice gathering with lots of good food! :) Goes without saying, I baked something for desert for the family. This time I decided to make use of the stone fruits in season and baked a Plum and Almond Frangipane Tart.
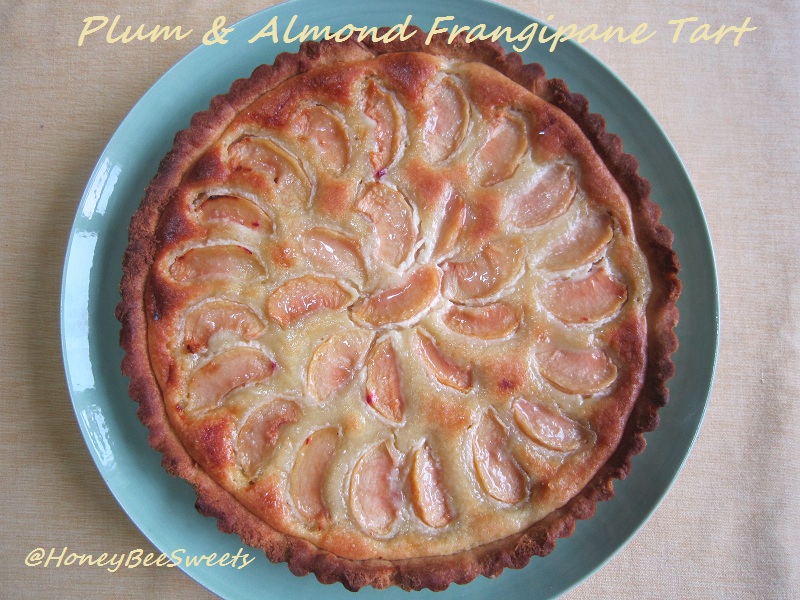
Frangipane is a mixture of ground almonds, sugar, eggs and butter, baked into a soft, macaroon-like layer. In this recipe, it's incorporated into this summertime fruit tart. I got this lovely recipe again from "Essentials of Baking" from William Sonoma. The only down side was I couldn't find French prune plums(stated in recipe) which was ruby red in flesh. And thus the tart didn't turned out as pretty as I hoped it will be since I was using Californian Santa Rosa Plums which has amber colored flesh. Looked kind of pale if you ask me. ;P But on the good side, it was surprisingly sweet! *phew*
Frankly speaking, I didn't do a good job on my baking...as you can see the crust looks too" toasty" on the sides. *sigh* The mistake was while doing the pre-blind baking for the tart shell, I got a little worried that the base won't be done, so went for an additional 2 minutes. And see what that extra 2 minutes can do?! Lesson learned; Never try to be too smart and over bake your pastry shell.

Ingredients for Plum & Almond Frangipane Tart: (makes a 9 or 10" tart pan)
Ingredients for Rich Tart Pastry:
210g all purpose flour
60g confectioner's sugar
1/4 tsp salt
125g cold unsalted butter, cut into small pieces
2 large egg yolks
1 tbsp heavy (double) cream (I omitted this)
In a bowl, combine flour, sugar and salt together. Scatter the butter pieces into the flour mixture and knead with your finger tips or pastry knife to combine everything till it resembles bread crumbs. Add in the double egg yolks and continue to knead till to comes together to form a soft pliable dough. Wrap in plastic and chill for 30 minutes.

Ingredients for Filling:
170g blanched almonds
155g + 1 tbsp caster sugar (I reduced to 140g)
1/4 tsp salt
1 tsp pure vanilla extract
1/2 tsp almond extract ( I omitted this)
1 large egg
60g unsalted butter, room temperature
8 ripe plums, peeled, pitted and sliced in 8 equal wedges

Method:
  • Preheat the oven to 200C and grease a 9 or 10" tart pan with a removable base.
  • Remove the chilled pastry dough from the fridge and lightly flour the work surface. Roll out the dough to about 12" in diameter.
  • Gently transfer the rolled out dough with the help of the rolling pin on to the greased tart pan. Gently press in the pastry at the edges and scrap away any excess dough.
  • Place a large aluminum enough to cover the tart over and gently press in the sides. Put some baking weight over the foil. Bake the tart shell for 13 to 15 minutes. Remove the baking weight and aluminum foil and bake for another 2 minutes to dry up the tart base. Remove from oven and let cool till needed.
  • Preheat the oven to 180C.
  • Meanwhile, make the filling: In a food processor, process the blanch almonds and the sugar till finely ground. Add salt, vanilla extract, almond extract if using and egg. Process the mixture till well blended. Add in the softened butter and processed until smooth. .
  • Using the rubber spatula, scrap the mixture into the tart shell and spread it out evenly.
  • Arrange the sliced plums in 2 circular rows on top of the frangipane mixture. Sprinkle that 1 tbsp sugar if desired. I omitted this and glaze the tart with warm jam after it's been baked.
  • Bake in the preheated oven for 30 to 35 minutes till the frangipane is golden and set. Transfer on to cooling rack and serve at room temperature or refrigerate and serve cold.
This fruit tart may seem sophisticated or complicated to bake, but on the contrary, it's not. :) Plus both the pastry dough and frangipane filling can be made in advance prior to the day of baking. So serving this at a dinner party will surely impress your loved ones especially when it seems like effortless to bake it. You can also replace the plums with any kind of stone fruit like nectarines, peaches or even Granny Smith apples would be nice. :)
Believe or not, but the above portion was the only slice that I managed to salvage back home after the gathering. Although it was slightly on the sweeter side (filling sugar can reduce by another 15g), it still turned out delicious. The pastry shell was buttery and nice, while the filling was both nutty, sweet and creamy which went real well with the slightly tart plums. My niece liked it so much that she had 2 big slices, heehee.


Wishing everyone a good good day today, tomorrow and day after! Cheers!

Sunday, August 28, 2011

Hokkien Festive Glutinous Rice

As long as I can remember, there is this special dish that is almost always served in my Hokkien Family during special occasion, or simply on a weekend when everyone is around. Whether it is on Chinese New year, Birthdays or even baby's 1st months, this dish is never left out. I practically grew up eating this. Its none other then the Hokkien Festive Glutinous Rice.

If you are a true blue Hokkien like me, I'm very sure this is not a foreign dish to you. :) Apart from the numerous delicious Hokkien dishes I know, this one is by far the most comforting and with the most nostalgic memories for me. :) The best memory I had was when my MIL was in California to help me with my first confinement. She made this Hokkien Festive Glutinous rice on my child's 1st month celebration. At that moment, being so far away from home and for so long, (plus going through post delivery blues), to be able to have a taste of this delicious rice, is like a taste of home....it was so memorable and priceless. *emotional* So at some point, I made a promise that I must learn how to make these traditional dishes so I can pass them down to my kids. :))
I have to admit my version of this wonderful dish is probably not be as good as my mum's or my MIL's. Somehow it lacks that special "kick" or something. But no worries, practice makes perfect right? And furthermore, my husband and kids enjoyed it very much during lunch...that is good enough for me. ;)) Anyway, here is my version:

Recipe for Hokkien Festive Glutinous Rice: (Serves 4 adults)
600g glutinous rice (soaked overnight)
120g shallots, peeled and sliced thinly
8 thin slices of ginger and sliced into very thin strips
150g fatty pork, sliced (I used sliced roast pork)
50g dried shrimp, soaked
50g dried Shitake mushrooms, soaked and sliced
6 tbsp vegetable oil
600 to 700ml water (this amount includes the soaking water from the dried shrimp and mushrooms)

Seasoning:
3 tbsp dark soy sauce
1 tbsp light soy sauce
1 tsp chicken seasoning
1/2 tsp salt
1/2 tsp pepper
2 tbsp sugar

Method:
  • In a frying pot, add the 6 tbsp of vegetable oil and start the heat at medium. Add the sliced shallots and fry till golden and crisp. Remove from the oil and place in bowl for later use.
  • Add the sliced ginger into the same oil and fry it at medium fire till golden brown. Scoop out and leave on paper towel for later use.
  • In another bigger pan, add in about 2 tbsp of the oil used for frying the shallots and ginger. Add in the sliced pork and fry till slightly crisp, dish up (I skipped this step because I used roast pork). Then add in the soaked dried shrimps and dried mushrooms and fry till fragrant. Dish up.
  • Drain the water away that is soaking the glutinous rice. Add the glutinous rice into the big pan and start to fry it. Add in the seasonings and half of the water. Fry it till the rice thickens, then add in more water as per needed. When the rice is almost cooked and very thick and sticky, add in the dried shrimps, mushrooms and pork in. Stir fry and mix well. Lastly add in half of the fried shallots and stir in well.
  • Add in the last bit of water if needed if too dry or the rice is not completely cooked. Cover and let it cook for another 3 to 5 minutes at medium low fire. Once done, dish up and pile on in a dome shape in a big bowl.
  • Sprinkle on the rest of the fried shallots and ginger on top of the rice. Serve when still warm.
I simply love the sticky and chewy texture of this rice dish. And the wonderful aroma from the mushroom, dried shrimp, fried shallots and ginger works together with the glutinous rice like magic. Do remember that the fried shallots and ginger is key ingredients here. :)) BTW, My husband ever said he can eat this everyday and I believe him. ;D

Being a Hokkien and married into a Hokkien family, I feel that I should really put an effort to learn the traditional dishes from both my mother and in law. And I also urge one and all to preserve this tradition and heritage, so our future generations will get to enjoy all these wonderful food, just like us!

My younger child saw me shooting and came over requesting to take with it. Yeah...that's her thumbs up for her lunch, lol!


I am submitting this post to Heritage Food Trail hosted by Edith of Precious Moments. Thanks Edith, for hosting such a meaningful theme. :) Have you submitted yours? Well, its always a good time to find out more about our own heritage, so why not start today?

Got to go, you folks have a great day!

Wednesday, August 24, 2011

Warm Chocolate Soufflé Tarts

I'm amazed with myself. It's been more then a month since I last made a chocolate desert! For a chocoholic like me, it's pretty abnormal, lol! Perhaps with the stuff that was going on around me lately had dampened my chocolate appetite. :P Hopefully this doesn't carry on, as I can never have too much chocolate...good dark chocolate in any form that is. :))

Today I am going to share with you all something that will melt any chocolate lover's heart. :) In fact, if you love soufflé , you'll love this desert even more! It's call Warm Chocolate Soufflé Tarts. Even the name itself is so tempting. ;)) Elegant chocolate soufflé that gain stability and crunch from a chocolate shortbread crust. Sounds good huh? However the elegant name can't really match those tarts that I baked up. Why?See for yourself. :P It took me ages to get a decent shot of the tarts. (*o*)"

Due to the fluffy "nature" of the soufflé filling, the characteristic look of this tart is to have a crack on the surface. Not that pretty if you ask me. But please don't be discouraged by it's looks, it's truly deceiving....this tart taste heavenly good. :)
I got this recipe from a book call "The Last Course: The Desserts of Gramercy Tavern" by Claudia Fleming. I had this book forever now and would occasionally refer back to it when I want some special desert to serve up. Interested in this tart? Here is the recipe:

Ingredients for Warm Chocolate Soufflé Tarts (makes about 18)
Chocolate Tart Dough:
1/2 cup (4 oz) unsalted butter, softened
1/2 cup (2 oz) +1 tbsp confectioner's sugar
1 large egg yolk
3/4 tsp pure vanilla extract
1/4 cup (3/4 oz) unsweetened coca powder (I used Valrohna Cocoa powder)
1 & 1/4 cup (6.25 oz) all purpose flour

Chocolate Souffle filling:
10 tbsp (5oz) unsalted butter, cut into pieces
5oz extra bittersweet chocolate, chopped (I used Valrohna 70% cocoa)
4 large eggs, room temperature
3/4 cup(5.25 oz) plus 2 tbsp caster sugar
3 tbsp all purpose flour


Method:
  • To prepare the pastry dough: In a large bowl, cream the butter and confectioner's sugar together until light and creamy. Add in the egg yolk and beat till smooth. Sift in the flour and cocoa powder and mix till the mixture comes together. Place the dough in a large plastic wrap and chill it at least 2 hrs or up to 3 days.
  • To prepare the filling: Over a double boiler, melt the chopped chocolate and butter and stirring till it combines well. Remove from the heat and let cool before use.
  • In another bowl, beat the eggs and sugar at high speed till the mixture is light in color, thickens & tripe in volume; also known as ribbon stage. Fold 1/3 of this egg mixture into the cooled chocolate mixture. Once incorporated, fold it back into the remaining 2/3 egg mixture and careful not to deflate the batter.
  • Then in 3 separate portions, sift in the flour mixture and folding in carefully till no visible flour. Repeat till all the flour has been folded in. Cover the filling and chill it for at least 2 hours, or at least up to 2 days.
  • Preheat the oven to 170C. Take the chilled chocolate dough out from the fridge. On a lightly floured surface, roll the dough into about 10" X 15" rectangle. Using a 2.5" or 3" round cutter, cut out about 16 to 18 rounds. Then press the cut out doughs into the tart tins. Prick the base of the dough in the tins and chill the shells for 20 minutes before baking.
  • After chilling, bake the tart shells for 13 to 15 minutes. Remove from oven and let cool completely. (I placed them under the fan.)
  • Spoon the chilled souffle fillings into the cooled tart shells to 80% full. Then bake in the oven at the same temperature for another 12 to 14 minutes.
  • The filling will puff up but will naturally deflate a little once it starts to cool down. Serve when still warm. Or if you like, chill the tarts and serve them cold...it's equally delicious!
Remember that the key point in making these is to use good quality chocolate & cocoa powder, or it won't taste as good.
How good does that look? Although the picture might make you think its a "brownie" or "cakey" texture, but in fact it's so much lighter then that. Well, it taste exactly like a soufflé ! Once you take a bite, you'll first feel the flaky chocolaty crust then follow by this light and fluffy intense chocolate filling which simply just melts away in your mouth. Truly heavenly. :) Don't wait folks, get busy now and bake some for yourself! :D

Needless to say, I will be submitting this to Aspiring Bakers #10: Easy As Pie ( August 2011) hosted by Janine of Not The Kitchen Sink! Thanks for hosting this month Janine! Have you submitted your post yet? Hurry before the month ends!


Have a good day all! Cheers!

Monday, August 22, 2011

Bacon Mushroom Quiche Lorraine

It's the start of another busy week and soon the end of another month. Much is the hustle and bustle about Singapore presidency election this week, and the anticipated Hari Raya Pusa next. And not forgetting the term break that will be coming in a couple weeks time. I am actually looking forward to this school break. Although I don't have loads lined up to do but simply to have a little more time at hand for myself will be pretty nice. And yes, more family time will be great too. So what fun plans have you lined up this school break?

Just last weekend, I managed to have some time to bake a savory pie for my family for supper. It's Bacon Mushroom Quiche Lorraine. The name sounds a little sophisticated but in fact the preparations for it ain't that hard.

I got this recipe from one of my old favorite cookbooks, "Essentials of Baking" from William Sonoma. The original recipe only calls for bacon but I kicked it up a couple notches by adding sweet onions and brown button mushrooms to the filling. And boy was it good! Anyway, here is the recipe:


Ingredients for Flaky Pie Pastry (for single crust)
115g cold unsalted butter
4 tbsp cold vegetable shortening (I used Ghee)
330g all purpose unbleached flour
1.5 tbsp powder sugar (optional)
1/2 tsp salt
60-80ml ice cold water


To make the Pie Crust:
  • In a large mixing bowl, add flour, salt and sugar and whisk well together. Add in the cubed cold butter & shortening and rub in till the mixture resemble bread crumbs.
  • Gradually add in the ice water, 1 tablespoon at a time till the mixture can just able to come together. Do not add too much water as it will become sticky and the crust will not be that flaky.
  • Pour the dough out on a lightly floured surface and pressed together to a a dough. Wrap in plastic wrap and place in fridge to chill for at least an hour. This can be done 2 days ahead.
  • Preheat the oven to 180°C and take out the chilled dough. Place on a lightly floured surface and roll into a round disc of about 13 to 14 " in diameter. (I am using 10" pie pan)
  • Place the disc on the lightly greased pan and gently tug in the sides. Crimp sides if desired. Poke some holes at the base of the pie dough with a fork. Then place a piece of parchment paper over it and some baking weights (either beans or rice)
Ingredients for the Quiche filling:
4 to 5 slices of thick-cut lean bacon (~125g) (I used smoked Applewood turkey bacon)
3 large eggs
1/2 tsp salt
1/8 tsp freshly ground black pepper
180ml fresh heavy cream
180ml fresh whole milk
1 tbsp unsalted butter, cut into small pieces


Method and Assemble: 
  • In a frying pan over medium heat, fry the bacon until the edges are crisp, about 8 minutes. Transfer to paper towels to drain, then pat dry with more paper towels. Cut crosswise into 1 inches pieces and set aside for use later.
  • Preheat the oven to 180C.
  • Using the same pan, add the chopped onions and saute using medium low heat until soft and opaque in color. Add in the slice button mushrooms and let it sweat down without stirring it. Add salt and freshly ground pepper to taste. Cook until the mushrooms have soften and golden brown. Dish up and let cool for use later.
  • Arrange the bacon pieces evenly in the prebaked crust. Then evenly place the saute onions and mushrooms over the bacon.
  • In a large bowl, whisk together the eggs, salt and pepper until blended. Whisk the cream and milk together till well mixed. Pour through a medium mesh sieve and into a pitcher.
  • Slowly and carefully pour the egg mixture over the mushroom bacon in the crust. Dot the top with butter pieces.
  • Bake the quiche until the top is lightly browned and the filling is set when you give the dish a gentle shake, about 35 to 40 minutes.
  • Transfer the quiche over to the wire rack and let cool for 10 minutes. Serve hot.
The whole family enjoyed the quiche very much. The flaky buttery crust, juicy mushrooms and the salty bacons with the creamy egg filling was delicious! My younger daughter had 2 helpings and kept asking me when will I bake it again. (*o*)''
I served the quiche with potato corn chowder. A simple and yet delicious dinner. ;)

Okay folks, hope you all have a good week ahead! Cheers!

Chicken & Brown Enkoi Mushroom & Orange Chiffon


The other day while I was shopping in town with my family, I happened to see this really lovely ingredient at the grocery department. Yes, it's lovely! It's almost like something you can find in the deep seabed....like a sea anemone. There were people crowding around the "demo lady" whom was cooking up the lovely ingredient and giving out free samples. I grabbed one and tasted it.....delicious!!! Well well, this ingredient is none other then the Enkoi mushroom. I am sure you have seen and tasted the white version before. However this time, what I saw was the brown Enkoi mushroom imported from Korea, quite special I must say. ;)
Without hesitation, I bought a couple back and was already planning how can I cook it. Since it was really fresh when I bought it, it would such a waste if I don't quickly use it soon. :P And I am sure you all know how mushrooms will become after a couple days sitting in the fridge. :oP So I decided to cook a simple dish; Saute Chicken and Enkoi Mushroom. This is a common dish which I am sure many of you out there have made it before at home.
Besides the enkoi mushrooms, I added some oyster mushrooms as well. :) Here is the recipe for Saute Chicken & Brown Enkoi Brown Mushrooms:

Ingredients:
300g chicken breast, sliced into bite size
1 pack of oyster mushrooms, about 250g
1 pack of brown enkoi mushrooms, about 220g (feel free to substitute it with white ones)
1 tbsp chopped garlic & shallots
Seasoning for chicken:
1 tbsp oyster sauce
1 tbsp light soy sauce
1 tsp Chinese cooking wine (绍兴酒)
a dash of pepper
1 tbsp corn flour
Seasoning for dish:1 tbsp oyster sauce
1 tsp soy sauce
1.5 tsp sugar
a dash of sesame oil
1 tsp cornflour + 1 tbsp water for thickening

Method:

  • Marinate the chicken pieces with the seasoning for it. Let it seat for at least 15 minutes.
  • Cut the brown enkoi mushrooms from their rooms and break up the mushrooms a little so that it won't be big chunks. Do the same for the oyster mushrooms, break the mushrooms into smaller pieces. Set aside for use later.
  • In a large saute pan, add some cooking oil and add the garlic and shallot in and cook at medium fire. Cook till fragrant and add in the chicken pieces. Cook till the chicken has becomes opaque and slightly brown.
  • Add in both prepared mushrooms, follow by the seasoning for the dish. Stir well and cover for 3 to 5 minutes. Add in the thickening mixture and cook for another 30 secs. Dish up and serve while it's still warm.
A simple enough and yet delicious dish that anyone can whip up anytime of the week. :) The brown enkoi mushrooms were actually smooth on the outside and still maintain its "crunch" and bite on the inside...excellent! Matching it with chicken and another mushroom was great because of its unique texture and flavor. :) I do hope you will try this brown enkoi mushrooms the next time you see it selling in the grocer next time. :) Enjoy!!
Another dish I want to share with everyone today is a simple Orange Chiffon cake. I have been wanting to try making another chiffon for a long time and that 2 oranges seating in my fridge just seems to answer my call. ;) I was actually procrastinating whether to post this up because it seems pretty common, but after the rave reviews I had from this cake, I decided to just post it.
Bakes a 20/21/22 cm tube pan
Ingredients:

(A)

4 egg yolks
100 ml. Orange juice

15 ml. water

85 ml. corn oil

80 gm. sugar

75g Cake flour

75g plain flour
3 gm. salt


Zest of 1 orange
 
(B)

5 egg white
80 gm. sugar

Method:
  • Sieve the flours twice and set aside. Preheat the oven to 170C.
  • Place the egg yolks and sugar over a heat proof bowl over a double boiler on a gentle simmer. Using a hand beater, whisk the mixture till foamy. Then add the juice and zest and continue to whisk till ribbon stage. Remove from heat and set aside to cool for later use.
  • In another bowl, beat the egg white and cream of tartar together till foamy. Gradually add in the caster sugar while the beater whisk at high speed. When it reaches stiff peaks, stop the mixer.
  • In 3 separate portions, fold the whites into the yolk mixture till all is combined.
  • Also in 3 separate portions, sieve the flour mixture into the egg mixture and gently fold in till all the flours are not visible.
  • Pour the batter into the prepared pan and give it a light tap on the table to remove some bubbles.
  • Bake in the preheated oven for 30 minutes or till golden brown and tester comes out clean.
On the first time I made this (without tasting it yet) I was a little worried that it will be too plain on its own. So I went ahead and ice the whole cake with fresh cream and top it with some orange wedges.
With the cream it was great and I realize the cake taste great on its own too! So after this first attempt, I modified the recipe (as above) and it turned out wonderful! I was really happy with it and made consecutive 4 times to share with my parents, my neighbors and my SIL.
The citrus aroma from the orange peel and juice was a such delight and very refreshingly light cake. A keeper I must say. Please don't hesitate to make this, it will become your family favorite. Even my younger daughter whom isn't very fond of chiffon cake, love it too. :D However from now on, I think eating it plain and no extra topping already suffice for me. ;) Try it and you will know what I mean. Have a great school holiday week with your kids! ;)


Wednesday, August 17, 2011

Purple Sweet Potato Bread & a" POPing" fun gathering

First, apologies for the long silence. Have been busy dealing with urgent matters and now that it's been resolved, I managed to have a breather or two. But again, I wonder if anyone missed me at all since now there are so many wonderful blogs out there. :P Nevertheless, I felt bad not putting up a post for the past 2 weeks and got worried that this tardiness might end up being a habit. ;P Anyway, I do hope my faithful readers will understand and still come by to support me when they can. :)

Today's recipe is Purple Sweet Potato Bread using the 17hr pre fermented dough technique. At first I thought the pumpkin version was my favorite, but now I can't decide which one is it after I baked this purple sweet potato version....it's equally good!
This loaf you are looking at is actually the 3rd time I've baked this recipe. Yes...its really worth repeating it so many times. :)
Here is the recipe that you all are waiting for:

Ingredients for Purple Sweet Potato Bread using 17hr pre fermented dough: (makes two 9X5X5)
Pre-ferment Dough:
377g bread flour
216ml water
11g fresh yeast (I used 8g active dry yeast)
5g salt
11g skim milk powder

Dissolve the yeast in water. Add bread flour, sea salt, skim milk powder and knead until soft. Cover the dough in cling wrap or a big zip log bag. Refrigerate to let it prove for 17 hours.

Note: The dough will expand in the fridge. So whatever container you put the dough in, do give some allowance for growth.

Main Dough:
162g bread flour
16g skim milk powder
5g sea salt
65g caster sugar
135ml water
5g fresh yeast (I used 4 g active dry yeast)
43g unsalted butter
269g mashed purple sweet potato

Method:
  • Knead all ingredients of the main dough together, except the butter. Add pre-ferment dough piece by piece. Knead after each addition until soft and smooth. Add butter. Knead until stretchable and pass the window panel consistency.
  • Put the dough into a big bowl. Cover with cling wrap and let it prove for 30minutes till double.
  • Divide the dough into 6 equal portions. Flatten each portion with your hands to drive the air out. Roll it into square shape, cover and let rest for 20 minutes before shaping.
  • Flatten the dough to drive the air out. Roll each out into a rectangular sheet with a rolling pin. Fold about 2cm from both sides towards the center and roll it out again. Roll the dough up like swiss roll (the width should be the same as the tin) and out them into the mould. Repeat for the rest of the dough portions. Cover with cling wrap.
  • Let it prove for about 45 minutes or until the dough has risen to 80 to 90% of the depth of the loaf tin. You can either cover the lid or bake it open top. If open top, brush with egg wash. Bake in 175C for 30 to 35minutes.
As always, this technique yields the softest and very bouncy "Q-Q" bread texture. The bread stayed soft even on the 3rd day. :) My kids love this bread a lot and I think the pretty color also plays a big part in that, lol! They would simply ask for a spread of butter and chomp it right down. :)
I guess by looking at the texture itself you can see the softness. So once again I recommend you try this out, you'll fall in love with it, I guarantee! :D
Even made some buns with seaweed and luncheon meat...for my kiddos breakfast. :)

Before I end this post, I like to say thanks to a group of wonderful bloggers that I had the honor to meet up over the last weekend. In no particular order, they are Grace, Jane, Jo, Edith, Eelin, Doris, ZhouYuan, Esther, Cathy and Jess. I was really glad to be part of this fun gathering which I felt at ease talking and exchanging baking fun with them. I do hope there will be more coming and soon. :) And special thanks to Eelin whom initiated the event and also Jo for graciously offered her lovely home to the gathering.Kindly visit these fellow bloggers on details of this event. :)

Thanks for coming by again. Hopefully will post up something yummy again soon. Have a great day all!

Thursday, August 4, 2011

Healthy Banana Oatmeal Crumble Cake

Decided to bake something healthy a couple days back, for my family and for myself. Haven't been eating that healthy lately with durian season going on, if you know what I mean. :D So I searched online and a few of my books and found this simple recipe that is for sure a healthy treat to snack on; Banana Oatmeal Crumble Cake.

This is a hearty and healthy cake and I feel it's not at all "heavy" snack. But it does fill you up after eating a decent slice as with the presence of oatmeal. So this cake is actually very good for breakfast since it fills you up nicely and prevent you from getting hungry before mid day.
I absolutely love the sweet crumble topping on this cake, it compliments the cake very well. The oats present in the crumble makes it slightly chewy and crunchy. :)

Ingredients for Banana Oatmeal Crumble Cake (Makes a standard loaf pan)
112g unsalted butter, room temperature
110g light brown sugar
2 large eggs, room temperature
1 tsp vanilla extract
1 cup mashed banana
60ml fresh milk
1/4 tsp salt
95g cake flour
1 tsp baking powder
1/4 tsp baking soda
1& 1/3 cup oatmeal (I used quick cook oatmeal from Quaker)

Oat Crumble topping:
3/4 cup oatmeal
50g butter, room temperature
50g light brown sugar
2 tbsp all purpose flour

Method:
  • Preheat the oven to 180C and grease a loaf pan and lined with parchment paper.
  • In a large mixing bowl, beat the sugar and butter together till light and creamy. Then add in the eggs one at a time and mix well.
  • Add vanilla extract and milk to mixture and incorporate. Then add in cake flour, salt, baking powder, baking soda and mix well. Lastly add in the oatmeal and stir in well.
  • Pour the batter into the prepared cake pan. Prepare the crumble topping by mixing everything together and thoroughly. Sprinkle the topping on the cake batter top and will be baked on together.
  • Then place cake to bake in the oven for 30 to 40 minutes with the tester comes out clean and the loaf is golden brown.
The cake was very moist with a nice banana fragrance and with the right amount of sweetness. I gave some to my sister and she loved it and asked me to bake some again next time. :) Even my kids whom are not fans of oatmeal, enjoyed too.

So there you are, another banana cake recipe....you can never have too many banana recipes in your baking repertoire. Enjoy folks!