Monday, October 31, 2011

Happy Halloween!

Halloween; A day you get to dress up and pretend to be someone else....fun. A day you can roam around the neighborhood and knock on them doors and yell "Trick or Treat!". A day you have all the excuse to stay up late. And of course a day you and your kids get to load up tons of candy and forget about cavity for once. So seriously speaking, what's not fun about Halloween?! None! I sure miss Halloween. It's never the same when I came back to Singapore....simply because its not a tradition to celebrate it here. The way the Americans celebrate this day, you will see how serious they are about it. And I simply love the enthusiasm they have!

And not wanting to loose "touch" with it completely, I made something fun today. Something that will cheer up any young or old. :) A pumpkin bread "monster". (^_^) *heehee*
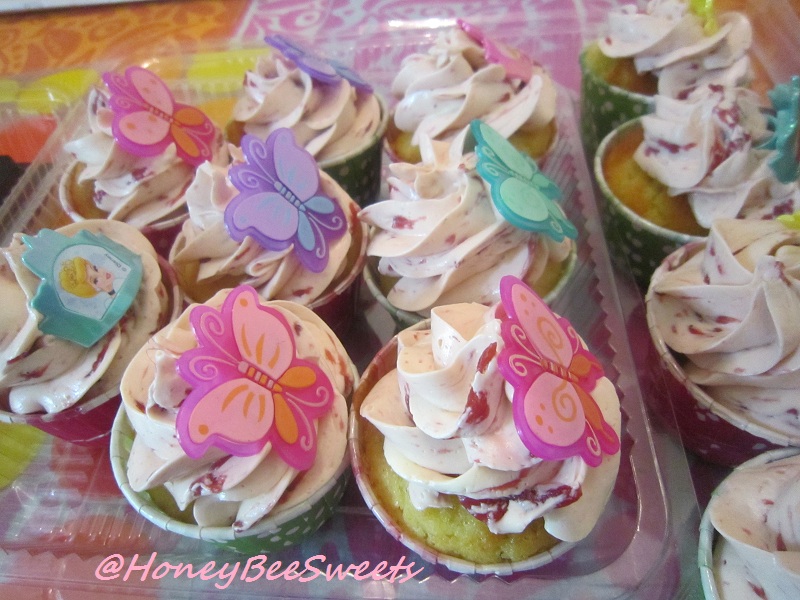
It took me awhile to come up with what I wanted to make. The initial plan was to bake some decorated cupcakes like what I did a couple years back. But since I made cupcakes for my kids a few days ago, I forgo the idea. Then I thought of baking a nice decorative Swiss Roll, but again that was way too much work! Then I happen to stumble upon this Chinese blog and fell in love with the idea of baking a pumpkin shaped bread!
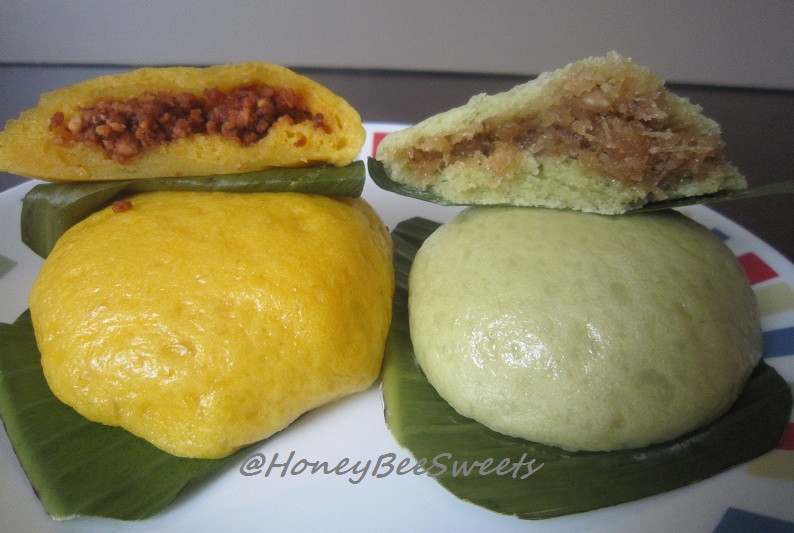
So I went ahead and used my 4 cup mini bundt pan for this instead of the usual 12 cup version....will be way too big if used the latter. For the recipe, I opted for the all trusty 17hr pre-fermentation method Pumpkin bread. And since I only have one mini bundt pan that is closely shaped like a pumpkin, I had to do the top and bottom baking separately. :P Good thing the color turned out the same...*phew*
As always, the bread turned out soft and delicious. And if you wonder why the bread appears much more orange in colour, that's because I added some edible orange food coloring to enhance the pumpkin look. ;)
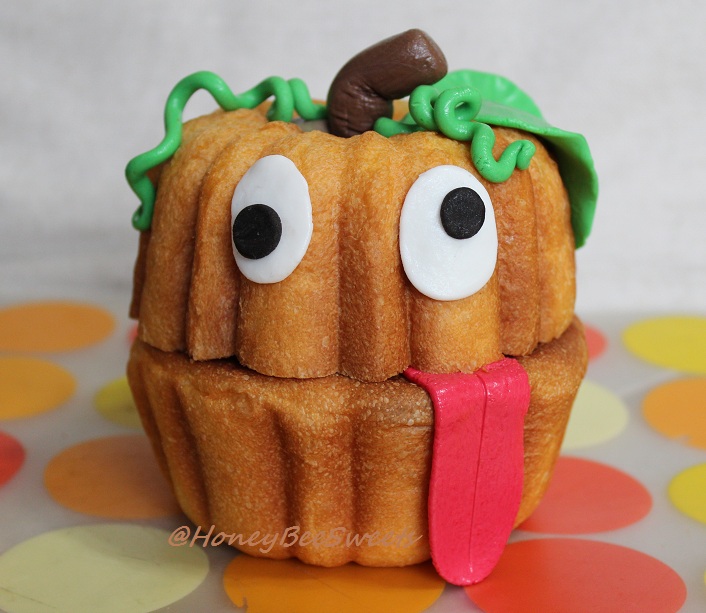
Since with just the bread itself, it looked kind of plain...not too Halloween if you ask me. So I decided to pull out my fondant stuff and add a little creativity and fun to it, heehee! It was fun! Just like the past occasion Halloween bakes! ;) My kids were amused too and kept asking if they can eat the fondant with the bread, lol!

I'm happy to submit this to Halloween Party Event hosted by Hankerie


The night is still young guys....hope you all will get in the Halloween mood and have some "scary" fun tonight! Happy Halloween Everyone!


Thursday, October 27, 2011

Pumpkin and Pandan Xi Pan (南瓜和班兰喜粄)

I am sure many Singaporeans like me are not very familiar with this kueh call Xi Pan (喜粄). When I saw this Hakka Xi Ban (客家喜粄) both in Reese and Wendy's blog, I was totally intrigued. I have never tasted it before since its not so common here in Singapore. And since it is the kueh theme this month, I figured why not make some to try it out. And since I couldn't decide which recipe to go for, I adapted both Reese and Wendy's recipe, but with the same starter dough. Not wanting to make it plain, I added pumpkin and pandan to enhance the flavoring.


Since I like my kueh with more flavorings, I fill them with roasted ground peanut and sweetened coconut filling. And I am glad I did, since the Xi Pan itself is only slightly sweetened, so with the filling is definitely a nice compliment.

Ingredients for Pumpkin and Pandan Xi Pan (南瓜和班兰喜粄)
Starter Dough:
180g cake flour
150ml water
1 tsp instant active yeast
Mix all the ingredients together and let it proof for 6 to 9 hours. I placed mine in an air tight container in a fridge overnight.


Main Dough for Pumpkin Xi Pan: (makes about 6)
120g pumpkin, peeled, steamed and mashed
70g glutinous rice flour
30g cake flour
1/4 tsp baking powder
50g caster sugar
2 tbsp cooking oil

Peanut filling:
150g roasted ground peanuts
30g confectioner's sugar
2 tbsp cooking oil to bind
Combine everything together and set aside for use later.

Method:
  • Combined starter dough with sugar and baking powder and mix well.
  • Add in the remaining ingredients and knead till dough is smooth. Brush some oil on the surface and let proof for 3 hours, covered.
  • In the meantime, cut out some banana leave square and brush them with a little cooking oil.
  • Once proofed, punch out the air and divide dough into 50g portions. Roll them flat and place a teaspoon full of the peanut filling. Wrap and seal tightly. Roll round and press gently down on to the prepared banana leave so it is like a flat disc. Repeat till all the dough is used.
  • Let the shaped Xi Pan rest for another 20 minutes before steaming.
  • Steam them for 10 minutes at medium low heat, remove and let cool before serving.
Main Dough for Pandan Xi Pan: (makes about 6)
50g cake flour

75g glutinous rice flour
62ml water blend with 5 strips of pandan leaves, strain and reserve only the liquid
60g caster sugar


Coconut Filling:
1 tbsp brown sugar
75g gula melaka, chopped small
1 tbsp water and 1 knotted pandan leave
150g grated coconut
1 tbsp sago soaked in 2 tbsp hot water for 10 minutes

In a heat proof sauce pan, add brown sugar, gula melaka, water and pandan leave and gently boil till the mixture thickens. Add grated coconut and stir till the coconut soaks up all of the sweet syrup. Add in the sago and water and stir till mixture is thick and no visible liquid. Let cool before use.

Method:
  • The steps will be exactly the same as the pumpkin version. But instead of adding peanut filling, add coconut filling instead.
Not sure why, but my pandan Xi Pan turned out better then the pumpkin ones. One batch of my pumpkin ones kind of "deflated" a little after steaming....suspect its the steaming water dripped over it or something. :P Only a couple of them were decent enough for pictures. :P
As you can see from the picture, once the pumpkin kueh's been cut using a knife, it shows how gummy the texture is. But if torn like the pandan one, it still shows a little of the fluff texture. Personally not too fond of the gummy texture....much prefer the bao more then this. ;P
Part of the reason why I made this was to bring some for my mum, since she loves kueh, especially coconut filling ones. :)) She told me she hadn't seen and tasted Xi Pan before....guess it is really uncommon around here. :P Good thing she said it's pretty good...*phew*...or perhaps she just being nice, lol! Either way, I'm glad I give it a try, else I might not know how a Xi Pan taste like. ;)


Have a great coming weekend! Cheers All!

Sunday, October 23, 2011

Loh Mai Chi (糯米糍)

In case any one of you have no idea what is Loh Mai Chi(糯米糍), it is actually slightly sweetened glutinous rice kuehs encasing sweeten roasted ground peanuts. The kueh is pretty similar to mochi texture, but its softer and probably much more sticky due to its higher ratio of water. And because of that, it is very hard, at least to me, to make this kueh. I kept telling myself as I was shaping and wrapping the peanut fillings; Why did I get myself into this "sticky situation"?! Lol! So naturally, I didn't do a good job making these...almost a quarter of them ended up badly wrapped and into my mouth!! Well at least they still taste good. ;)
As you can see, these balls are not exactly picture perfect but trust me, they are the most presentable ones I made, lol! I only made half the recipe, so it only yields about 12 balls, not a lot of room for practice if you know what I mean. :P
I got this recipe from the book "Agnes Chang's Hawkers' Delights", one of my favorite kueh / local delights cookbook. :) But I think next time I might reduce the amount of water added so that it won't be that sticky to handle. :P But again, the texture is really soft and nice....

Ingredients for Loh Mai Chi (糯米糍): (makes about 24)
250g glutinous rice flour
500ml water
80g sugar

Filling:
500g toasted peanuts, skin removed and grounded
100g toasted sesame seeds, grounded (I omitted this)
150g icing sugar, sifted

Mix everything together until well combined.

Flour for coating:
500g rice flour (I used only 200g)
The book suggested to fry the flour till very dry and then let cool. But I just microwave 3 times at high for 1 minutes.

Method:
  • Skin: Mix all the ingredients until well combined. Pour into a greased steaming tray and steam with medium heat for 45 minutes (I only steamed 20 minutes) until cooked.
  • Leave to cool and pour into the rice flour for coating. Then using a greased scissors, snip it into 25 equal portions.
  • Take a portion of the cooled kueh and flatted into a disc. Place a teaspoon worth of peanut filling in the center and wrap it up by sealing the ends properly.
  • Then coat it again with the rice flour before putting it into small paper liners.
Because the peanut filling is a like a loose pile(no oil or water added), its so hard to place it neatly and seal the dough. So when I see how nicely some of the fellow bloggers made these yummy kueh....envy envy! I guess the only way is to make them again and practice more!
I love this shot, a generous amount of peanut filling...I like! If you are a peanut lover like me, you have got to make this. It's like peanut filled mochi, nice! :D You know if you can't shape it like you want it, just snip up the kueh and roll them in the ground peanuts and eat them like Muah chi, haha! I bet it's equally good. ;)


Okie dokie, got to go. Hope you all have a great week ahead! Cheers!

Wednesday, October 19, 2011

Purple Sweet Potato and Pumpkin Ang Gu Kueh II

After seeing so many wonderful kueh posts from fellow bloggers, I felt that I have better put up my Ang Gu Kueh post before it becomes "stale", heehee. (^o^) Its funny that I was actually planning to make it way before knowing about this month's theme. Have been craving for some lately. And I know it will bring back some fond memories of the day which I first made it with my dear friend Reese back in KL. :) Thanks for such a great recipe Reese! Using that recipe, I made pumpkin kueh with mung bean filling and purple sweet potato kueh with yam filling.
Its so unlike me to pass on not making peanut filling for the kueh. But due to time constraint and not wanting to spend so much time in the kitchen rather then with my kids, I just settled with mung bean and yam filling this time. *sigh* Hopefully I will get some time after the exams to make a big batch of roasted ground peanuts!
But of course the mung bean and yam filled ones are still delicious, so no worries there. :) I have added the recipe here for my easy reference in future:

Ingredients for Pumpkin & Purple Sweet Potato Ang Gu Kueh:
Mung Bean Filling:
250g mung bean, soaked for at least 2 hours
130g caster sugar
4 to 5 tbsp vegetable oil

Drain the mung beans and discard water. Place the mung beans in steamer and steam at medium high fire for 20 to 25 minutes till soft. While still hot, add in the caster sugar and oil and mash in well. Once the sugar has melted, blend the mixture till smooth and let cool completely before use. You can make this a day ahead and chill in fridge or freeze them if you make it more then 3 days ahead.

Yam Filling:
250g yam, steamed and mashed
120g caster sugar
1 tbsp skim milk powder
3 to 4 tbsp cooking oil

Similar to above mung bean filling method.

Kueh skin using Pumpkin / Purple sweet potato:
200g steamed and mashed pumpkin / sweet potato
300g glutinous rice flour (I used 10g more for pumpkin skin)
1 tbsp rice flour
2 tbsp caster sugar
3 tbsp cooking oil (I used 4 tbsp for sweet potato skin)
200ml water (I used an extra tbsp for sweet potato skin this time) 
  • In a large mixing bowl, knead all the ingredients together and gradually adding the water as per needed. The dough should be a soft pliable dough but not stinky.
  • Cover the dough and let rest for 20 minutes.
  • In the meantime, rinse the banana leaf with hot water and dab dry it. Cut out oval shapes slightly bigger then the kueh size. You will need 24 for this recipe. Brush with some vegetable oil on the surface.
  • Divide the dough into 24 portions and roll round. Then take one portion and place about 1 heaping tbsp of filling in the middle, then wrap and seal nicely. Place in the mould which is slightly dusted with rice flour and press down with some pressure.
  • To unmould, knock on the side of the table and let the kueh gently fall out on to your palm. Place kueh on cut out banana leaf and into the steamer. Repeat till all the kuehs are moulded.
  • Steam at medium high heat for 10 minutes. Brush some cooked oil over the surface of the kuehs to prevent sticking.
I only made half recipe for each root vegetable but was enough to satisfy me, heehee. :D I love both filling! Good thing I didn't make peanut ones, else I would be eating way too much, lol!

Okay, got to go. Hopefully will post something up again real soon. Take it easy all. Cheers!

Monday, October 17, 2011

Happy Birthday to my little girl

It has been a crazy busy week for me and it always happens when it's around my kids' birthday. Besides making a special fondant cake for the family celebration, I had to prepare cupcakes for her school celebration as well. Although it is a lot of work, but I gladly do it for them since it's my gift plus I love working with fondants! Lol! Besides, how many more years will they be thrilled over my homemade cakes? Not too many I guess. :P Anyway, this year my little one has requested for a Smurfette Cake for her birthday. At first I was kind of lost on how should I do it, but after some research and help from a couple of good friends, I manage to get this done:
I am sure many of you have come to know about Smurfs when you were young. It was again popularized recently with the phone / IPad App game and also the recent The Smurfs movie. However my girl got to love Smurffette was neither of those but was from the free toy she got from her McDonald Happy Meal. :P

I did not do a good job on the cake, so much to brush up on. I guess I did not give myself enough time for the buttercream to set before covering the cake up with fondant. So it wasn't as smooth as I hope it would be. :P Good thing its for my own girl, lol! Guess I need more practice! Comparing with last year's Tinkle Bell cake, which one do you think is better?
I took my friend's recommendation and used a chocolate bundt cake recipe plus a yellow buttermilk cake recipe from Martha Stewart. These cake are much more sturdy then the ones I used previously. But because the family has been so used to fluffy cakes, they were not too keen on these denser cakes. :P Conclusion? Its so hard to please everyone! (=_=")
For my girl's class celebration. I used just the yellow buttermilk cupcake recipe and top them off with Chocolate and Strawberry Swiss Meringue Buttercream. Not forgetting to add a little fun by placing a princess or butterfly toy ring on each cupcake so the kids can keep them as a souvenir after enjoying the cupcake. :)
My daughter ended up enjoying the cupcake more then the Smurfette cake. Why? I guess she gets to have the ring to play with, whereas the smurf cake was merely for viewing and eating pleasure only. :P I too love the SM buttercream and yellow cake combo too, think I will use it again next time I'm baking for such occasions.
Her classmates love the cupcakes too! Saw them happily licking off the delicious buttercream and munching on the soft yellow cake, a satisfaction that is hard to describe. :) My little girl came to me today and gave me tender a hug and softly said. "Thank you mummy for making my birthday cakes." Priceless. :)

Another Mummy mission completed. :) Overall contented with the results, but could be better. :P Thanks folks for staying to read my post. Hopefully will get time to post up some kueh recipe soon. :) Till then, have a great week ahead! Cheers!

Sunday, October 9, 2011

Kueh Talam Cendol

It's been ages since I last made any kuehs in the house. It's no surprise as my kids aren't really fans of any nonya kuehs, except for kueh lapis. I came to know and taste Kueh Talam when I was in Malaysia which I had loads of fun making it together with a few of my good friends there. Although I have to admit I wasn't too crazy about kueh talam, but getting to make it sure brings back some fond and nostalgic memories of the fun days I spent with my friends in KL. I decided to make a little twist to the usual recipe and make Kueh Talam Cendol instead.
Personally I love cendol, very much. :) But because of the high sugar and coconut content, I try to minimize eating it. In fact I can't remember the last time I had a bowl! So it seems like the right timing to try out this new talam cendol to satisfy my cravings. :)
Okay, I admit, I suck at slicing the kuehs. But it's so delicate, its really no easy task! Even laying it nicely and taking the photos took me quite awhile to accomplish, not to mention to capture a decent shot. (^_^") So please close an eye when you view the photos, it'll some what look better, heehee.

Ingredients for Kueh Talam Cendol: (makes a 7"X7"X3" or 8"x8"X3" square pan)
Bottom Layer:
600ml thick coconut milk
400ml water
1 tsp salt
100g rice flour
40g green pea flour
60g caster sugar
250g cendol, drained
  • In a saucepan, add in all the ingredients except the cendol. Place it over the stove at medium low heat and stir constantly with a whisk.
  • Cook the mixture till it thickens, slightly thinner then condense milk consistency. Immediately remove from fire and pour in the drained cendol. Stir well and pour it into a greased prepared square pan. (either 7"X7"X3" for a taller version like mine or 8"X8"X3")
  • Place the pan into the steamer and steam at medium high heat for about 20 to 25 minutes till it sets.
Top layer:
120g rice flour
30g green pea flour
150g gula melaka, chopped into fine bits if using blocks
100g dark brown sugar
1/2 tsp alkaline water
1000ml thin coconut milk (400ml thick coconut milk + 600ml water)
  • In another saucepan, add in all ingredients in and heat over medium low heat.
  • Cook till the mixture thickens as well, slightly thinner then condensed milk consistency. Pour the mixture over the already set cendol layer.
  • Steam again at medium high heat till the top layer sets, about 30 minutes.
  • When done, remove from steamer and let cool completely before slicing. Or you can chill the whole block for 2 hours before slicing it to get nicer cuts. (Don't make the same mistake as me. :P)
Although the gula melaka scent was not as strong as I wanted it to be, it still turned out to be quite a tasty kueh with a well balanced taste. The bottom layer is slightly salty with the sweet gula-coconut scent on top. Although the top layer is a little softer then the bottom, it some how balanced it off giving it a different textured taste in the mouth. Even my"not-too-keen" on kueh kids also had a slice each. ;)

Overall quite an easy desert to whip up. And there are also quite a number of ways to incorporate different ingredients into it, like Tapioca, glutinous rice and even sweet potatoes! Do try!


Okay, gonna keep this post a short one. Will be posting a little less in the coming 2 weeks as I'll be busy with my kid's birthday & exam. Hope you all had fun and thanks for staying tune!

Tuesday, October 4, 2011

Chocolate Macarons with Strawberry Compote Buttercream

Frankly speaking, up to a week ago, I was no fan of macarons. But if you offer me those from Canelé Pâtisserie, I'll gladly gobble them up lol! But seriously, a small cookie that probably fills a third of your mouth cost around S$3? If you don't want to pay that kind of money just to have an exquisite cookie, baking it yourself will be a wise alternative. Since my "not so good" experience more then 2 years ago, I've shelved the idea of baking a macaron. But lately the "mac fever" seems to be back again and I began to feel a little envious of all those beautiful macaroons my fellow bloggers baked. Then Wendy justified that the recipe from Swee San was not overly sweet and tasted wonderful, I decided to give it a go...again. :) Good thing I did!
What you see is actually my first attempt using Italian Meringue method, not bad huh?To prevent any failures, I literally had to study the recipes way ahead and seek advice from the experts before baking it. Fortunately it turned out well. This shows that preparation work is needed, don't just plunge into it. Although my macs may not look as nice as some of the other bloggers', it still look decent enough. :) But I find the colour for the chocolate shells a bit weak, have to up some more of that cocoa powder. :P

Prior to this, I did bake a batch of Dark Chocolate Macarons with Chocolate Swiss Meringue Buttercream using the French technique by David Lebovitz. It came out "feetless" and with cracks all over. I was pretty disappointed but figured its because I didn't let it rest and the oven temperature was way too hot (David's recipe stated to preheat oven to 180C ?!). But my family some how just loved those cracked macarons to bits, lol! I guess crack or no crack, feet or no feet, it still tasted good. :) But to satisfy my "needs" to get it right, I did the Italian Meringue method. (^_^)


Here is the recipe for my future reference:


(For detail pictorial steps, please refer to Swee San's post)


Ingredients for Chocolate Macarons with Strawberry Compote Swiss Buttercream


Macaron shells:


100g finely ground almond


100g confectioner's sugar


1 tbsp Valrohna cocoa powder (I will up this to 2 tbsp next time)


40g fresh egg white


pinch of salt


100g sugar


25ml water


34g aged egg white (I left it in the fridge for 2 days)


Method:

  • In a blender, finely ground the almond powder and confectioner's sugar together till powdery like. Then pour it into a bowl and sieve in the cocoa powder. Then mix in the egg white and salt. Stir and mix well. Mixture will be thick.

  • In a saucepan placed over medium fire, heat up the sugar and water. Once the sugar has all melted, place your candy thermometer in and monitor it till it reaches ~108C. Once it reaches 108C, beat the egg white at high speed till it reaches soft peaks, which by then the temperature should be close to 118C.

  • Slowly drizzle the sugar syrup into the egg white while the mixer is still at medium speed. Once all the syrup is in, continue to beat till the meringue is glossy. (Mine was a little "slacky" as Wendy mentioned in hers too, lol!)

  • Fold in 1/3 of the meringue into the almond meal mixture. Since the almond mixture is thick, you'll need to stir harder to incorporate it well. Repeat the other 2 portions and fold in gently.

  • Scoop the batter into a piping bag with an 10mm nozzle. Pipe out on a baking tray lined with baking parchment paper. Let rest for 10 minutes while you preheat the oven to 150C with fan off.

  • After 10 minutes, bake the cookies in the oven for 14mins.

  • After baking, remove from oven and let cool completely before peeling off.


Strawberry Compote Swiss Meringue Buttercream:

100g fresh strawberries, cut into small chunks


1 tbsp caster sugar

1/2 tsp lemon juice

100g Swiss Meringue Buttercream (I followed Wendy's recipe to the dot, please refer to her post)


In a saucepan over medium low fire, add in the chopped strawberries, sugar and lemon juice. Cook till the strawberries has soften and juice that oozed out has thicken slightly, about 5 to 8 minutes. Let it cool completely before mixing in the buttercream. Scoop the buttercream into piping bag a pipe on to the cooled macaron shells.


I realize I always overfill my cookies. Nothing wrong with that I suppose, in fact I find it tastier, lol! Indeed a pretty addictive cookie to bake once you attain some good results. The possibilities of flavors....mmmm! But in the meantime, I'll just stick to these chocolate / strawberry flavor since these are my kiddos favorite. My kids said "Mummy, these are the most delicious cookie in the world!" Hmmmm.....(^_^"). Although the macarons are still sweet to me, I find that with berry compote buttercream, it sort of mellow out the overall sweetness. :)


I want to thank Swee San and Eelin whom took the time to write to me to explain a thing or two about macarons. ;) Okay folks, thanks for staying and reading my post. Hope you all have a great day! Cheers!