Showing posts with label pancakes. Show all posts

Saturday, March 30, 2013

Roti Jala, MFF featuring Johor

Finally! I managed to squeeze out sometime today to make something in support for this month's MFF, featuring Johor. Must support must support...many of my blogger friends doing it, so must give face, lol! Since I was pressing for time, I chose one of the easier recipes to tackle, which is of course Roti Jala. Although I still had to cook the curry to go with it, it was still worth the effort when you dip and bite that first mouth, yummy!
Actually I had quite a lot of fun making these thin crepes...even my little one was very excited and helping me out, haha! :D It's like free form crepe making...squiggling the batter around the pan, haha! And since I did not have that special roti jala tool that helps drizzle the batter, I used my handy dandy squirt bottle, heehee..
This squirt bottle has been used mainly for my desert recipes, I am happy that it actually work beautifully with this roti jala recipe...save some $$, lol! Plus the recipe is super easy! The only troublesome part is straining the batter and scooping it into my squirt bottle. :P Here is my version of the roti jala recipe:

Roti Jala (Makes about 16 to 18)
130g plain flour
1/2 tsp salt
2 large eggs
250ml coconut milk / fresh milk
1 tsp turmeric powder
  • In a large mixing bowl, beat the eggs and coconut milk together till well combined. 
  • Sift in the plain flour and salt and stir well with whisk till it is completely incorporated and forms a thin batter.
  • Strain the batter through a sieve to catch any lumps, but you can skip this step if you have the roti jala tool, seems like those that uses it has no problem not sieving. 
  • Heat up a pan at medium low fire, and squirt batter over it...at free form! 
  • It takes only 20 to 30 seconds for one of these thin crepes to cook, so be watchful. And you do not want to over cook them as they become crispy...which I think will be hard to fold later.
  • Once you see the surface starts to dry out, quick dish out. There is no need to cook the other side...I find the texture just right .
  • Repeat until all the batter has been used up. Serve while still warm with curry of your choice. Yummy!
If you ever hesitate about making this, don't! This is such an easy recipe to whip up, I'm serious...not to mention the fun I had too, haha! And when you dip into that creamy, spicy curry, it is awesomeness to the max!! You can opt for a healthier version by using only fresh milk instead of coconut milk but bare in mind it will not be as fragrant.
 I love how the tumeric powder gave it it's light golden shade....and thankfully it didn't contribute much taste to it, else my little ones will be complaining, haha! And you see those yummy pumpkin chunks in my curry? Those are the bomb! It's Japanese pumpkin, slightly expensive but so sweet and smooth....so glad it went well with my chicken curry. Make sure you add some pumpkin too next time if you are a pumpkin lover like me, heehee!


Okay, I am super happy to finally submit this one post to this month's Malaysian Food Fest ( Johor Month ) hosted by Annie of Annielicious Food. Yay!!!

Have a great weekend everyone...before it's over! Cheers!

Saturday, December 10, 2011

Melbourne trip 2011 Part One & Banana Oat Pancakes

Melbourne, capital of the state of Victoria in Australia. One of the places that I have eyed on for awhile to visit. My family and I finally made a trip there and it was a wonderful experience and a nice get away indeed! Mid November's weather is like Spring to Summer season, so the temperature was really nice too! In our stay, we got to experience both the colorful city life in Melbourne as well as some quiet stay in the nearby seaside cities which is only a couple hours drive away. However I realize  I didn't really capture many nice pictures this time....perhaps I was too busy taking care of my kids, lol! Anyway, bare with me and hope you will still enjoy viewing them. ;)
Flinders Street Station is the central railway station of the suburban railway network of Melbourne.
(GPO) General Post Office Clock Tower, one of the prominent buildings in the CBD area.
One of the highlight in Melbourne is a visit to their famous Queen Victoria Market.
An abundance of fruits all over the market. Not only that, it sells all sorts of stuff over there too! I even heaved back a 10 inch pie dish, 4 ramekins & a 24cm cast iron roasting dish! Why? Because it was so cheap...the cast iron roasting dish only cost me AUS$24.90! Ok ok, will show you all once I cook up something with them. After I returned to the hotel then I realised that I've forgotten to take pictures of the store. It's located in the far end corner of the market. Haiz...gotten too excited about my purchases!
A showcase of Artisan breads there. Looks good isn't it, but I didn't get any since I decided to eat this instead....

How good does this look?! I realize that Aussies love their bacon and ham...I have at least one serving of bacon or ham every other day...:P Yum!


It wouldn't be right if you don't get to see a real koala when you are in Australia. In fact that is basically what my kids wanted to see most of the time while we were there. (*_*)"
It took me so long to get this shot. Some koalas simply just shy away from the cameras and it seems ages before they move an inch. :P
Since this trip was a visit to a koala conservation center, the animals are always at a safe distance from the visitors. So seeing them through my camera lens is as"close" as it gets. :P
Look at this cuddly cute baby koala bear! It's sleeping so comfortably in it's mummy's arms. (^_^)
I'm sure anyone that had been to Phillip Island before knows about the "No photography" rule on the penguins when they do their "penguin march" back to their young on land. But we were so lucky that we spotted one baby penguin the day after! Good thing it was bright day light, so no flash was used, heehee!
The Nobbies, one of the most breathtaking spots we visited.
Caught my little one gazing out into the blue ocean. Wonder what she is thinking...
These eye catching and colorful boat sheds are at the lovely beach in Mornington, a small seaside town. I love how quiet this place is, there are only a handful of people at the beaches there on a weekend afternoon. And those 3 are my husband and kids!
We are practically the only people there. (^_^) Finding such a nice, clean, quiet beach is like finding a treasure...I love it!
We even found small starfishes near the beach sides! No worries, no sea creatures were harmed in the "making" of this post, hehehe..
On our ferry ride from Mornington to Sorrento, Queenscliff, we actually saw dolphins swimming along side the ferry! It's too bad I didn't have my camera with me. (-_-) Sorrento is yet another small quiet town with many gracious old buildings, definitely a nice place to get away from the hussle and bussle of city life.
We stop at this really nice place call The Pear Cafe for lunch. Love the ambiance there. 
Warm toasty bread with steak ham and juicy tomatoes plus gooey mozzarella....a simple and satisfying lunch.
Best of all, with a cup of Mocha. Frankly speaking, I'm not a coffee person, but this cup of Mocha is super yum! It's creamy rich, fragrant and chocolaty (yes, chocolaty). Hmmmmm!

Before I keep going on with more photos of my trip, I think I should save it for my next time. Else this post will be super long! More photos will be posted next time with scenes from the Great Ocean Drive! So stay tune!
What's a food blog without any food?! So here it is; I want to share with you all a simple, delicious and healthy breakfast that you can easily whip up for you family; Banana Oat Pancakes.
I got this recipe from the special edition of "The Australian Women's Weekly Christmas Entertaining 2011" magazine. I usually love to buy the local food magazines whenever I go traveling, and Women's Weekly is definitely one of the good ones to get.
These pancakes are so so good! You would think that oats will make the pancakes heavy, but no, oh no, they are light and creamy, almost melt in your mouth! Really! I was a little worried my kids will shy away from them because of the oats, but luckily, they each had 4 pancakes...doubled what they usually have. ;) I did slight modification to the recipe, here is my version:

Ingredients for Banana Oat Pancakes: (serves 4 adults)
375ml fresh milk
80g unsalted butter, cut small
100g quick cook oats (original calls for 140g)
60g plain all purpose flour (original calls for 50g)
40g brown sugar (original calls for 1 tbsp)
1.5 tsp baking powder
1/2 tsp salt
pinch of cinnamon
2 egg,s separated
1 tbsp cater sugar
1/2 tsp pure vanilla extract
3 small bananas, about 150g (original calls for 340g)
cooking oil or butter
butter, maple syrup and fresh fruits to serve together
  • Combine the milk and butter in a small saucepan over medium heat until the butter melts and bubbles appear around the edge. Remove from heat and stir in the oats. Set aside for 10 minutes.
  • Sift flour, sugar, baking powder, salt and cinnamon into a medium bowl. Whisk egg yolks and vanilla extract into oats mixture; add flour mixture and stir until just combines.
  • Mash bananas; fold into the pancake batter. Beat the egg whites with 1 tbsp of caster sugar till stiff peaks, then fold into the oat mixture until just combined.
  • Heat a large non-stick frying pan over medium heat; spray with cooking oil to grease. Drop 1/4 cups (60ml) of the batter onto the pan; cook for 2 minutes each side or until cooked through and browned both sides. Remove pancakes from pan; cover to keep warm. Repeat with remaining batter. Serve while still warm.
I love oats, so these pancakes are perfect for people like me. :) I'm not exactly a health freak, but if you are...better still, you'll love it! It's that nutty, creamy taste from cooked oats that's just so good! You gotta try this out and you will know what I mean. And I am very sure these pancakes will be on my breakfast plate very often from now on. :)

Okay, hope I didn't bore you all with my super long post! Have a good weekend all and stay tune to my next post. ;) Cheers!

Thursday, August 4, 2011

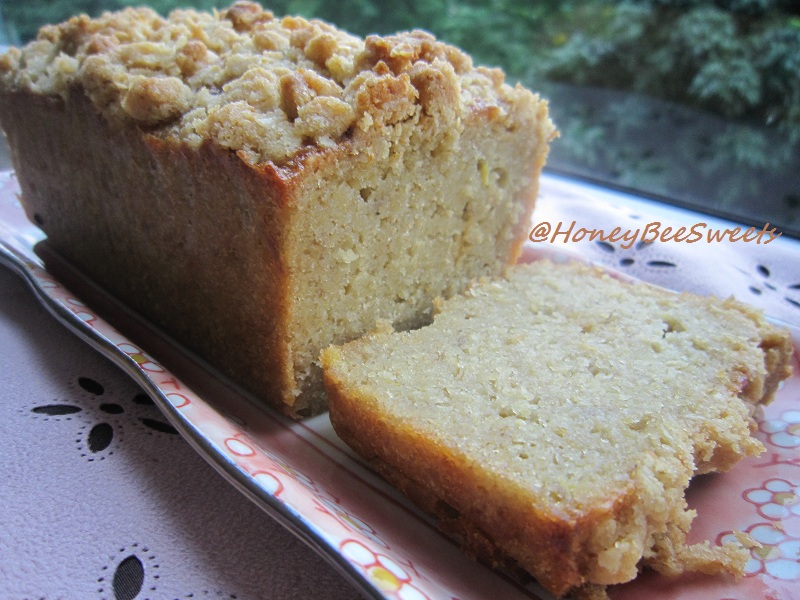
Healthy Banana Oatmeal Crumble Cake

Decided to bake something healthy a couple days back, for my family and for myself. Haven't been eating that healthy lately with durian season going on, if you know what I mean. :D So I searched online and a few of my books and found this simple recipe that is for sure a healthy treat to snack on; Banana Oatmeal Crumble Cake.

This is a hearty and healthy cake and I feel it's not at all "heavy" snack. But it does fill you up after eating a decent slice as with the presence of oatmeal. So this cake is actually very good for breakfast since it fills you up nicely and prevent you from getting hungry before mid day.
I absolutely love the sweet crumble topping on this cake, it compliments the cake very well. The oats present in the crumble makes it slightly chewy and crunchy. :)

Ingredients for Banana Oatmeal Crumble Cake (Makes a standard loaf pan)
112g unsalted butter, room temperature
110g light brown sugar
2 large eggs, room temperature
1 tsp vanilla extract
1 cup mashed banana
60ml fresh milk
1/4 tsp salt
95g cake flour
1 tsp baking powder
1/4 tsp baking soda
1& 1/3 cup oatmeal (I used quick cook oatmeal from Quaker)

Oat Crumble topping:
3/4 cup oatmeal
50g butter, room temperature
50g light brown sugar
2 tbsp all purpose flour

Method:
  • Preheat the oven to 180C and grease a loaf pan and lined with parchment paper.
  • In a large mixing bowl, beat the sugar and butter together till light and creamy. Then add in the eggs one at a time and mix well.
  • Add vanilla extract and milk to mixture and incorporate. Then add in cake flour, salt, baking powder, baking soda and mix well. Lastly add in the oatmeal and stir in well.
  • Pour the batter into the prepared cake pan. Prepare the crumble topping by mixing everything together and thoroughly. Sprinkle the topping on the cake batter top and will be baked on together.
  • Then place cake to bake in the oven for 30 to 40 minutes with the tester comes out clean and the loaf is golden brown.
The cake was very moist with a nice banana fragrance and with the right amount of sweetness. I gave some to my sister and she loved it and asked me to bake some again next time. :) Even my kids whom are not fans of oatmeal, enjoyed too.

So there you are, another banana cake recipe....you can never have too many banana recipes in your baking repertoire. Enjoy folks!

Tuesday, January 4, 2011

Fluffy blueberry pancakes


Happy New Year my dear readers and fellow bloggers! I trust that you had a great Christmas and New year celebration this year. :) Well, it's been weeks since I last posted on my blog. Sorry for my MIA, been away on vacation in California and now finally back and about and eager to keep up with what I've missed out. :) Frankly speaking, I was kind of lazed back and it did take me quite a bit of "effort" to post this up, lol! Guess the holiday mood in me hasn't completely go away...no surprise in that! Furthermore the jet lag is killing me, struggling with the right hours without dozing off. :P And today is a BIG day, first day of school again! Have been busy getting my kids ready for it...so with all these "excuses", it's no wonder I've been gone so long, ha!

Today I just want to start the year off with a simple blueberry pancake which can just be a great start to your new day in this new year. :) Pardon this weird & odd shape looking pancake, lol! I was actually trying my best to make it look like a Mickey Mouse head shape pancake...somehow the batter was not very obliging. :P Perhaps I should have tried out a slightly "thicker' batter rather then this version, it was pretty runny. However the end product was really fluffy and soft, no doubt about it. :)
Since I have sneak back a good 2 pounds of fresh blueberries back from California (yes, even during Winter they have it), its really a no brainer to make these pancakes. ;) I got the recipe from William Sonoma's Comfort Food cookbook and it's really quite simple to prepare. Here it is:

Ingredients for Blueberry Pancakes (serves 4)
1 & 1/4 cup All purpose flour
3/4 tsp baking soda (I reduced it to 1/2 tsp)
1 & 1/2 tsp baking powder
2 tbsp caster sugar
1/4 tsp salt
1&3/4 cup buttermilk
2 large eggs
3 tbsp melted unsalted butter
2 cups fresh blueberries (frozen is fine too)
Maple syrup and butter for serving

Method:
  • Preheat oven to 200F. In a large bowl, sift together the flour, baking soda, baking powder, sugar and salt.
  • In another medium bowl, whisk together buttermilk, eggs and the melted butter. Pour the butter milk mixture into the flour mixture and stir till just combined. Fold in the blueberries. Remember DO NOT over mix the batter.
  • Place a griddle over high heat until hot. (To test, flick a little water onto it. It should skitter across the surface) Lightly oil the griddle. I used a normal non stick pan and it was okay.
  • For each pancake, pour about 1/4 cup of the batter onto the griddle and cook until bubbles form on the surface, about 2 minutes.
  • Flip the pancakes and cook for another 1-2 minutes. Transfer to a baking sheet and keep warm in the oven. Repeat till all the batter is used.
  • If batter starts to thicken, thin it a little with more buttermilk.
  • Serve the blueberry pancakes piping hot with lots of maple syrup and butter. Yum!
Noticed that Mickey's pancake mould. Yeah, got it in Disneyland during vacation. Not sure is it me not being familiar with the usage with these type of mould or the batter is runny...the pancakes just didn't turned out that nicely shaped.
Perhaps I need more practice. ;P Anyway, before I can snap a few more pictures, my kids were already gobbling the pancakes up...so I just had to settle with what I have. :P Perhaps looks ain't that important after all huh? But I am sure glad it was a delicious breakfast! :) Try it and enjoy!
Since I didn't really take enough decent looking photos during my vacation, I figured just skip that altogether and just share with everyone a video I took in Disneyland. It's actually a wonderful firework show during Christmas Eve. Even though it was freezing cold that night and my family and I were huddling together... watching this firework was still a true magical experience. :) Hope that watching it will bring a smile to your face. :)


Before I sign off, I just wanna wish you all a great and smooth year 2011 ahead. No matter what happens, take it as it comes with an open heart and may you iron out any rough patches along the way. Cheers all! Have a good week! ;)

Monday, July 27, 2009

Asian Pancake / Mian Jian Kueh

Mian Jian Kueh or Asian Pancake as some of you might call it, is one of the favorite snacks that I grew up eating. I remember I would be the first in the family to munch it up every time my mum buys it fresh from the market in the morning. So it comes to no surprise that I will eventually make this delicious treat at home. Well, maybe the delay is due to having no confidence in finding and trying out a good recipe. Since I have tasted very good ones in Singapore....which are the store bought ones of course, so that kind of discouraged me even further, haha! Anyway, this lazy Sunday morning with nothing in particular to do, I decide the time has come for me to finally to do it.
Some of you readers out there must be going like....err why is it so flat? Well, I got the recipe from Baking Mum but I did made some changes to the ingredients (maybe that's why!) but strictly follow the steps, even allow it to proof for 2 hrs before using. But in terms of taste and texture, it's still good, so I was not totally disappointed. :)

So for my own reference in the future, here is my recipe:
Ingredients forMian Jian Kueh:
Pancake batter:
300g Hong Kong flour
20g Tapioca flour
5 tbsp caster sugar
1/2 tsp salt
1 tsp alkaline water
1 tsp instant active yeast

Cheese Filling for the pancake:
3 wedges Laughing Cow cheese
2 ripe small bananas
  • Slice the cheese wedges into thinner slices. Also slice the banana, length wise .
Chocolate Filling for the pancake:
60g Lindt chocolate (70% cocoa), chopped small
1 tsp light corn syrup
(Alternatively, you can use Nutella)

  • Melt the chocolate in double boiler with the light corn syrup till smooth. You can add 1 tbsp of caster sugar if you prefer sweeter version.

Peanut Filling for the pancake:
4 tbsp Organic creamy peanut butter (no sugar added)
2 tbsp ground roasted peanuts
(Alternatively, you can use chunky peanut butter)


Method & Assembly:

  • Mixed all ingredients for the pancake batter together in a large mixing bowl.
  • Let batter proof for at least 2hrs before use.
  • Heat up a non-stick frying pan of at least 15 inches wide. Cooking oil is optional is your pan is non-stick.
  • Add 1/3 of the batter into the pan at low to medium heat, cover the lid and let cook for 2 minutes.
  • Remove lid and reduce the heat to small. Then add one of the filling on one side of the pancake.
  • For cheese filling; Gently place the sliced wedges on one side of the pancake surface, follow by the sliced banana.
  • For Chocolate filling; Gently spread the chocolate on one side of the pancake.
  • For Peanut filling; Gently spread the creamy peanut butter on one side of the pancake, then sprinke the roasted gound peanuts over it.
  • Then you gently using the spatula, flip the other side of the pancake without the filling over to close up the pancake, making it a semi-circle.
  • Remove from it and place on a clean chopping board and cut it into 4 wedges.
Frankly speaking, this is a pretty easy recipe to make, but to get the correct fluffiness of the pancake and the perfect filling to go with it, it ain't a walk in the park! But I will cut myself some slack since this is indeed my first attempt, so I will definitely try it out again with better technique and recipe. ;)

Personally, I love the peanut version...what can I say, I am nuts over peanuts, haha! Love the extra crunch from the roasted peanuts added on top....and it was not too sweet like those store bought ones, since mine was a organic peanut butter with no sugar added. Yum-O!
Okay, I admit, this Cheese and Banana is a HoneyBeeSweet's original concoction, haha! Some people might be a little turn off with the thought of these 2 ingredients together. But guess what, I like it! If you have tasted the Laughing cow cheese before, you would know it's creamy, smooth and slight salty taste....usually can be found in those store bought Mian Jian Kueh too. Then I thought perhpas adding alittle sweet ripe bananas into it might enhance the texture and taste....and indeed it was a winner too! I guess the above picture tells it all...
The chocolate filling was actually my girls' favorite. I was kind of surprise because it is slightly on the bitter side since I did not add any extra sugar to the 70% cocoa chocolate and corn syrup. But I am glad that they like dark chocolate since it is healthier then the milk version.
Perhaps the next time I make, I will try a different recipe. Also will try filling it with traditional red bean filling. ;) Have a great week all!

Tuesday, May 26, 2009

Banana Chocolate Chip Sourcream Pancakes

Have not made pancakes for my girls for the longest time now. Lately every weekend morning my husband and I will either be playing tennis or training for the coming KL marathon, which will normally be followed up by breakfast on our own at the nearby coffee place. Hence we seldom eat breakfast with our girls during weekend mornings. So bad! Okay okay, that's why I was pretty determine to make it for them while I'm home last Saturday morning. This time,I added a little twist in the batter, not the usual pancake they eat, where I added 1/4 cup of sour cream, which turns out great! My girls raved about it and finished up their stack in no time! ;)
Ingredients for Banana Chocolate Chip Sour Cream Pancakes:
85g all purpose flour
15g cake flour
1 1/2 tbsp caster sugar

1 tsp baking powder

3/4 tsp salt

1/4 cup sour cream

1 tsp vanilla extract

1 large egg

120ml fresh milk

15g unsalted butter

1 ripe medium banana
, peeled and cut into thin slices
1/4 cup mini chocolate chips

Method:
  • In a bowl, place all dry ingredients in, meaning flour, cake flour, baking powder, sugar and salt. Stir well to blend everything together.
  • In a large mixing bowl, lightly beat the egg and add sour cream and stir well.
  • Heat up the milk and butter till almost boiling. Slowly drizzle and stir the milk mixture into egg mixture till everything is incorporated. Add vanilla and stir well.
  • Add the dry mixture into the egg mixture and stir till just combined. Over mixing the batter will not yield nice fluffy pancakes.
  • Heat up a pan with some butter or cooking oil at medium low heat.
  • Scoop desired amount of batter into the pan. Then top the batter with 3 to 4 slices of banana and sprinkle some chocolate chips. Then using a small heatproof teaspoon, making sure the chocolate is inside the batter, else it will burn after flipping the pancake.
  • Cook about 2 to 3 minutes per side till golden brown and crisp. Remove from pan and serve with maple syrup and butter, yummy!
If any of you worry about the sour cream giving it a sour taste, not at all! It actually contribute to it's light texture. These pancakes are so light and fluffy, with the bananas so soft and sweet, plus the chocolate all melted in, a perfect combination! The crispy sides is such a treat to eat too! And even if you don't serve with maple syrup, it's still delicious on it's own. I think I can eat this every morning! ;D

When my girls finished their breakfast that day, they were already asking me if they will be having these pancakes again tomorrow, haha! And since I made quite a lot, the 2 left overs are still good even when it's not heated up. My elder daughter goggle up another one for snack in the afternoon too. ;) I guess I should try to make these yummy breakfast treat for my girls more often....it's already worth every trouble when you see they enjoying a delicious home made breakfast you make just for them. ;D