Showing posts with label Chinese snack. Show all posts

Saturday, May 30, 2015

Mee Sua Kueh (面线糕)

I was told by a friend that this Mee Sua Kueh (面线糕) was once a very much popular dish on the Facebook cooking groups a couple years back. Strangely I have never heard or taste it before until my recent late night dim sum adventures with my hubby then I got to savour it. Quite a special kueh as compared to the traditional ones we know of like pumpkin and yam kueh. The strands of noodles gives it a nice texture and mouth feel, plus that salty aftertaste is also something I adore of mee sua. ;9

Main ingredients involved are pretty much similar to the other kueh. The four main key aromatics for chinese cooking, that is dried shrimps, fried shallots, mushrooms and chicken stock.

And since this is my first attempt, I shan't make it too complicated. I'll try to make it as close to my yam kueh version as possible.

Ingredients for Mee Sua Kueh (面线糕) -makes a 8"by 8"by 1.5" size pan 

250g mee sua (It is th whole box)
30g dried shrimp, soaked
5 shittake mushrooms, soaked
5 to 6 shallots, peeled and thinkly sliced
3 garlic gloves, minced
1 chickem breast, minced
800 ml chicken stock
  
2 sprig green onion, chopped in to small sections
Handful of wolf berries (optional)

Seasoning for the Minced Chicken
1 tsp soy sauce
a dash of pepper
1 tsp sesame oil
1 tsp corn flour

Seasoning for the Kueh
1 tsp chickem seasoning
1/2 tsp salt
1 tsp sugar
1/2 tsp white ground pepper
  • Prepare the steamer at medium low fire. And a steaming dish, lightly greased.
  • First you marintae the minced chicken meat, let it chill marinated for a good 20 to 30 minutes before use.
  • Chopped the softened dried shrimp and slice the mushroom thinly.
  • On a fry pan, add 3 tbsp of cooking oil and add 3/4 of the sliced shallots. Cook till the shallots are fragrant and golden. Do not over cook them as it will become bitter.

  • Remove the shallots and drain on paper towels. Leaving the oil in the pan, add in the minced garlic, chopped dried shrimp and mushroom. Stir fry till aromatic and slightly golden brown.

  • Then move the ingredients to the side of the pan and add the marinated minced chicken meat in.
  • Cook the minced chicken and breaking it up into smaller pieces. Next you add in the chickem stock. And up the fire to high.
  • Once the chicken stock starts to boil, add in the mee sua. Break up the mee sua as you add in, so it will not be lumps.
  • After you add in all the mee sua, stir up the mixture so all the noodle is soaking up the chicken stock. Also add in the seasoning for the kueh as stated above.
  • Cook for a few minutes until the mee sua is soften. Off the fire and pour the mixture into the prepared pan or dish. Then place in the steamer and steam at medium to high fire to cook for at least 35-40 minutes.
  • Onced cooked, remove from the steamer and let cool for 30 minutes before adding the toppings.You can then add your reserved fried shallots, chopped green onion and wolfberries if using.

  • Leave the kueh to cool completely before cutting. I usually like the steamed kueh more, but these mee sua kueh are also pretty tasty when they are fried up the next day too!

  • If you like them panfried, just cut up the kuehs into large rectangular pieces and pan fried them.

Whether you like them steamed or pan fried, I think this mee sua kueh is a sure hit among the family. When my kids had them, it reminded them of their usual favorite mee sua soup haha. :D
Serve it up with some salad or fresh fruits since it is kind of hot these few days.

One last look at the crispy skinned mee sua kueh before I sign off today. Hope this recipe will motivate you to cook it for your love ones soon, preferrbly this long weekend yes?

Okay, enjoy your holiday guys!

Wednesday, April 15, 2015

Mango Sticky Rice (Khao Niaw Mamuang)

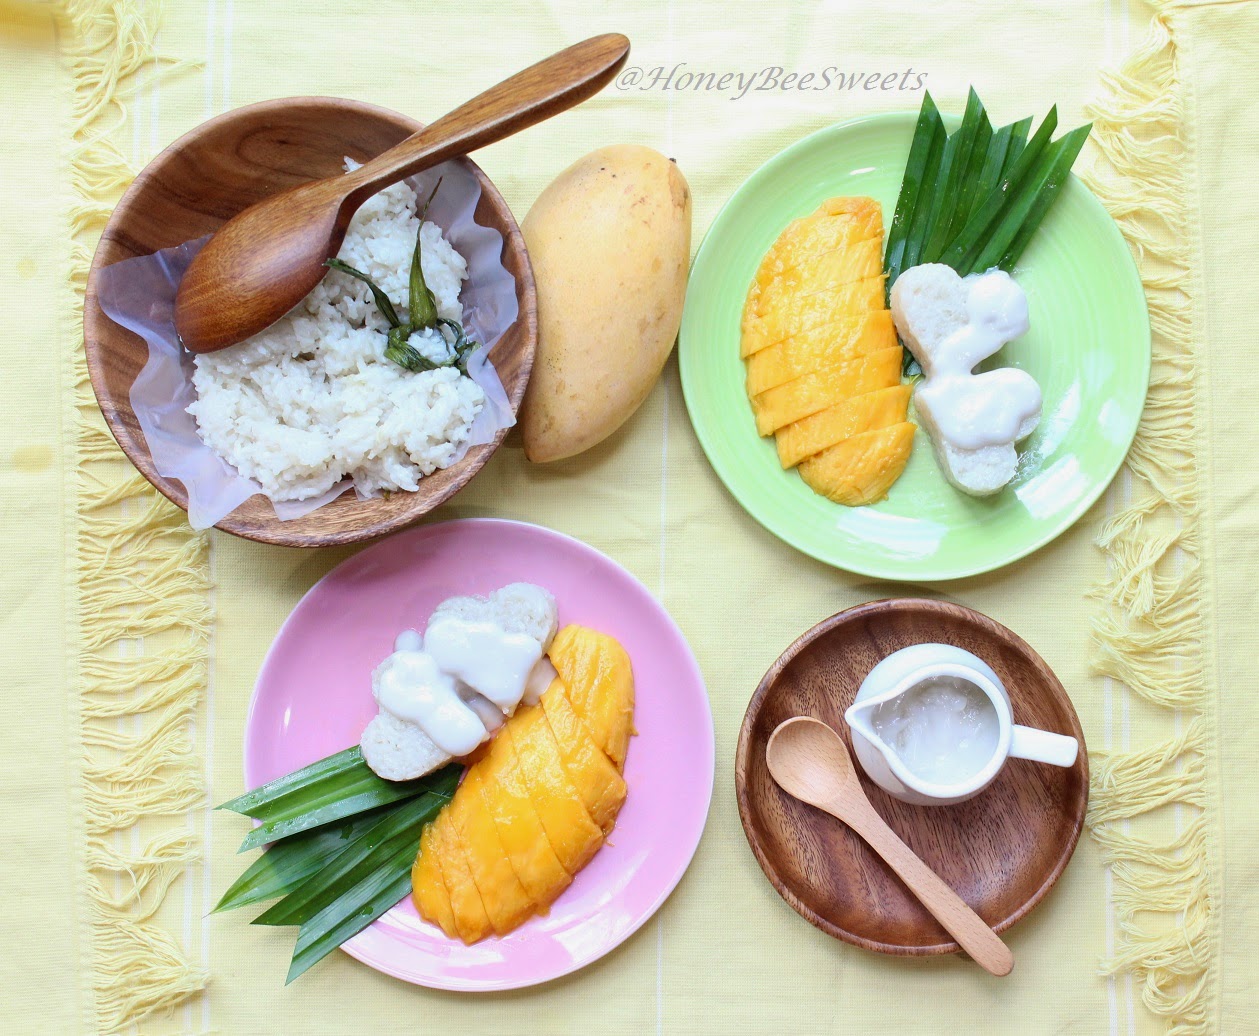
I can't even remember how many times I wanted to attempt making this dessert and forgo the idea in the end. Either I don't have mangoes or I run out of coconut cream, or I need to go on diet....like forever! But I am such a HUGE fan of Mango Sticky Rice, and would always try to order this at the Thai restaurants when I dine there. Com-on, who doesn't? Warm glutinous rice soaked in coconut milk, paired with juicy sweet mango fruit, it's heaven! Well....the only reason why I don't eat it that often is...ahem, the amount of calories and fat contained inside it! *Yikes* Okay lah, life's too short to avoid such delicious food altogether. So occasional indulge is totally permitted..unless your doctor says otherwise that is. ;P
Mango Sticky Rice (aka Khao Niaw Mamuang)..don't ask me how to pronounce that Thai name, is best made when Mangoes are abundant, sweet and in season of course. I much prefer Malaysia honey mangoes rather then Australia's mangoes which are in fact more expensive and contains more fire.

The recipe I used today is an adaptation of Angie's version from Seasaltwithfood. Thanks Angie!

Recipe for Mango Sticky Rice (serves 4 to 5 people)
2 large and ripe honey mangoes
250g glutinous sticky rice, soaked overnight, drained
100ml water

Mixture to cook with rice
180ml coconut cream/milk (I used AyamBrand coconut milk)
1 tsp salt
3 tbsp caster sugar
2 pinescrew / pandan leaves

Coconut cream to serve
125ml coconut milk
1 tbsp caster sugar
1.5 tbsp corn flour/ starch
pinch of salt
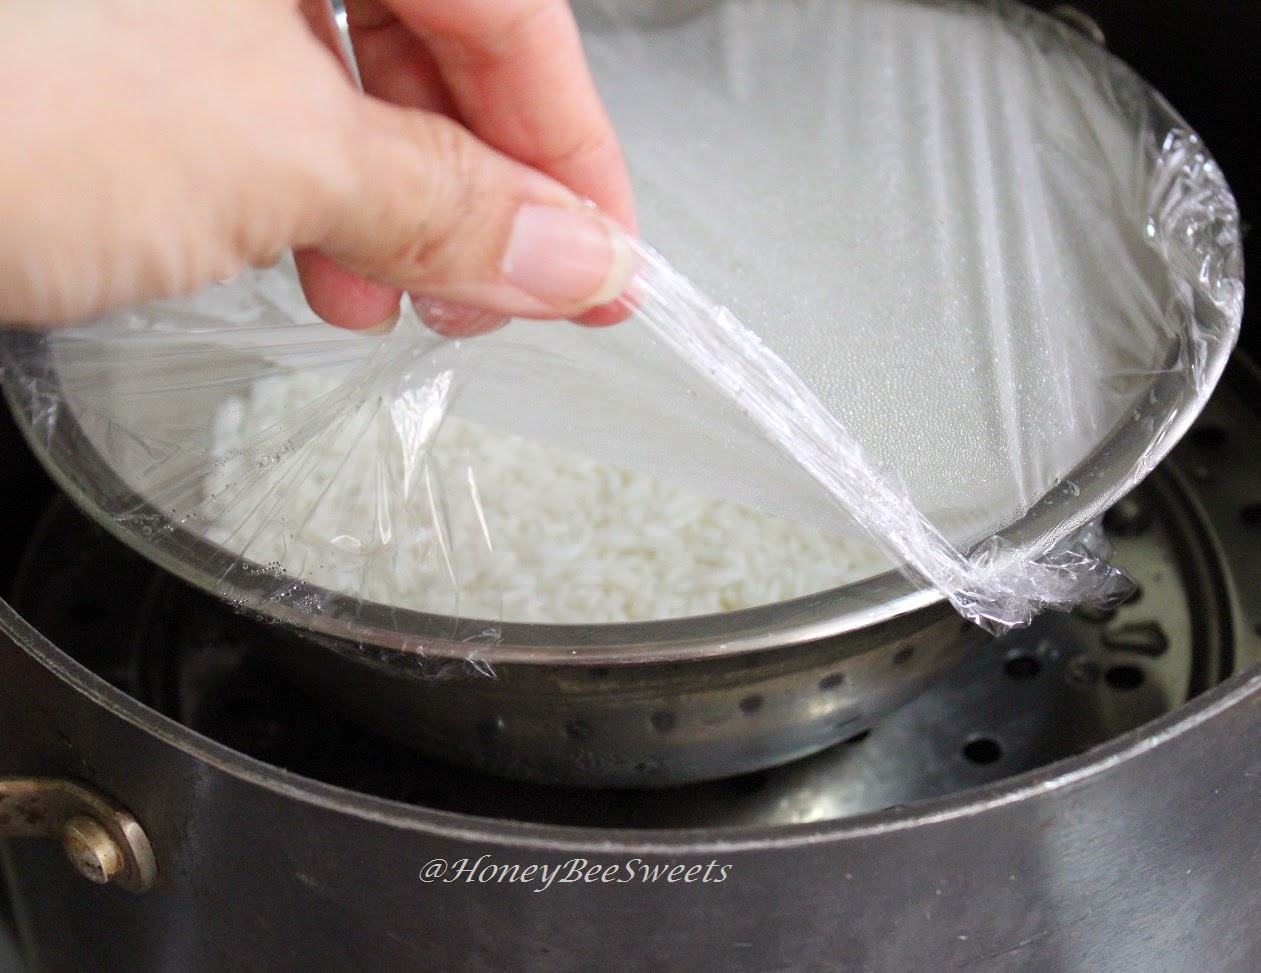
  • First of all, set up the steamer over medium fire. Drain the glutinous rice from it's soaking water. Place it in a steamer bowl and add 100 ml water. The water will help cook and soften up the rice faster. Steam for 30 minutes at medium fire and give it a stir at mid point of 15 minutes. (You can wrap with plastic wrap to prevent excess water from dripping in)
  • While the rice is steaming, prepare the sweet coconut cream for serving over the dessert. In a small sauce pot, add in the coconut milk, salt, sugar and corn flour in.

  • Cook it over low fire and keep a close watch not to let the mixture burn. Stir it constantly and make sure no lumps form at the base. Once the mixture thickens, remove from fire and let cool. Scoop out the cream and set aside to serve later.
  • Next you make the coconut mixture for the glutinous rice to soak in. Using the same pot you used for the coconut cream sauce, so you wash one less pot haha. Similarly, add in the coconut milk, pandan leaves, caster sugar and salt.
  • Stir well till all the sugar has melted in over medium low fire. Cook the mixture till it comes to a simmer for 3 minutes and off the heat.
  • Add in the steamed glutinous rice at this point and toss to coat the rice with the coconut milk mixture.
  • Place the coconut rice mixture back in the steamer bowl and in the steamer to keep warm before serving. 
  • Now you cut up that sweet mangoes, place them on the serving plates. Scoop some warm coconut glutinous rice on the plate as well. And finally some sweetened coconut cream over the rice.
  •  
  • Just like that, serve it up and enjoy when it is still warm....yummm! :9
Simple as that... steam rice, cook creams and cut fruit! Now you can enjoy this authentic Thai dessert right at home (no service or GST) and with extra servings too!
 Hope my post has inspired you to try cooking this at home...especially it is Mango season now! It is gonna taste way better then any ones you've had before...because it is made by yourself. ;) Wait no more, start cooking guys!  :D
 
Have a fabulous day ahead!
 

Wednesday, April 8, 2015

Steamed Prawn dumpling / Siew Mai (蒸鲜虾烧卖)

Another impromptu post. :P Impromptu because I did not have the intention to post this recipe but later changed my mind again haha! Mainly because my kids love siew mai / dumplings in general, so I reckon it's best I record this down. ;) Anyway, this is a rather easy dish, so gonna keep it a short post. And if you are looking for simple steam meat and prawn dumpling recipe, then this should be it.
If you are expecting these to taste like those selling outside...well, you can very well change the page now. Store bought ones are usually packed with seasoning and additives to achieve that certain flavor and texture. All natural home made ones will taste slightly more blend but most definitely more healthy! And most certainly suitable for your kids, family and yourself. ;)
So let's take a look at the recipe shall we?

Recipe for Steam Meat & Prawn Dumpling / Siew Mai ((蒸鲜虾烧卖) -makes 8-10
160g minced pork
8-10 large prawns, peeled and devined
8-10 round fresh wanton skin 
1 sprig of spring onion, chopped fine
2cm ginger, peeled and minced finely

Seasoning 
1 tbsp light soy sauce
1/2 tsp chicken powder seasoning
1 tbsp corn flour
1 tsp sesame oil
1/8 tsp five spice powder
1/8 tsp white ground pepper
1/2 tsp sugar
1 tsp Chinese Shaoxing wine
  • On the chopping board, cut off about 1/3 of the prawn (the 1/3 part as the tail portion). Repeat with the rest of the prawns. Then leaving the 1/3 tail part, then roughly chop the 2/3 portions. 
  •  
  • Mix the 2/3 chopped portions of the prawns with the minced pork. Then add in the seasoning and mixed with with your hands, giving it a good squish all over to make sure it is well incorporated. Then lift the minced meat mixture and slam it into the bowl, do this several times so as to improve the texture of the meat...as I was told haha. :P
  • Next add in the minced ginger and chopped spring onion and mix well again. Let the mixture marinate for a good 1hr in the fridge.
  • After 1 hr, prepare 1 small bowl of clean water, the dumpling skins, the reserved prawn tails and the fillings on a clean working surface.
  •  
  • Dap some water around the rim of the dumpling skin.
  •  
  •  Then place the dumpling skin on your thumb and forefinger, which you form a ring. Add about 1 heaping tablespoon of the filling in the middle. 
  •  
  • Then press in the sides of the dumpling skin so that it's rim form a circular ring. Place on the working surface, and slow form the shape to a small cylinder shape. Then stick a prawn tail in the middle.
  •  Repeat the same steps to make more dumpling till you make 8 or 10 of them. You can double the recipe if you want to serve more people.
  • Prepare the steamer at medium fire and steam these dumplings for 10 mins till the meat is cooked through and the prawn is pink. 

  •  Your dumplings should looks like these. ;)

You can re-plate these dumplings over fresh lettuce to make them look more appealing. ;)
 These are really quite fun to make too! You can even get your young one to make them with you. ;) And trust me, they will enjoy these siew mai even more if it's made by them haha!
A close up of these yummy and I would think healthy dumplings/ siew mais! Do try it out and let me know how it goes!


Saturday, March 21, 2015

Tau Suan (豆爽) -Split Bean Dessert Soup

Tau Suan is probably one of those desserts that I would cook regularly for my family to enjoy over the weekend. It's funny how I would still Google or dig through my cookbooks for this recipe especially I cook it rather often. Guess there's way too many good recipes to register in this brain of mine. :P So blog post it is then! Just a simple short one that I can refer to every time. ;) An essential recipe that every Chinese family should know how to make. ;)

Really no rocket science here. It is probably as easy as boiling red bean and green bean soup. But if you take that extra step of soaking and steaming the split beans, you will definitely be rewarded with a tastier bowl of tau suan. Let's now take a closer look at the recipe and steps involved:

Ingredients for Tau Suan (豆爽) -Split Bean Dessert Soup (Serves 4-5pax)
250g dried split bean
1.8Liters water
180-200g caster sugar
2 - 3 spears of pandan leaves
50g chestnut flour/powder (You can sub with corn flour or sweet potato flour)

  • Place the dried split beans in a large bowl, rinse it once and drain the yellowish water away. Then soak it with more fresh water for a good 2-3 hours.
 
  • After soaking, drain the water away. Prepare a steaming pot. Place the soaked split beans into a bowl and a knotted pandan leaf. Place the bowl in the steamer and steam for 25-30 minutes till soft.

  • In the meantime, prepare a pot, add in the water, sugar and the other knotted pandan leaf. Bring it to a boil and stir till the sugar dissolves. Off the fire.
  • Mix the chestnut flour with 1/2 cup of water till combined. Add this mixture to the sugar water in the pot.

  •  Stir well till the two mixtures are well combines. On the fire to medium and bring to a gently boil. At this point, add in the steamed split beans.
  •  Again stir well to combine and the soup will slowly thickens up. Taste it to see if you need more sugar or more water to dilute it. And you're done!
 A bowl of tau suan is NEVER complete with out some crunchy fried dough (油条) :9 I actually blogged and posted Ham Chee Peng before! The dough for you tiao and ham chee peng are pretty much the same, so feel free to hop over to my Ham Chee Peng recipe to try it out. ;)

 For this time, I bought some freshly fried you tiao to go with my tau suan  (豆爽). :9 Don't tell me you don't crave for this dessert some times...I've never met a person that dislikes it!


A comforting bowl of tau suan dessert, so much love and yumminess! Do try it out...it is really so easy to make too. ;)

Happy cooking!


Wednesday, February 25, 2015

Mango Sago Pomelo (杨枝甘露)

I guess every year after all the praying at home is done, we are usually left with a (or more) ripe pomelo fruit. Yes of course you are welcome to just peel and consume it as is. But some might think it's bitter after taste ain't that palatable...unless you get Ipoh Pomelo heehee (Confirm sweet yo). So why not make dessert out of it? Of course the most common one is Mango Sago Pomelo (杨枝甘露). If you have attended Chinese dinners or weddings, there's bound to be once you will have this as a dessert. Well, now you can satisfy your appetite by making a whole lot of it and chill it in the fridge to consume whenever you fancy over the next couple days, yoohoo!  
There is quite a number of different recipes out there, which I am pretty sure everyone has their own concoction and preference of sweetness. Personally I love the soup to be stronger in mango taste, not too sweet and a creamy after taste. And of course with loads of liao (sago, mango and pomelo!) inside, yum!


Ingredients for Sago Mango Pomelo (Serves 6-8 pax)
2 large ripe mango (oops picture only shows one haha)
  • Peel the mango, cut out all the flesh. Then weigh out about 250g of the flesh for puree (Which I usually picked out the not so nicely cut ones) 

  • Cut the rest into bite size cubes and store in a air tight container to chill in the fridge.
  • Puree the 250g mango flesh till smooth. Set aside to use later.
70g sago
3 cups water
250g mango puree   
150ml fresh milk
200ml evaporated milk
200ml water
70g caster sugar (you can add less first, taste test then add more to your preference)
Fresh mango flesh (cut earlier) 
Pomelo pulps (I added half of my pomelo fruit in, so go crazy and add more if you love this fruit) 

  • Soak the sago for 5 minutes in the 3 cups of water in a sauce pan. 
  • Then place the pan over medium fire and start boiling. Stir constantly making sure the sago doesn't clump together or the bottom of the pan.
  • Cook for about 5-7 minutes till the sago is transparent. Off the fire ans let sit for another 5 minutes.
  • Drain the whole mixture in to a fine sieve. Run cold water over it and set aside for use later.
  • In another pot, add in milk, evaporated milk, water and sugar in. Place the pot over medium fire and bring to a simmer and stir constantly to make sure the sugar melts.
  • One you see bubbles on the side of the pot, remove from fire.
  • Leave the mixture to cool for 30 minutes. 
  • Add in the mango pure and sago. 
  •  
  • You can whisk if necessary to break up the lumps and making sure everything is incorporated nicely.
  •  
  • Add in the pomelo and mango cubes and give it a gently stir. Chill the whole mixture for at least 2 hours in the fridge in an air tight container. Best eaten when cold. :9 Enjoy!

This dessert is best enjoyed after a nice hot pot dinner. So make for your family soon! I am sure they will love it too. ;)