Showing posts with label fruits. Show all posts

Saturday, July 4, 2015

Blueberry Cream Cheese Pound Cake (revisited)

Frankly speaking, I love simple bakes like butter cakes, pound or loaf cakes. They are easy enough to whip up within a couple hours and usually helps use up that particular ingredient in the pantry that has been sitting there for days. :P I mean who has time to make frosting and what not all the time, simple is the way to go for a quick craving fix. And save those icing (and calories) for special occasions if you ask me. This time round I have a block of cream cheese and some blueberries that I bought during a sale, sitting beautiful in my fridge for almost a week. Not good. Use them to bake cake? Great! And at the back of my mind, I remember I always, yes almost always, bake this Blueberry cream cheese pound cake recipe years back while I was in States. Yes, where blueberries were dirt cheap, so why not! This lovely recipe was adapted from Martha Stewart. :) So simple and yet so delicious! 

I decided to give this recipe I used for years a slight twig, reduce sugar, increase liquid amount. Result was great because using the sweetness of the blueberries itself instead of loading the cake with caster sugar was much better. And replacing the moisture from the sugar removed with none other then my beloved buttermilk. :9

Ingredients for Blueberry Cream Cheese Pound Cake (Makes a 10 cups / 8" bundt)
325 g cake flour
230 g unsalted butter, room temperature
200 g cream cheese, room temperature
4 large eggs
215 g caster sugar
1 tbsp pure vanilla extract
1/2 tsp salt
Zest of a lemon
1 tsp baking powder
150ml shaken buttermilk
1 cup fresh blueberries (frozen ones can be used too)
  • Preheat the oven at 180C and grease the bundt pan thoroughly.
  • In a large mixing bowl, cream the butter and cream cheese together till smooth.
  • Next add in the caster sugar and salt, beat till light and fluffy. It should take about 4 to 5 minutes. 
  • Crack in one egg at a time and mix well after each addition.
  • Add the vanilla extract and lemon zest, whisk for a minute.

  • Next shift in half of the cake flour and baking powder in. Mix till well combined. Then pour in the buttermilk, mix well again. Lastly, shift in the rest of the cake flour and incorporate well.
  • Toss the blueberries in 1 tbsp of plain flour, this will prevent the blueberries from clumping together when mixed into the batter. 
  • Now add the blueberries into the batter and gently fold in to combine.

  • Pour the batter into the prepared bundt pan and bake in the oven for 45 to 50 minutes or till the cake tester comes out clean.


  • I would suggest turning the baking pan at mid point of the baking time. Just to ensure the cake is evenly baked out.
  • Place cake on the rack to cool before slicing. :9
  • Cake can be kept at room temperature for 2 days, 3rd day it should be sent into the fridge if there is still any left. :)


Oh glorious cake! I can have a quarter of this! Okay, let's not get ahead of ourselves. :P Let's move on to see how the cake turned out inside. 
Check out the creaminess inside...woooooah! :D Taste? Not overly sweet as expected, which is just right for me. But feel free to up another 30-40 g of caster sugar if you like yours sweeter. Creaminess was spot on, melting moments on every bite. Much love.
Need I say more? Guess not. You seriously have to try this out. If it is some bake that I have used for years and still further improved on it, must be that good! 

So what's stopping you? Try it out! Guarantee no regrets. ;) Yes, blueberries are still abundant now and creamcheese is still on sale!

Happy baking all!


Wednesday, May 27, 2015

Strawberry Yogurt Popsicles

Not sure about you, but whenever I bought myself a new toy, I mean new cooking toy,  I would get all excited to try out new recipes with it. And this time I bought myself quite a fun and dainty little popsicle mold from Zoku. :) Needless to say, I chose an easy recipe to test out this new toy. Plus I have fresh strawberries in the fridge, I made Strawberry Yoghurt mini pops!
These popsicles just reminds me of baby pacifiers haha! Frankly speaking they are the right size for my kids. They come back from school in the afternoon and craving for some cold treats. And what's better then homemade fruit popsicles verses sodas and store bought ice cream. :P These popsicles are so easy to make, even my 10 year old is capable of making them herself! 

The only thing that deters me from making popsicles at home last time was unmolding them. Soaking in warm water, leaving it to stand at room temperature which is such a torture when you are so craving for one. Or like me...pull and pull like no tomorrow, oops. :P Sometimes the holding stick just slides out on its own.. -_-" But NOT anymore with Zuko! Yay! These are so easy to remove, just pushing the silicon base and it pops right out~! Ok ok, I bought it from TANGS Orchard basement where all the bakeware is. I believe Vivo branch carries it too. ;) *Excited!*


Ingredients for Strawberry Yogurt Popsicles
90 g fresh strawberries
200g Greek Honey Yogurt
50g Strawberry Jam (I use New Zealand brand Anathoth Farm from Coldstorage)
1 tsp fresh lemon juice

  • I had the other ice cream old from Daiso to standby incase I have more to freeze. 
  • First you wash and slice up ~90g of the berries and place in the blender container. Leave some thin slices of the strawberries for decorations later but it is optional.
  • Next add in the strawberry jam. Got this Anathonth Strawberry jam recently and love the intensive flavour and chunky fuit in it.


  • Then now add in the greek yogurt and that fresh lemon juice.
  • Blend at high speed for a minute.
  • Place the thinly sliced starberries in the cavity of the Zuko mold. Then gently pout the puree into it. If you look carefully, you will see where you should fill the puree to. The right level which the stick will be able to grip it.
  • Place the sticks over and cover all of the cavity.
  • Since these popsicles are smaller, it also means the freezing time is reduced as well. I left it for 2 hours and it was already good to go!

  • After two hours, remove from freezer. Then using your thumb, push up the silicon mold to release thepopsicales. 

  • See! Just a push and it just pops out. Easy peasy right?

Perfect treat on warm days or any day yeah? 

Hope you guys like this super easy and healthy popsicle recipe. You cab change the fruit to any kind you fancy, like mango or even orange. :9

Have fun always

Monday, May 18, 2015

Raspberry Rose Chiffon with Raspberry Buttercream


I remember seeing this recipe from Swee San's blog awhile back, I knew at that point that I will try that recipe out. Just that I didn't know when haha. :D Okay, back up ... I am talking about this lovely recipe, Raspberry Rose Chiffon Cake.


Not only is the taste is so special, it is such a uniquely elegant flavor that even my picky sisters were impressed. Thanks to Swee San of course...quite the pastry chef! You can hope over to her post to see how she create this lovely recipe

I made changes to the recipe since I wanted mine to fit into my 21 cm tube pan. And instead of using whipped cream, I made buttercream for the frosting since I needed to transport it out for a gathering, I wanted a more stable topping. And since I use raspberry jam, I presume the raspberry will be more intense verses the fruit puree itself. In turn I reduced the sugar level as well to maintain the proper sweetness of this cake.

Ingredients for Raspberry Rose Chiffon (Makes a 21 or 22cm tube pan)
5 egg yolks
10 g dried rose buds
70 ml fresh full cream milk
40 g homemade raspberry jam (store bought is fine)
50 ml corn oil
40 g caster sugar
pinch of salt
125 g cake flour
1 tsp baking powder

5 egg whites
90g caster sugar

Method: 
  • First of all, removed the calyxes of the dried rose buds.

  • Then places the rose buds into a blender and chop up the rose petals into fine flakes. 
  • In a large mixing bowl, add in these blended rose flakes, follow by egg yolks, caster sugar, milk, raspberry jam, vegetable oil and salt.

  • Give that mixture a good stir to combine everything together evenly using a whisk.
  • Once the mixture is smooth, sift in the cake flour. Again mix well till the mixture is smooth and no lumps.
  • Preheat the oven to 170C. Prepare a 21/22cm tube pan. (DO NOT USE non-stick pans)
  • In another mixing bowl add in the egg whites in. Start beating it at high speed and gradually add in the caster sugar. Continue beating till the meringue reaches stiff peaks.

  • Gently fold in the whites into the egg yolk mixture in 3 separate mixtures till all is well combined and the colour is uniform and no visible white lumps.

  • Pour the batter into the tube pan. Then using a tooth pick or chopstick, give the batter a good swirl to remove any air pockets that might be trapped in the batter.


  • Bake in the preheated oven for 30 minutes or till the cake tester comes out clean.
  • Remove the tube pan from the oven and invert it to cool. Let cake to cool completely before removing from mould.
  • Once baked, let cool and remove from pan. Set aside for now while you work on that raspberry buttercream.


Recipe for Raspberry Buttercream
Basic Vanilla Swiss Meringue Buttercream (makes ~2cups)
2.5 oz egg whites (~120g)
2.5 oz caster sugar 
(~120g)
1/4 tsp salt
bean scrapings from 1/2 of a vanilla bean
250g unsalted butter, cut into 2” chunks, room temperature

100g homemade raspberry preserve / jam (store bought is fine too)

Method: 

  • Prepare a double boiler with a gentle simmer. In a heat proof bowl, combine egg whites, sugar and salt into it. Mix well but no beating is required. Place the bowl over the double boiler and placing a candy thermometer to monitor the temperature. 
  • Stir once in awhile to prevent the egg white from curdling at sides. Aim to to have the temperature reached at least 146F / 63C for food safety reasons. 
  • Once the temperature is reached, remove from heat and beat it till it is silky white. Add vanilla extract and mix well. If the mixture is still hot, place it over a bath of ice water to cool it down.
  • Add the butter chunks one piece at a time and continue to beat while doing so. Continue to beat till all the butter has been added and the buttercream is smooth and silken. 


  • Use about 1 cup for the cake while you can chill the rest in the fridge for use in future.
  • Add in the raspberry jam and beat well till smooth. Chill if necessary if the buttercream is a little too soft. 
  • Use it to frost on the cooled chiffon cake as desired. And decorate the cake of course. ;))
There you have it. Just like your favourite chiffon cake recipe, this cake ain't as complex as it sounds. :)


Made this cake for a gathering with my sisters. It was so well received, and everyone said it's such a special flavoured cake. It's fruity, it's floral, it's pleasure to both taste and smell. 


My blog post is never complete without having a closer look of the cake...yeah a sliced version please!
Checkout the fluffy soft interior of the cake.And that sweet pinkish colour is love! 

Trust me, the combination of flavours is the in thing right now. And this combo is awesome. I can't wait to try out combos like Earl Grey Lavender or ....Chocolate Chilli? Maybe not. :P

Have a good week ahead all!


Wednesday, April 15, 2015

Mango Sticky Rice (Khao Niaw Mamuang)

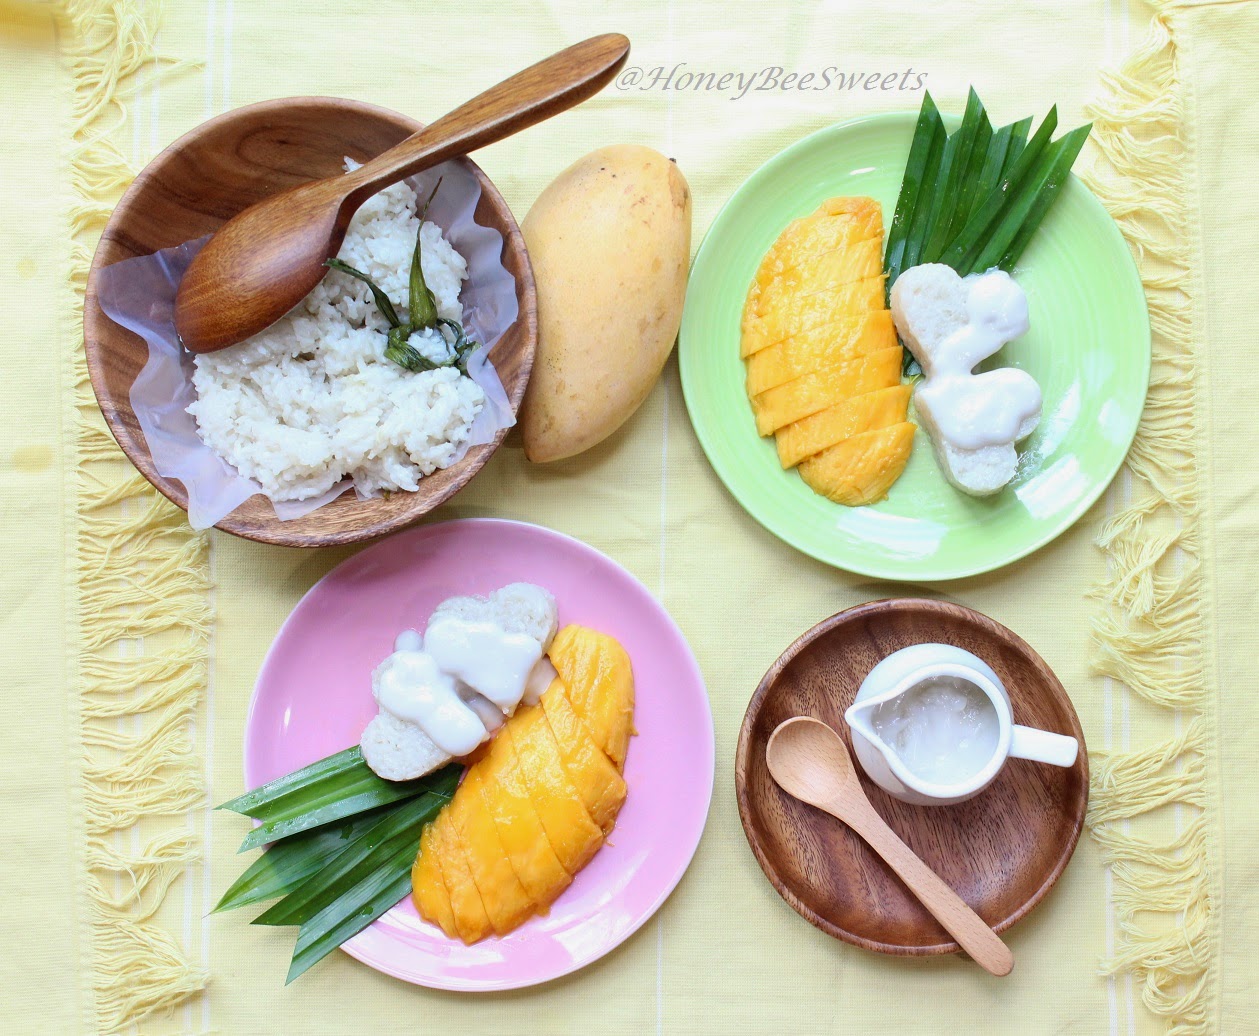
I can't even remember how many times I wanted to attempt making this dessert and forgo the idea in the end. Either I don't have mangoes or I run out of coconut cream, or I need to go on diet....like forever! But I am such a HUGE fan of Mango Sticky Rice, and would always try to order this at the Thai restaurants when I dine there. Com-on, who doesn't? Warm glutinous rice soaked in coconut milk, paired with juicy sweet mango fruit, it's heaven! Well....the only reason why I don't eat it that often is...ahem, the amount of calories and fat contained inside it! *Yikes* Okay lah, life's too short to avoid such delicious food altogether. So occasional indulge is totally permitted..unless your doctor says otherwise that is. ;P
Mango Sticky Rice (aka Khao Niaw Mamuang)..don't ask me how to pronounce that Thai name, is best made when Mangoes are abundant, sweet and in season of course. I much prefer Malaysia honey mangoes rather then Australia's mangoes which are in fact more expensive and contains more fire.

The recipe I used today is an adaptation of Angie's version from Seasaltwithfood. Thanks Angie!

Recipe for Mango Sticky Rice (serves 4 to 5 people)
2 large and ripe honey mangoes
250g glutinous sticky rice, soaked overnight, drained
100ml water

Mixture to cook with rice
180ml coconut cream/milk (I used AyamBrand coconut milk)
1 tsp salt
3 tbsp caster sugar
2 pinescrew / pandan leaves

Coconut cream to serve
125ml coconut milk
1 tbsp caster sugar
1.5 tbsp corn flour/ starch
pinch of salt
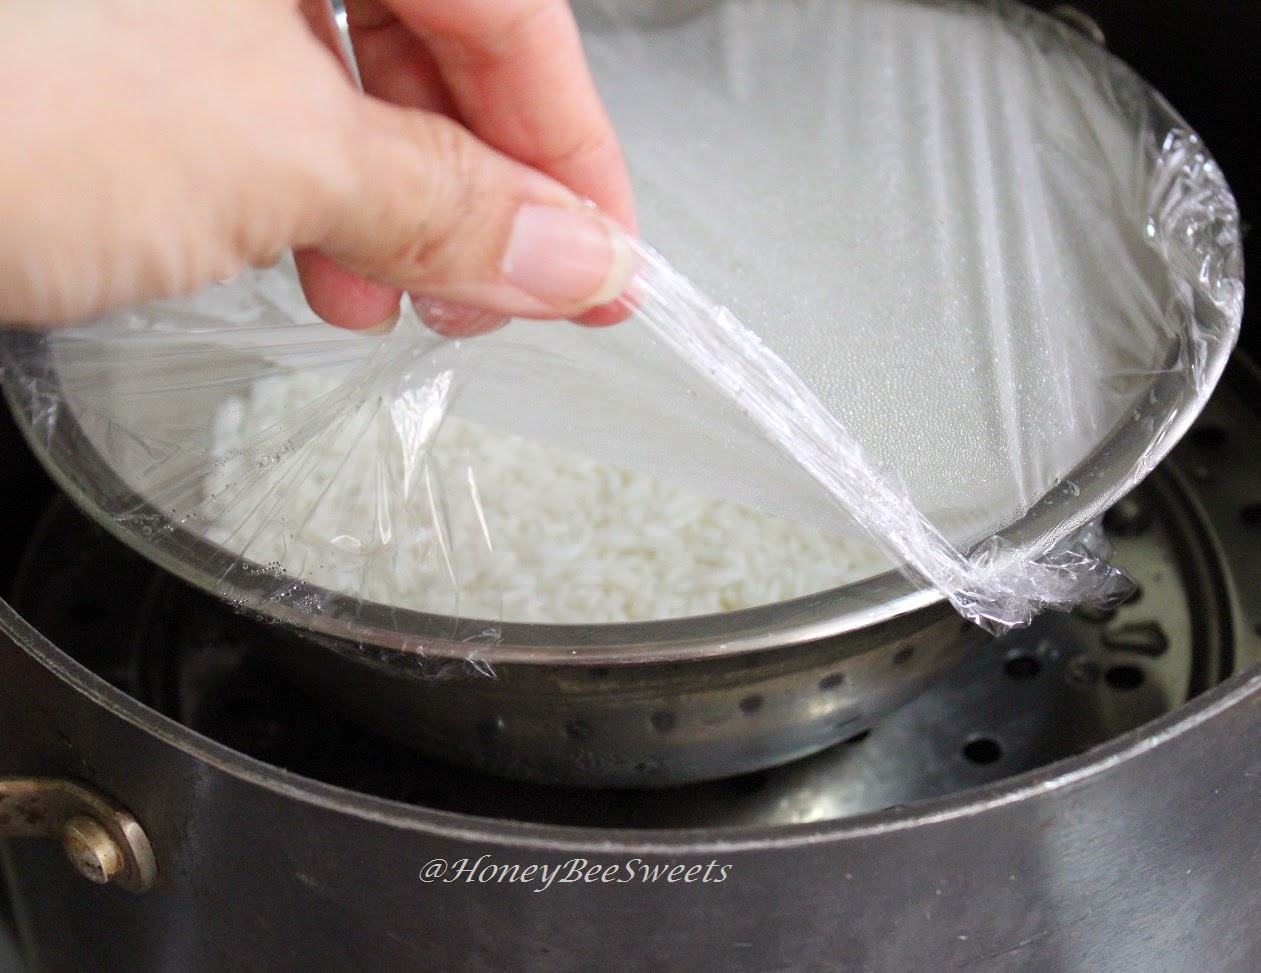
  • First of all, set up the steamer over medium fire. Drain the glutinous rice from it's soaking water. Place it in a steamer bowl and add 100 ml water. The water will help cook and soften up the rice faster. Steam for 30 minutes at medium fire and give it a stir at mid point of 15 minutes. (You can wrap with plastic wrap to prevent excess water from dripping in)
  • While the rice is steaming, prepare the sweet coconut cream for serving over the dessert. In a small sauce pot, add in the coconut milk, salt, sugar and corn flour in.

  • Cook it over low fire and keep a close watch not to let the mixture burn. Stir it constantly and make sure no lumps form at the base. Once the mixture thickens, remove from fire and let cool. Scoop out the cream and set aside to serve later.
  • Next you make the coconut mixture for the glutinous rice to soak in. Using the same pot you used for the coconut cream sauce, so you wash one less pot haha. Similarly, add in the coconut milk, pandan leaves, caster sugar and salt.
  • Stir well till all the sugar has melted in over medium low fire. Cook the mixture till it comes to a simmer for 3 minutes and off the heat.
  • Add in the steamed glutinous rice at this point and toss to coat the rice with the coconut milk mixture.
  • Place the coconut rice mixture back in the steamer bowl and in the steamer to keep warm before serving. 
  • Now you cut up that sweet mangoes, place them on the serving plates. Scoop some warm coconut glutinous rice on the plate as well. And finally some sweetened coconut cream over the rice.
  •  
  • Just like that, serve it up and enjoy when it is still warm....yummm! :9
Simple as that... steam rice, cook creams and cut fruit! Now you can enjoy this authentic Thai dessert right at home (no service or GST) and with extra servings too!
 Hope my post has inspired you to try cooking this at home...especially it is Mango season now! It is gonna taste way better then any ones you've had before...because it is made by yourself. ;) Wait no more, start cooking guys!  :D
 
Have a fabulous day ahead!
 

Wednesday, February 25, 2015

Mango Sago Pomelo (杨枝甘露)

I guess every year after all the praying at home is done, we are usually left with a (or more) ripe pomelo fruit. Yes of course you are welcome to just peel and consume it as is. But some might think it's bitter after taste ain't that palatable...unless you get Ipoh Pomelo heehee (Confirm sweet yo). So why not make dessert out of it? Of course the most common one is Mango Sago Pomelo (杨枝甘露). If you have attended Chinese dinners or weddings, there's bound to be once you will have this as a dessert. Well, now you can satisfy your appetite by making a whole lot of it and chill it in the fridge to consume whenever you fancy over the next couple days, yoohoo!  
There is quite a number of different recipes out there, which I am pretty sure everyone has their own concoction and preference of sweetness. Personally I love the soup to be stronger in mango taste, not too sweet and a creamy after taste. And of course with loads of liao (sago, mango and pomelo!) inside, yum!


Ingredients for Sago Mango Pomelo (Serves 6-8 pax)
2 large ripe mango (oops picture only shows one haha)
  • Peel the mango, cut out all the flesh. Then weigh out about 250g of the flesh for puree (Which I usually picked out the not so nicely cut ones) 

  • Cut the rest into bite size cubes and store in a air tight container to chill in the fridge.
  • Puree the 250g mango flesh till smooth. Set aside to use later.
70g sago
3 cups water
250g mango puree   
150ml fresh milk
200ml evaporated milk
200ml water
70g caster sugar (you can add less first, taste test then add more to your preference)
Fresh mango flesh (cut earlier) 
Pomelo pulps (I added half of my pomelo fruit in, so go crazy and add more if you love this fruit) 

  • Soak the sago for 5 minutes in the 3 cups of water in a sauce pan. 
  • Then place the pan over medium fire and start boiling. Stir constantly making sure the sago doesn't clump together or the bottom of the pan.
  • Cook for about 5-7 minutes till the sago is transparent. Off the fire ans let sit for another 5 minutes.
  • Drain the whole mixture in to a fine sieve. Run cold water over it and set aside for use later.
  • In another pot, add in milk, evaporated milk, water and sugar in. Place the pot over medium fire and bring to a simmer and stir constantly to make sure the sugar melts.
  • One you see bubbles on the side of the pot, remove from fire.
  • Leave the mixture to cool for 30 minutes. 
  • Add in the mango pure and sago. 
  •  
  • You can whisk if necessary to break up the lumps and making sure everything is incorporated nicely.
  •  
  • Add in the pomelo and mango cubes and give it a gently stir. Chill the whole mixture for at least 2 hours in the fridge in an air tight container. Best eaten when cold. :9 Enjoy!

This dessert is best enjoyed after a nice hot pot dinner. So make for your family soon! I am sure they will love it too. ;)