Showing posts with label Swiss roll cake. Show all posts

Thursday, December 27, 2012

Red Velvet Christmas Yule log Cake

It's so fast! Christmas is finally over...gosh I am already feeling to the "blues" coming on. :P I guess that has A LOT to do with the school reopening soon. ~Dread!!~ 6 weeks seems to fly pass so fast...it almost seems like it was only yesterday that we just started our holidays, no? Lol! Anyways, we all have to face the inevitable ...come what may, we deal with it one day at a time with an open heart! ;) 

Although Christmas has already past, but I reckon that I best post up this fabulous red velvet Swiss roll log cake recipe for future reference. I hope everyone had a fabulous Christmas celebration...and got their desired Christmas present! I know I did! Will elaborate on that on my coming pot. ;) For now...the Red Velvet Yule Log Cake.
It almost always that I made 2 yule log cakes for Christmas every year. And I always prefer to try a new recipe. And since I love red velvet cake with cream cheese frosting, I thought it will be really nice to bake it into a log cake! Plus that red coloring just adds on the festive mood!  And of course I referred to none other then Martha Stewart's recipe since her red velvet is the best I've tasted. :)
This recipe is the "bomb", I can eat it everyday, haha! I actually made these cuppies for my kid's form teacher awhile back and she loved it too. ;) And remember I actually used it in my mum's birthday cake: Red Velvet & Light Cheese Cake with Pink Ombré Roses.

However for this log cake, I need to change the recipe so that the cake can be soft and "flexible" enough to roll up nicely. So here is the version I have come up with, without compromising the wonderful velvety taste of the cake:

Ingredients for Red velvet Swiss roll cake: (makes a 13" by 14" tray) (serves 10 -12 ppl)
3tbsp quality cocoa powder (I used Valrohna)
20ml hot water
- Mix cocoa powder and hot water together to form a thick paste. Let cool for use later.
80g egg yolk
40g caster sugar
100ml buttermilk
50ml vegetable oil
130g cake flour, sifted
1 tsp vanilla extract
1/2 tsp red food coloring (I used Wilton no-taste red)
1/2 tsp white vinegar

120g egg white
80g caster sugar
  • Using the double boiler, place a mixing bowl over it. Add in the egg yolks and sugar. Beat the mixture till it thickens and double the volume. 
  • Remove from the boiler and stir in the cocoa mixture. Also add in buttermilk, vegetable oil, vanilla extract and stir gently till well combined.
  • Then add in the red food coloring and white vinegar and combine well.
  • Lastly add in the sifted cake flour and gently mix in till well combined.
  • Preheat the oven to 170C and lined and grease the baking tray with parchment paper.
  • In another clean mixing bowl, beat the egg white till foamy and gradually add in the caster sugar and beat till stiff peaks.
  • Gently fold in the whites to the egg yolk batter in 3 separate portions. Remember to fold in gently and not deflate the batter.
  • Pour the batter on the prepared tray and spread evenly. Bake in the oven for 15 minutes till done.
  • Remove from oven and let cool completely.
Cream Cheese frosting
340g cream cheese, soften 
227g unsalted butter, room temperature
200gg confectioner's sugar
1 tsp pure vanilla extract
  • Beat butter and cream cheese with a mixer on medium-high speed until fluffy, 2 to 3 minutes. Reduce speed to low. Add sugar, 1 cup at a time, and then vanilla; mix until smooth.
 Assemble:
  • Once the cake has cooled completely, spread about 1/3 of the cream cheese frosting on the surafce, evenly, leaving about 1" at the edge so as to have a cleaner edge when rolled up.
  • Roll the cake from the longer side inwards. Trim the sides and slice portions of the cake as desired to make different log segments.
  • Frost the cake till all is covered and use a fork to run through the frosting to create the log texture. Decorate at will! Chill as per needed so that the cream cheese frosting is more stable.

 I actually made the same recipe twice....and both occasion was a success! My friends raved about it and even her 5 year old daughter (picky eater) had seconds!
A look at the interior of the cake. :P Yummy! I definitely will be baking it over and over again. I was really glad the cake still turned out great after the modifications. :D

I am going to submit this to Aspiring Bakers #26 - Creative Christmas Motif Bakes! hosted by Alan of Travellingfoodies.

And also linking this post to Cook Like A Star organised by Zoe of Bake for Happy Kids, Baby Sumo from Eat your heart out and Riceball from Riceball Eats
Cook like a Star - December 2012
Martha Stewart


Monday, March 12, 2012

Teddy Chocolate Swiss Roll & Curry Chicken Pie

The one week school break is finally here. But even though there's no school, life seems a little more hectic for me. I tend to get less things done when my kids are at home....no surprise there. But at least there's less stress during this period of time which I always welcome. (^_^) I made a simple treat for my kids yesterday, a Teddy Bear Swiss Roll with Chocolate Swiss Meringue Buttercream.
My kids love Swiss roll cakes and it never fail to amuse them when I "dress it up" with some cute designs on the sponge cake. Although the teddies are not as nicely done as I hoped, it was still decent enough for me to blog about it, lol! My young one even asked me if the design are brown cats....o well. (-_-)"
This is the usual vanilla sponge recipe which I used previously using the egg separation method (分蛋式海绵蛋). Since I have already posted it several time, please just refer to here for details.
Instead of using brown food coloring, I used melted chocolate to color the bears. As for the eyes and cheeks I used edible maker pens to draw it. Personally, I feel the rosy cheeks on the teddies makes them a little more cheerful, hee. :D
The cake is as usual, soft and spongy which was still tender when straight out of the fridge. Excellent recipe from 孟老师的美味蛋糕卷 cookbook. Hope you enjoy this post as much as I had fun baking it up plus posting it to share. ;)

Another recipe that I'm posting today is kinda of an experimental one since I only saw it once on a Chinese recipe book and roughly copied it down months ago. It ain't chicken pie nor curry puff but Curry Chicken pie, lol! The moment I read about it, I knew it was gonna be delicious! Especially if you like both the earlier mentioned dishes, this is a sure win for you. ;)
Just imagine: flaky, buttery pie crust encasing creamy curry chicken filling with soft potatoes and tender carrots....how good does that sound to you?! I was really happy it turned out great as my family loved it very much, even my kids whom are not too fond of spicy food, both had 2 servings each! Interested? Check out my recipe:

Ingredients for Curry chicken pie: (makes an 10" pie)
Pie Crust:
250g plain flour
80g wholewheat flour
115g unsalted butter, cut into small cubes
3 tbsp Ghee
4g salt
30-40ml ice water
  • In a mixing bowl, sift the salt and flour in. Add the cubed butter and knead in using your finger tips until the mixture resembles bread crumbs. Add in water and knead till it just comes together into a soft pliable dough. Wrap in plastic wrap and chill for at least 30 minutes.
Egg Cream Mixture:
100ml evaporated milk
100ml fresh milk
2 whole eggs
30g curry paste (adjust as per personal preference, some curry paste tends to be more spicy)
Alternatively you can use Japanese curry cubes (I added 2 cubes)

Curry filling:
150g cooked roast chicken
80g green peas
100g boiled, peeled and cubed carrots
100g boiled, peeled and cubed potatoes
2 hard boiled eggs, peeled and slice into wedges
  • Remove the pie dough from fridge and roll out to about the circumference of your greased pie dish. Then gently place the rolled out dough into the pie dish and press in to even out the layer.
  • In a mixing bowl, mix all the ingredients for the egg cream mixture. Make sure the curry paste is mixed in properly with no lumps.
  • Preheat the oven to 190C.
  • Place all the curry filling ingredients evenly distributed at the base of the pie dish over the pie dough.
  • Then pour the cream mixture over the curry filling, making sure the filling doesn't over flow.
  • Bake in the oven for 35 to 40 minutes until the filling is set and golden brown. Let pie cool for15 minutes before slicing. Enjoy!
Note that the curry paste used is up to personal preference, if you like it more spicy, adjust as needed. I used a Japanese curry paste which my kids love. This "east meets west" recipe surely can be easily accepted and enjoy by many, so why not give it a try? Have fun baking and eating it!

Okay all, have a great week ahead!

Friday, December 23, 2011

Merry Christmas All!

Christmas is almost upon us! Somehow this year I have pretty strong festive feelings, not sure why. :) Perhaps is the awaiting of meeting up with my dear friends or maybe it's just the burst of eagerness to bake after my vacation. :P Either way, I am please that I got to bake some Xmas goodies this year. The last one is this Christmas log cake, inspired by my friend Grace. :)

I used plain vanilla Swiss roll recipe but encasing rich and decadent dark chocolate buttercream. ;) It was baked for a dinner gathering at my in-laws and everyone loved it. ;) It was finished off in a flash!
Since I have an early morning tomorrow, I shan't be posting up the recipe. Interested bakers can inquire after Xmas. ;) Be back before you know it!

Lastly, I just want to thank all my dear readers and fellow bloggers' constant support throughout this year. I truly and really appreciate it! I hope I can continue to do this and have you all by my side. ;) Lastly, I'm taking this opportunity to wish everyone a blissful and joyous Christmas and an amazing New Year! Cheers All!

Sunday, July 31, 2011

Dear Mum's Birthday: Passion Fruit Swiss Roll Cake & "寿桃" (Peach) Buns

It's my mother's birthday again. It goes without saying I have to bake a nice cake for her as well this year...nicer then the one last year. But because of the recent Father's Day cake I made, my family kind of fell in love with the passion fruit cake flavor. So I decided to bake a passion fruit cake but in the same Swiss Roll cake deco I made for my MIL's birthday cake in June. I have to say this cake is like a marriage of 2 recipes & technique I learned in these months. And this is the result of the happy "marriage", heehee.
I know I should have come up with a new design on the outside, but I really don't have that kind of time leisure, so I just went to the same design as the previous one. But bare in mind that this is a Passion Fruit Swiss Roll Cake...meaning the cake is rolled up just like the one in the Father's Day & my Hubby's Birthday cake I made. Meaning the cake layering are in vertical form. Anyway, I will upload a picture of the sliced cake after tonight's celebration. :)

Instead of using the same recipe of sponge cake (whole egg technique); I decided to change the recipe to using the egg separation method "分蛋式海绵蛋". Main reason is this method yields the softest of all the techniques (i.e. Chiffon, Sponge and egg separation). Here is my recipe:

Ingredients for Passion fruit Cake Batter (13" by 15"):
Set A:
5 large egg yolks
60g caster sugar
110g superfine or cake flour
2 tsp corn flour

Set B:
50g unsalted butter
50ml fresh passion fruit juice (~ 3 passion fruits)

Set C:
6 egg whites
pinch of salt
50g caster sugar

Ingredients for Passion Fruit Cream Cheese Filling:
150g unsalted butter
250g cream cheese, room temperature
80g confectioner's sugar
50ml passion fruit pulp
100ml non dairy whipping cream
1.5 tbsp gelatine powder melted in 2 tbsp boiling water

Method:

  • Melt the butter together with the passion fruit juice from Set B under double boiler and let cool until needed.
  • Line a baking tray with parchment paper and greased it again. Preheat oven to 170C.
  • Again under double boiler, beat the egg yolks and sugar (from Set A) till triple in volume and thickens.
  • At the meantime, beat the egg white with gradual addition of the sugar in Set C and beat till mixture is stiff peaks.
  • In 3 separate portions, add the egg whites into the yolk mixture, folding gently till all is added in.
  • Sift in the flours in 3 separate portions as well, using the electric mixer at its lowest speed. Do this till there is no visible lumps of flour and making sure not over beating and deflating the mixture.
  • Take about 2 tbsp worth of the batter and mix into the melted, cooled butter mixture. Make sure it is well mixed and then add it back to the cake batter and gently stir to blend.
  • For the Swiss Roll decoration details, please kindly refer to this post.
  • Finally, pour the batter into the baking tray and level out with a scraper. Then bake in the oven for 13 minutes or till tester comes out clean. Let cake cool completely before use.
  • In the meantime, prepare the cream cheese filling: Cream the butter, cream cheese, sifted powder sugar, gelatine mixture and passion fruit juice together till smooth.
  • Pour in the whipping cream and continue to whip at high speed till mixture fluff up and increase in volume more.
  • For details on how to assemble this cake, please refer to this post.
I really have to work on my piping skill...my Chinese characters are not very nicely done. ;P And hopefully the taste of the cake will work out nice as well tonight. *fingers crossed*

Latest update!
Managed to get a shot of a slice....the cake was indeed very yum, just like the previous time, heehee!


Besides the cake, I also made some "寿桃" (peach) buns for my mum's birthday. Traditionally, these buns that are served during an elder's birthday celebration. Since this was my first attempt, I had a very rough work done...but still presentable...I think, lol!

I had these buns filled with white lotus paste (no sugar added). Had thought of adding salted egg yolk in it too but decided not to, as there's too much work!! :P As for the bun recipe, it's none other then my trusty soft mantou recipe of course, hee. :D
Hope you guys are not laughing your pants off looking at my ugly "寿桃" (peach) buns. :P Seriously need some practice on the shaping. Luckily it is just for my family's consumption....hee. :D But let's hope my mum won't be disappointed in these. *double fingers crossed*

Okay folks, gotta go and prepare for the celebration tonight, will post again soon! Have a great week!

Thursday, July 28, 2011

Chocolate Swirl Bread Loaf & Pork Floss Swiss Roll

Another month is coming to an end, and it is almost August. And before we know it, we'll be marching into the last quarter of 2011. Time is just swishing by really fast and sometimes I feel kind of helpless thinking about it. Wonder if anyone of you felt the same. :P Anyway, I'll try to minimize the wasting of time here by posting two recipes in this post. First up is Chocolate Swirl Bread Loaf. I have again adapted the 17hr pre-fermentation method in this recipe. Using the plain white loaf recipe, I incorporated some cocoa sugar powder to create the swirl effect.


Pardon me if you find this loaf rather hideous looking...kind of like the incredible hock loaf, lol! I guess I should have dine a better job on the shaping. But it's really kind of messy and hard to handle as the cocoa sugar powder melts into the dough as I place it into the loaf tin....so lessonlearn ; choose a cooler day to bake this. ;P

Ingredients for White Bread Loaf (makes 2 loaves of 9X5X5)
Pre-ferment Dough
480g bread flour
274ml water
14g fresh yeast ( I used 8 g instant active dry yeast)
7g sea salt
14g skim milk powder

Dissolve the yeast in water. Add bread flour, sea salt, skim milk powder and knead until soft. Cover the dough in cling wrap or a big zip log bag. Refrigerate to let it prove for 17 hours.

Note: The dough will expand in the fridge. So whatever container you put the dough in, do give some allowance for growth.

Main Dough:
206g bread flour
7g sea salt
69g caster sugar
199ml water
3g fresh yeast (I used instant active dry yeast)
48g unsalted butter, room temperature

Chocolate Mix:
40g cocoa powder
100g caster sugar
Method: (*note that I use only half of the dough portion for this)
  • Knead all ingredients of the main dough together, except the butter. Add pre-ferment dough piece by piece. Knead after each addition until soft and smooth. Add butter. Knead until stretchable consistency.
  • Put the dough into a big bowl. Cover with cling wrap and let it prove for 30minutes till double.
  • Punch out the air and roll the dough into a flat rectangle, about 250cm by 30cm. Sprinkle the chocolate mix all over the dough surface.
  • Cut the dough into 8 equal strips and stack them one on top of the other. Then further cut the dough log into 6 equal squares.
  • Take the stacks of square dough, place them standing up like books until it fills up the whole
I apologize for the lack of visual aid in the shaping of the loaf this time. But no worries, normal Swiss roll style shaping will work just fine. :)
    A shot of the bread's soft texture. Didn't bother to slice it this time, lol! Anyway, it's a good recipe, will make it again, perhaps with cinnamon sugar & chocolate chips next round.

    The other recipe is Pork Floss Swiss Roll. I have done this Swiss Roll before...quite awhile back. Although this combination may seem unorthodox, cake with pork floss? But trust me, it is surprisingly delicious. So far anyone that has tasted it has changed their own opinion about this unusual marriage of ingredients and rave it's yumminess. :)


    This time I used the vanilla sponge cake recipe from 孟老师的美味蛋糕卷 cookbook. This vanilla cake recipe uses the same egg separation method which always yields a soft texture. Here is the recipe:

    Ingredients for Vanilla Sponge Swiss Roll cake: (makes a 14cm X 10cm)
    Set A:
    40g unsalted butter, melted and cooled
    100g egg yolk (about 5)
    20g caster suagr
    Set B:
    160g egg white ( about 4)
    75g caster sugar

    55g cake flour

    For detail steps; please refer to my earlier post for the technique.


    I will be submitting this to Aspiring Bakers #9 - Swiss Rolling Good Times hosted by Obsessedly Involved with Food. If you have not submitted yet, do hurry as it's only a few days left! Don't miss out the fun and the attractive gift that might just be yours! :)

    Okay all, have a great weekend ahead! Cheers!

    Wednesday, July 20, 2011

    Black Forest Swiss Roll Cake with Cream Cheese & Fresh Cherries

    Hi folks! Hope all is well. :) It's already past mid week and it's as usually busy for me. But all work and no bake makes me dull, lol! So finally I "squeeze out" some time this afternoon and did the Swiss roll cake I have been thinking of for the past week. :) It's Black Forest Swiss Roll Cake! Seen it on other bloggers' post which urged me even more to try it. Since there were some fresh cherries left in my fridge, I used them instead of canned ones. I guess the downside is that the cherries can get a wee bit tart. :P Luckily my family love fresh cherries, so they have no problem with it at all.:)) Personally, I like the slight sourness in the fruit which makes the cake's over sweetness just right. :)
    I have adapted the same egg separation technique "分蛋式海绵蛋" for this Swiss roll cake from 孟老师的美味蛋糕卷 cookbook. For more details on the recipe and steps, please refer to my previous post on Chocolate Swiss Roll.
    Instead of using just plain whipping cream for the filling this time, I added cream cheese into it. It turned out very smooth, extra creamy and went really well with the chocolate cake and cherries. Simply decadent! Read on for the cream cheese filling:

    Ingredients for Cream Cheese Filling:
    200g cream cheese, room temperature
    3 tbsp fresh orange juice (you can use lemon juice)
    30g caster sugar
    100ml non dairy whipping cream, cold

    Method:
    In a large mixing bowl, place the cream cheese in and start beating it till smooth and creamy. Add the orange juice, sugar and continue to beat till smooth. Lastly pour in the whipping cream in and start whipping till the mixture fluffs up and increase in volume by double. Give it a taste test to see if the sweetness is just right for you, adjust accordingly. Chill in the fridge till needed.
    The only thing I find it hard to handle was the chocolate shavings. With this kind of hot weather, I had to move the cake & chocolate shaving in and out of the fridge, just to prevent it from melting. :P And notice the sun is almost setting when I'm taking these photos....can't afford the strong rays shinning on my "precious", lol!
    Once again this cake technique has yield super soft and spongy texture. It doesn't deflate like the chiffon technique and it taste much softer then the usual whole egg sponge technique. :) Overall, a wonderful recipe. :) My family simply loved it! If you have the time, I highly recommend you give this a try, definitely worth it! :)


    Okay all, have a good day! Cheerio!

    Thursday, July 7, 2011

    HoneyBee Swiss Roll Cake

    I have finally did it! Something I have been wanting to do for awhile...another Swiss roll cake decoration!
     Doesn't this picture just cheer you up a little? It almost seems like a little kid doing a new kind of art work, lol! Since my last couple of attempts with the Pikachu Mango Swiss Roll and my MIL's birthday cake, I promised myself that I must do it again. :) I knew I had to do a picture with a bee in it, heehee.
    This time I followed the recipe given in my cookbook. And mind you, its in Japanese and I am half guessing the words and trying to translate it online, lol! And the best part is I actually modified the recipe and so as to increase the volume to fit my bigger baking tray...scary right, lol! :P Anyway, the recipe calls for a simple vanilla cake using egg separation method, almost like chiffon cake technique. Here is my recipe, translated by yours truly (use it at your own risk, heehee) :

    Ingredients for Vanilla Swiss Roll ( 10 inches by 14 inches cake tray) :
    Egg Yolk Batter:
    4 egg yolks
    40g caster usgar
    75ml water
    50ml vegetable oil
    1.5 tsp pure vanilla extract
    100g Cake flour

    For decorations and drawings
    • (A) Four separate small bowls with 1tsp of above batter placed in it(for red, pink, yellow & brown food coloring) Note that I use 1 tsp of cocoa powder instead of brown coloring
    • Add 1/4 tsp of cake flour into each bowl and mix well (Next time I will omit this as I find it hardens the batter a little and thus separating the decoration from the Swiss roll)
    • (B) Another bowl with 2 tsp worth of above batter place in it (for green food coloring) Note that original recipe calls for green tea powder but I used green food coloring.
    • Add 1/2 tsp of cake flour to the bowl and mix well.
    • 1 egg white beaten with a pinch of cream of tartar & 10g caster sugar till stiff peaks. Take 1/3 of this egg white and mix in (B) mixture while the remaining 2/3 is divided equally among the 4 bowls in (A) and mix well.
    • Place your desired picture on the baking tray and place a greased parchment over it and grease it again. Preheat the oven to 165C.
    • Pipe the decorations on the parchment as required and bake in the preheated oven for a minute. Repeat till the whole picture has been piped out and baked except for some of the outlines which will require black food coloring later.
    Egg White Batter:
    5 egg whites
    40g caster sugar
    1/4 tsp cream of tartar
    • Beat egg white till foamy, add cream of tartar and continue to whip. Gradually add in the sugar and continue to beat at high speed till it reaches stiff peaks.
    • Fold white into the reserved main egg yolk batter gently in 3 separate portions till all is incorporated.
    • Pour batter over the baked decoration and filled up the baking tray. Level it nicely and then place in preheated oven to bake for about 12 to 14minutes till the top is golden brown.
    • Remove from oven and let cool completely before removing from tray and peeling off the parchment.
    This is how it looks like once all the decoration has been baked on to the cake and yet to be rolled up and outlined. Note that outlining the picture should only be done after you have filled and rolled up the Swiss roll. Simply just use some food coloring with 1/2 tsp of water and a fine tip brush will do.
    Please pardon some of the "untidiness" you can spot from the Swiss roll. It can be really hard to control the cake batter to make it perfectly the way you want it to look like. I'm sure those bloggers that have attempted this will know what I mean. :P There were a few mistakes I made while making this, biggest one was forgetting to grease the parchment and causing some of the batter to stick! *sigh* Anyway, I am still happy with the end result...even thought it took me a whole 3 hours to complete it! ;P
    I have filled the cake with simple whipped cream and fresh sliced strawberries, plus a thin layer of chocolate ganache...which explains why there's this brownish color on the inside. :P

    My kids loved the cake...taste wise that is, they don't really fancy much of mummy's "art" work. :P The cake is indeed very soft...and no cracks when rolled. Shall make it again with other flavors next time.

    Thanks for staying and reading my long post. And hope my explanation is clear enough for those who wants to try out. :P

    Needless to say, I'll be submitting this post to Aspiring Bakers #9 - Swiss Rolling Good Times hosted by Obsessedly Involved with Food.

    Have a good weekend folks!

    Friday, June 3, 2011

    "Swiss Rolled" Mango Yogurt Cheesecake

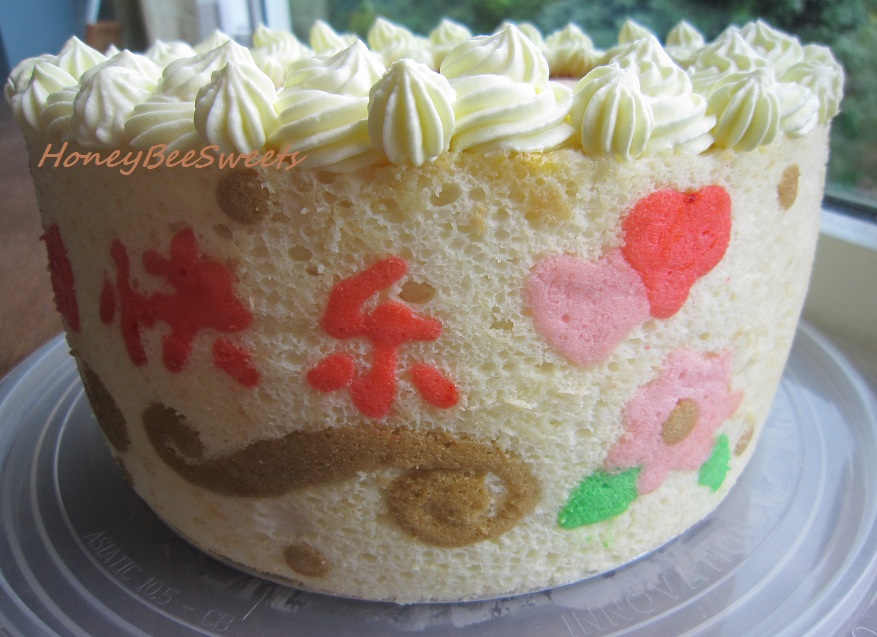
    Last weekend was my MIL's birthday and for the past month, I had been pondering what kind of cake should I be baking for her. Nothing too "adventurous" either in taste or looks, especially if it's meant for an elder member of the family. But I wanted to bake something real special too, not something I've done before. :P So with much consideration and "engineering" involved, I decided to go with this Swiss Rolled Mango Yoghurt Cheesecake. Why Swiss rolled? Check it out yourself:
     
    If you remember a while back when I did the Pikachu Mango Swiss Roll Cake, you'll know where I got this idea from. Nice? I sure hope it had made the birthday lady a littler happier seeing this cake. If there is a phrase to describe what I went through to make this cake, it's "没有功劳,也有苦劳" (rough translation: even if I didn't get any credit for it, I sure did gave my full effort in making it). You folks must be wondering what effort? What's the big deal? Well, the thing was I made a major mistake in the process of baking the Swiss roll cake around it. When I piped the Chinese characters "生日快乐", I didn't realize that it will turn out to be the mirror image when I placed the sheet cake up! Left with no choice, I re-baked the Swiss roll sheet again, deco and all....*sigh!!!* Well at least there's a lesson learnt here! I'm pretty sure I won't be making this mistake again....I hope!


    I got idea of making fruit yogurt cheesecake from Wendy of Table for 2 or more, where she made a Passion fruit Yoghurt Cheesecake. It looked really light and refreshing, something nice to have after dinner. So it was definitely a good choice for me. :)) I followed her recipe to the dot except that I replaced the passion fruit with fresh mango puree and the plain yogurt with mango yoghurt. As for the Swiss roll, you can use my Pikachu mango Swiss Roll cake recipe. :))
    Besides the minor "set back", I really enjoyed making this cake. :) It still turned out as I expected it to be. (BIG relief!). :P It was light and freshing, with a slight tang from the yogurt which I find it easy to go down even after a heavy dinner. :))

    As you can see from the sliced up cake, the yogurt layer and the cheesecake layer are not in proportion. :P I should have doubled up the cheesecake recipe and reduced the the yogurt filling. O well, next time! BTW, sorry for my poor photography this time, sure didn't do justice to the cake, heehee *thick skinned!*

    Hope you all like this cake I made and a little inspired to bake a nice birthday cake yourself for you loved ones. :) Either way, have a good good weekend! Cheers all!

    Wednesday, May 4, 2011

    Orange Swiss Roll with Rich Chocolate Cream & A bundle Joy

    It's already the beginning of May and loads of things seems to be going on in this month. First is the Singapore Election that will be held this Saturday. Everyone is talking about it; on newspapers, radio shows, blogs and also FaceBook. Very happening now with rallies to attend and hearing the views from the nominated candidates. Also reviewing what Singapore's potential future leaders need to embark on and how it will directly affect us. I just sincerely hope whatever the result may be, it'll be for the best, be it for the people or the country.

    Going on as well is the mid term exams with the kids. It is stress time both for parents and children. But looking on the bright side, there seems to be a continuous string of long weekends for the children to do their revision. :) Anyway, I wish everyone best of luck for their papers!

    On the lighter side of things, yesterday I manage to bake a Swiss roll cake for a friend. I believe most of you knows who she is, its Grace from Kitchen Corner. She has been pretty busy lately and couldn't be with us much in the blog sphere. Why? Hope over to her blog and you'll know. :) Grace and I have been talking about meeting up for the past month. But since we were rather busy with our own stuff, we had to postpone the meet up until today. Wanted to bake more but only managed to churn out a simple Orange Swiss Roll with Rich Chocolate Cream cake for her.
    The initial plan was to make a much nicer pattern then just simple chocolate hearts on the Swiss roll. But since I had to prep for dinner, I just went with the easy way. *sorry Grace* Hopefully she & her hubby will enjoy this simple desert. Interested in the recipe? Here it is:

    Ingredients for Orange Chiffon Cake (makes a 10" by 14" tray):
    Egg yolk mixture:
    4 egg yolks
    30g sugar
    1/2 tsp orange essence (optional)
    75ml freshly squeezed orange juice
    80ml water
    Zest of 1 naval orange
    60g cake flour
    60g plain flour
    80ml vegetable oil

    Egg white mixture:
    4 egg whites

    94g caster sugar
    1/4 tsp cream of tartar
    Decorations:
    50g semisweet chocolate (I used Valrohna with 65% cocoa), melted and cooled

    Filing:
    80g semisweet chocolate, chopped small
    50g salted butter
    120ml non dairy whipping cream


    Melt the chocolate and butter in double boiler and let cool slightly. Then as the whipping cream is being whipped in the mixer and almost reaching stiff peaks, gradually pour the chocolate butter mixture in. Continue to whip till mixture is well combined. Chill it till needed.
    For detail steps on the Swiss roll method, please refer to my previous post on Pikachu Mango Swiss Roll. Thanks!

    I was a little disappointed with the chocolate hearts as it looks kind of messy on the roll. :P But luckily the cake still taste pretty nice, soft orange flavored cake with rich chocolaty cream. Yummy combo. :)
    While I was at Grace's place, I got to meet the new addition of her family. Believe me when I say I am totally charmed by him! He is such a beautiful little baby. He has such big bright eyes with cute little dimples on his cheeks and always generous with his smiles. :) He is really a bundle of joy! I'm so sure he's gonna be a girl-magnet next time, lol! Think I will pay Grace a visit again soon...see what I mean?! Lol!

    I am submitting this to Aspiring Bakers #7 - Chocolate Delight (May 2011) hosted by DG from Tested and Tasted. Thanks for hosting this month Doris!

    Hopefully I will have time to post up a tart recipe that I've been "dying" to try soon.
    Okay, hope you all have a nice week. Cheerio!