Thursday, January 22, 2015

Ban Guan Kueh / Soon Kueh

Ah yes, I have finally decided to blog about this Kueh recipe. There has been so many requests for it and because of so many reasons (shan't go there), I held back. Anyway, today's the day I share with all my readers my all time favorite kueh...Ban Guan Kueh...or Soon Kueh?
Frankly speaking, up till now, I am still a little puzzled over the name of this delicious savory kueh. So is it Ban Guan Kueh or is it Soon Kueh? Technically speaking, Ban Guan is jicama in Hokkien. And in this recipe, I used only jicama and no bamboo shoot which is "Soon" in Hokkien. In Chinese, known as "竹笋".So if you ask me...I really don't know haha! Perhaps someone that is reading this, whom also is a kueh "expert" for that matter, can enlighten me on this matter. ;) 

In all else, let's just get to the juicy part shall we? The recipe of course! I have tried so many different recipe and I finally come to one that I can say it works perfectly. All thanks to Anges Chang's book "Anges Chang's Hawker's Delight" which I believe Singapore bookshops have already stopped selling this book. *bummer right* One of her vegetable dumpling recipe uses this kueh skin which looks pretty close to a soon kueh skin. I tried, it turned out great and the rest is history! Anyway, I did minor changes to it and so here is my version:

Ban Guan / Soon kueh (makes about 20-23 kuehs)
Kueh Filling:
800-1kg jicama, peeled and shredded
6 dried shiitake mushrooms, soaked till soften, sliced to thin strips
4 tbsp dried shrimp, soaked in warm water till soften, roughly chopped
3 garlic gloves, minced
5 shallots, chopped small

Seasoning:
3 tbsp oyster sauce
1 tsp salt
3 tsp sugar
1 tsp chicken powder
1 tbsp light soy sauce
1 tbsp corn starch + 2 tbsp water (thickening agent)

Kueh Skin:
300g wheat starch (蒸面粉)
200g starch flour (aka Tapioca flour)
100g rice flour
1 tsp salt
825ml boiling water
4 tbsp shortening (those white vegetable shortening, can get in NTUC bakery section)

Some cooking oil and brush to coat the kuehs before and after cooking it
  • First we prep the filling: In a wok, heat up 2 tbsp of vegetable oil over medium low fire. Add in the minced garlic and chopped shallots, cook till fragrant.
  • Add the chopped dried shrimp and sliced shiitake mushrooms and stir fry for a good 3-5 minutes till the mixture is aromatic and slightly brown.
  • Add in the shredded jicama and seasoning, stir fry to mix well. Cover and cook till the jicama is soften, about 5-8 minutes.
  • Lastly mix the corn starch and water together and add into the jicama mixture. This will thicken the whole filling.
  •  
  • Scoop out the filling and let cool completely before use.
  • Next you make the skin: In a large mixing bowl, add in all three flours and salt. Next you carefully add in the boiling water.
  • Gently but work rather quickly, stir the whole mixture together (you can use the mixer) till it is all combined.
  •  
  • Add in the shortening and again mix well. Let mixture cool down before working with it.
  • Prepare the steamer before you start working on wrapping the kuehs. 
  • If you prefer, you can weigh out the skin portion by portion of about 70g each. Or you can
    just eye balled it. Because once you wrap, you will need to trim the sides to make it neater.
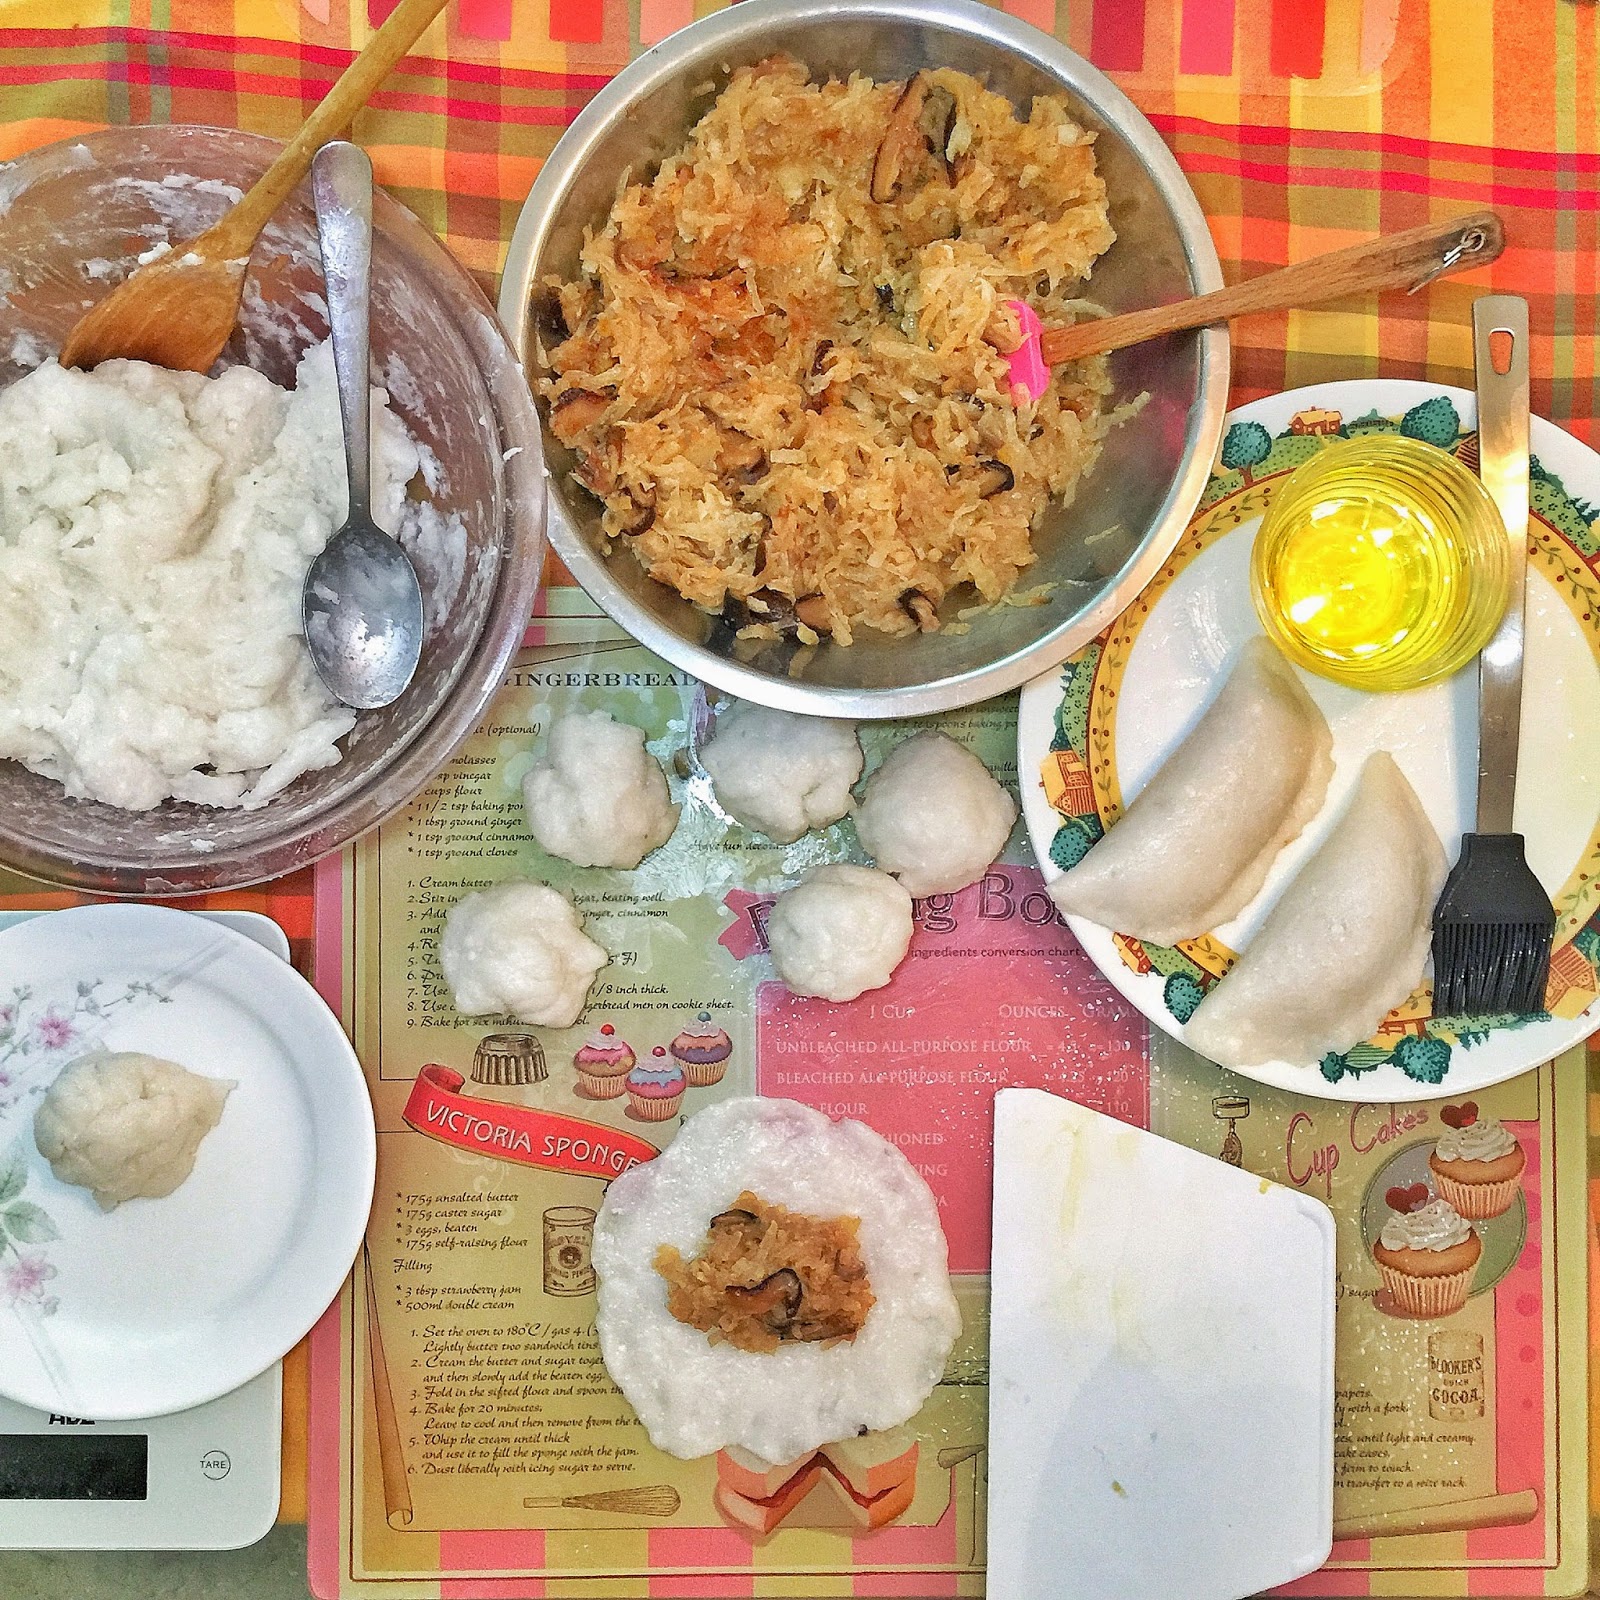
  • Roll out that skin dough portion into a flat round, then scoop about a heaping tablespoon of the filling on top, fold the skin and seal the sides. Give the kueh a good brush of cooking oil to prevent it from sticking.
  • Next is just repetitive work, roll, scoop, wrap ...repeat till all the filling or skin dough is used up. 
  • Steam in the steamer at medium fire for a good 10 minutes. Remove and brush with some cooking oil. Repeat till all have been steamed.
  • Enjoy the kueh while still warm with lots of sweet dark sauce and chilli! Yum :9

This is just one of those comfort meals that I think I will never ever get tired of. Brings back the good memories and nostalgic feelings. :)
So when was the last time you have a warm Soon Kueh? Been awhile? I guess it is time for you to get to work and make some for yourself and love ones! :D

Have a great day ahead all and Happy cooking!


Tuesday, January 6, 2015

Chicken Curry Mee

Wow, I am surprise that I am blogging two days in a row! Haha! The fact of the matter is I really love this recipe so I have to record it down on my blog before it's gone. :P What recipe? A comforting spicy dish that every household should have... Chicken Curry ...with noodles! Yeah Chicken Curry Mee. I am sure many of us have seen and tasted it before, be it Penang style or local Singapore style, everyone has their own rendition. Well, so long as it taste good, that's all that matters right? ;) 

Plus the change of weather lately, having this on rainy nights is just so shiok!
Oh man, when I cooked this, I seriously didn't think it will turn out so good. :D It's like striking a jackpot! Lol! Anyway, the whole family loved it, even my kids who can't really take spicy food! Yay!


Okay! Let's get cooking! Here are ingredients we need for this yummeh curry mee. :9
Oopsie, I missed out the Sing Long Chilli Sauce in this ingredients photo. :P Anyway, you can click on the name to see how it looks like. :)

Recipe for Chicken Curry Mee (Serves 3-4)
Curry paste:
6 garlic gloves
5 shallots
1 large red onion
1 tsp salt
1 tsp sugar
  • Blend everything together till smooth. Set aside for use later.
1.5 kg Chicken, cut into smaller pieces
2 lemongrass stalks, bruised with the back knife
3" thick young ginger, sliced thinly
4-5 Kaffir Lime leafs
1 package (200ml) coconut cream/milk
300 ml water 
1 tsp chicken seasoning
1 tbsp tomato ketchup
2 pandan leafs
2 russet potatoes, peeled and cut into large chunks
5 fried beancurd (dao pok), sliced smaller
5-8 large shrimps, peeled and devined
1 pack of egg noodles
1 Japanese cucumber, julienned
Salt, sugar to taste
  • In a large bowl, place the cut chicken pieces in. Add in the paste and mix in so that all the chicken pieces are coated with the paste (as seen above). Let it marinate for 20-30 minutes.
  • Next in a heavy cooking pot, add 2 tsp of cooking oil over medium low fire. Add in lemongrass, young ginger and kaffir lime leafs. Cook for a couple minutes until aromatic.

  • Next add in the marinated chicken pieces in paste. Cook at medium fire for 5 minutes till most of the chicken has turned opaque.
  •  
  • Add in water, chicken seasoning, coconut milk and ketchup. Give it a stir and let it boil. Add in pandan leafs, salt and sugar.
  • Next add in cubed potatoes, fried beancurd and give it a good stir. Let it come to a boil, then reduce the fire to a simmer. Let simmer for 10 minutes.
  •  
  • In the meantime, parboil the egg noodles in a pot of boiling water. Drain and divide the noodles in serving plates.
  • Taste test the curry and add more water if needed if there is not enough gravy. Ladle chicken pieces and gravy over egg noodles and top it with some julienned cucumber. Serve immediately. Enjoy! 
I am just glad I cooked this, and more glad I posted this. Will definitely cook this dish again. :9 You can change to serving this with baguette or bee hoon...which ever you fancy. ;) Most importantly, cook your yummy curry mee and eat it too! Enjoy!

Have a good night all!

Mango Panna Cotta

After that whole week of continuous rain, the weather has finally made a change for the last couple of days. Back to scorching sun and unbearable heat. :P I guess this changed of weather did prompt me to come up with some cooling desserts. Well, it is better to make something healthier at home then to keep feeding my kids ice cream.

A fruity cold creamy dessert like pudding or panna cotta just came to mind since I just bought two large mangoes recently. Mango Panna Cotta it will be!


Recipe for Mango Panna Cotta (recipe Adapted from 孟老師的甜点杯)
3 gelatine sheets (or 3/4 tbsp gelatine powder)
200g fresh mango meat
250ml fresh milk
100ml fresh heavy cream (for cooking not whipping)
35g caster sugar
1 tsp fresh lemon juice
extra mango chunks for deco
  • Soften the gelatine sheets in cold water. If warm water, it will melt away.
  • Blend the mango flesh in blender till smooth.
  •  
  • Next you add the milk, heavy cream and sugar into a heavy saucepan. Heat over low fire till it reaches 40-50C . Stir well to make sure the sugar is all melted. DO NOT let the mixture boil.
  • Once the sugar has all melted, remove the saucepan and place it over some ice water to cool the mixture.
  •  
  • Add in the lemon juice, give it a good stir. Next add in the soften gelatine sheets and stir well till all is dissolved. You can add this when the mixture has cooled down slightly.
  • Lastly, add in the pureed mango and mix well using a whisk.
  • Carefully sieve the whole mixture into another bowl.
  • Lastly, pour the mixture into small jars or bowls. Should yield about 5 portions of 150CC.
  • Chill in the fridge for at least 4-6 hours or overnight, covered.
  • When the panna cotta is set, top it off with some fresh mango chunks.
  • Serve when it is still cold. Or continue to chill until ready to serve. Enjoy!
Well, did this recipe change your perspective of making panna cotta yourself? It ain't as complicated as it seems right? For quite some time I keep thinking that Panna cotta involves a slightly more complex step as compared to making a pudding. But I guess it's the other way now since pudding you do need to stem bake for some. :P

I was thinking, for this recipe, you can even try swapping the mango to other fruits like avocado? Strawberries? Blueberries? Wow...so exciting just thinking of the possibilities. But do note that you need to let it have enough time to set before serving. And do check that your gelatine powder or sheet hasn't expired before working on the recipe. :)
So light, so creamy...it tasted like mango cloud haha! Anyway, I think I was a little impatient before taking this shot so it didn't set as nicely as I wanted it. So don't make the same mistake as me! :P Just let it do its "thing" and chill out in the fridge ya? :D

Anyway, hope you all will try this out. :)
Have a good day guys!

Friday, January 2, 2015

Buttermilk Cake with Banana and Salted Caramels

Yes, my first post of 2015! I have to remind myself that I need to keep this blog going, no matter how busy I am. :P So let's baking ya? And since I have a small pocket of time when my kids were in school (first day today, I decided to bake a cake. A simple cake, yet tasty, familiar and comforting.  Buttermilk Cake with Banana and Salted Caramel...that should fit the bill ya? 
Soft moist cake topped with caramelized banana slices and salted caramel chunks :9 Okay...the salted caramel chunks kind of sunk in ...haiz :P But it's all good when you bite into the cake...salty sweet gooey goodness, yum! Now the recipe...

Recipe for Buttermilk cake with Banana and Salted Caramels (makes 8x8")
For the Salted Caramel (recipe adapted from Smitten Kitchen)
125g granulated sugar
56g unsalted butter
1/4 tsp sea salt flakes
3 tbsp heavy cream
  • Prepare a shallow bowl with a piece of parchment over it and lightly greased with butter.
  • To make the caramel, use a heavy saucepan for it. Add in the sugar and 2 tbsp water over medium heat.
  • Give the saucepan a good swirl to make sure all the sugar is wet and melting. Let it slowly boil till it reaches a golden colour. Remove from fire and continue to swirl it...it should still continue to darken a little to a copper colour.
  • Add in the butter gently as it will bubble. Swirl and let it melt down.
  •  
     
  • Next add in the sea salt.
  •    
  • And lastly add in the heavy cream and stir in well. Return the saucepan over the stove at low fire and let it slow boil till it gets thicker and darker in colour.
  • Pour the hot caramel on the greased parchment and let it cool completely. (Cool to the touch)
  •  
  • Then chill it in the fridge for at least an hour before use.
For the Buttermilk Cake
115g unsalted butter, room temperature
180g light brown sugar
2 large eggs
1 tsp pure vanilla extract
 250g cake flour
1 tsp baking powder
1/4 tsp baking soda
1/4 tsp salt

*200ml buttermilk, shaken
2 large bananas, cut length wise and slit to halves 

* I used store bought buttermilk because I feel the buttermilk was creamier and more buttery in smell as compared to making my own using milk and lemon. But by all means, use 200ml to 1 tsp fresh lemon juice if you have not buttermilk available.
  • Preheat the oven to 180C and grease a 8x8" square pan, lined with parchment and again grease it with butter.
  • In a large mixing bowl, add in the butter and sugar. Beat it till light and fluffy, about 5-8 minutes at medium speed.
  • Next add in the eggs, cracking in one at a time and mix after each addition. Then add in the vanilla extract and mix again.
  •  
  • Sift in a bowl the cake flour, baking powder, baking soda and salt.
  • Add in 1/2 of the cake flour mixture into the egg mixture and mix well.
  • Add in all the butter milk and mix well again
  • Lastly add the remaining 1/2 of the flour mixture and mix till all is well incorporated. 
  • Pour the batter into the prepared  bake pan and smooth it out with a spatula.
  • Now you line the sliced bananas neatly over the cake.
  • Next you take the caramel from the fridge and make sure that it is solidified enough to be handled.
  • Next you snip the caramel into small squares which you can put onto the cake.
  • You then place the salted caramel chunks on to the cake as well...not on the banana...you will know why later. :)
  • The caramel might be a little soft, but it is ok...just work fast. :) 
  •  Last step is to sprinkle some granulated sugar over the banana surface so that it will caramelized. But this step is totally optional if you prefer yours to be less sweet. :)

  • Once you have added all the salted caramel chunks, put the pan in the oven to bake.
  • Bake for 40 -45minutes till the tester comes out clean.
I cannot begin to tell you how awesome my kitchen smells when this cake was baking in the oven. I was drooling the whole time hahaha! That banana, caramel and creamy buttermilk combo was perfect!
As you can see that soft moist texture of the cake...so yum! And that tender sweet banana plus deep dark caramel at the bottom (Unfortunately :P) is just heavenly in each bite. :9 Next time I bake this, I will try to make sure my salted caramel chunks are harder...so it won't be sinking way down. :P


Anyway, next time you have ripe bananas hanging around in the house...why not give this recipe a try. :) I am sure it will not only impress you, it will make you want to share it with everyone. Ahem...show off heehee. :P


Okay guys, signing off now, it has been quite a long day
Till the next time...have an awesome weekend!