Tuesday, April 28, 2009

Mango Cranberry Cream Loaf

If you happen to read my earlier post, I just got back from Cameron Highland. There were a bunch of things need to attend to. But when I see that there was no more bread for breakfast, I got to work immediately, haha. And seeing the mangoes in my fridge getting all ripe, gave me an idea of making a brand new bread recipe. Yes, this recipe is created by yours truly, so do try at your own "risk", haha. Well, I figured since I've made so many loafs of bread now, why not try coming up with my own bread recipe, it's not that hard really. Luckily, the loaf came out great, even though it's not the prettiest looking loaf, it still taste good!
Bare in mind that I did not add any food coloring to my dough, the yellow comes all natural from the mango itself.

Ingredients for Mango Cranberry Cream Loaf:
250g bread flour
50g cake flour
200ml fresh mango puree
50ml fresh whipping cream

40g caster sugar
3g instant active yeast

1/2 tsp of mango essence
20g unsalted butter, room temperature

1 cup dried cranberries


Method:
  • Mix all ingredients except butter and cranberries in a large mixing bowl to form a soft dough. Knead the dough till it is not sticky, about 20 minutes.
  • Add the unsalted butter in and continue to knead till the dough is shiny and elastic. To test if the dough is ready, pull a small piece off and stretching it with your fingers. If dough is very elastic and pulls to almost see through without breaking, then it's done.
  • At this point, if using cranberries, mix it in till it's evenly incorporated.
  • Place dough in a greased bowl and cover with plastic wrap and allow to proof for at least 90 minutes.
  • Punch out the air in the dough and divide it into 3 equal portions.
  • Roll out each portion into a long flat oval shape and roll up one end to make it into a swiss roll form. Place in greased bread tin (8" by 5").
  • Repeat with the other 2 dough portions and let proof for another 60 minutes or it rises to 90% of the tin.
  • Preheat oven to 180°C.
  • Brush loaf top with egg wash and bake in the oven for 30 to 35 minutes. If top browns too quickly, cover with foil till baking time is complete.
  • Remove from bread tin immediately when done and cool on rack completely before slicing. Enjoy!
Cream was added to the recipe to reduce the acidity from the mango and it went really well! And the best part is I can say this is a vegetarian bread loaf, meaning no eggs was added! Cool right. ;) The scent of mango is pretty distinct in the loaf and the cranberries' sweet and tangy taste goes well with it too! The bread taste good on it's own, really soft by the way. But I think with a spread of cold butter will be even better!.Give it a try and let me know how you like this recipe!

Cameron Highland

Let me ask you a simple question...how often do you stop and smell the flowers? Yes, literally, stop and inhale the wonderful fragrance from mother nature's creation. Well, frankly speaking I haven't done that for the longest time! I used to attend to my garden every morning for a whole hour or two (if my kids don't wake up that early) making sure every plant was thriving or blossoming away. Especially when its Spring time, the garden will be filled with wonderful colors and scent! Such a pleasure to seat in my rocking bench there in my yard and enjoying my morning drink. Such wonderful times...but back to our current time, I managed to recapture some of that moments when I was up in Cameron Highland last weekend. How you say? I stopped and smell the flowers, heehee. :)

If you are looking for a recipe, sorry not this post. ;0 This time it will be all about the nice views I captured in my 3 days stay in Cameron.; ) Interested? Scroll on and have a pleasant view!
It's really hard to show you how breath taking it is just by these photos. And there was such an enormous range of flowers over in Cameron Highland due to it's cool temperature, making every corner a little flower garden on it's own! The weather was nice, the sun was strong and it was not cold but cool, what more could I ask for. ;)
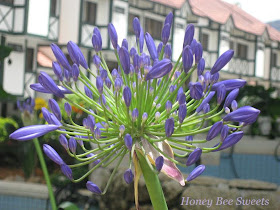
I used to grow these hanging flowers in my garden last time. But I have not seen the sweet pink colored ones before!
These are orchids by the way, quite a different breed. ;)
Even the cactus are blooming!
And if I am not wrong, Hibiscus is Malaysia's national flower. ;)This flower is just amazing! How I wish I can see this flower everyday in my garden!I have to say some of these flowers are pretty exotic looking to me. I really enjoy them and hope you do too. As for the names of these beautiful flowers...I have no clue for some, so I guess I rather not put the names for all. I guess part of the reason why I love flowers may have something to do with my name? Bee and flower...go figure, hahaha! Haven't really got to taste anything that fantastic over in Cameron Highland, so I shan't mislead anyone about the food there. But do try their self-pick strawberry farms! My two girls had loads of fun picking the strawberries there.
Also look out for their sweet corn, it's even good when you eat it raw! Sweet, fresh and crunchy, beat the fattening popcorn any day! Cheers!

Thursday, April 23, 2009

Hello Kitty and Friends

I got a bit of free time this morning and decided to do something fun. Checked my pantry and found something that was double wrapped tightly in plastic wrap and tied in a plastic bag. After painstakingly untying the nodes half way then I knew what I wanted to do this morning (with a grin on my face). The "secret package" was in fact some fondant that a friend has helped me buy not too long ago! Need I say more? Cupcakes and fondant of course! This is like adult play dough, and I cannot wait to get my hands on it, heehee.

It took me awhile to come up with ideas on what I can make with the fondant....the rest was fun fun fun, haha! Actually, deciding on making Hello Kitty fondant mold was a no brainer. The cat's face is cute, it's not complicated to mold out and I was pretty sure my girls will love it. ;)
I have initially intend to make only Hello Kitty fondant mold. But after making four of those, I figured variety would be much nicer. So decided to give her friends a shot too (fingers crossed). Did not want to make the rabbit friend as it looks too much like Hello Kitty. :-P So I went with the big eye frog and the angry penguin. Okay okay, I should introduce them properly in case you are really interested in what their name really are. ;) The penguin is call "Badtz Maru" and the cute frog is call "Keroppi".
Baking the cupcakes took me less then an hour to complete. But molding the cute animal faces took me the whole morning plus a couple hours in the late afternoon. :-P But no regrets really, it's too fun, haha! The only annoying thing is that I have to keep washing my hands to prevent the different colors of the fondant mixing together.
The cupcake recipe is extracted from Martha Stewart's Living magazine February edition, call One-Bowl Chocolate Cupcakes. Seeing the name itself I am pretty much sold! Anything that is one-bowl is my kind of recipe!

Ingredients for Peanut Butter Bread (makes 18):
3/4 cup unsweetened cocoa powder
1 & 1/2 cups all purpose flour
1 & 1/2 cups sugar (I put 3 tbsp less)
1 & 1/2 tsp baking soda
3/4 tsp baking powder
3/4 tsp salt
2 large eggs
3/4 cup warm water
3/4 cup buttermilk
3 tbsp safflower oil (I used olive oil)
1 tsp vanilla extract

Method:
  • Preheat oven to 180°C. Line the standard muffin tray with cupcake liners.
  • Sift cocoa powder, flour, baking soda, baking powder, sugar and salt into a large mixing bowl.
  • Add eggs, warm water, buttermilk, oil and vanilla extract and mix well till everything is incorporated.
  • Divide the batter among the muffin cups, filling to about 2/3 full.
  • Bake until top springs back when touched, about 20 to 22 minutes.
  • Transfer cupcakes onto wire racks and let cool before placing fondant over the top.
The cake is chocolaty, soft, moist and not too sweet, actually went very well with the fondant, haha. ;) You must be going like" Ahhh...soo cruel, you ate Hello Kitty & her friends!" Hahaha, well, in my opinion, not eating well prepared, yummy food and letting it go to waste then is cruel! ;)

I used basic butter cream to adhere the fondant onto the cupcake. And the molding of the fondant is really up to your own creativity. My tools are just my hands and toothpicks. :)
I had loads of fun making this and am looking forward to doing more the next time, so do stay tune and see what's next! Cheerio!

Tuesday, April 21, 2009

Lotus Seed Paste Flower Buns

If you are wondering what is Lotus Seed Paste (莲蓉). It's a sweet paste (like red bean paste) which is of course made from lotus seed itself. This sweet filling is usually used in mooncake or other popular Chinese deserts. It is also my husband's favorite filling. :) Although I do not really fancy it that much, I was really thrilled when I found it selling in a major grocery store the other day. I did not hesitate to buy it as it dawns on me that it would be rather troublesome to make it from scratch!

No no, I am not gonna make mooncake, it's still long way to Mid-Autumn Festival. So why not just do something simple, Lotus Seed Paste Buns! I browse through my bread recipe book and found one bread recipe that uses red bean paste as a filling, so I can just swap the filling. Even my fellow blogger Kitchen Corner has attempted this recipe before, should be "doable". ;) Furthermore the flower shape of the buns are just to pretty to pass!
I gave the lotus seed paste I bought a taste test before baking these bread and found it pleasantly mild, not too oily and not too sweet (which means I can put more filling in the buns). Anyway I realize that Kitchen Corner's recipe is slightly different from the recipe book, so I will post out the recipe on my blog for reference sake in the future. :)

Ingredients for Lotus Seed Paste Flower Buns:
Set A:
200g Bread flour
20g cake flour
25g caster sugar

1/4 tsp salt
3g / 3/4 tsp instant active yeast
15g milk powder
25g egg
115ml water
Set B:
15g unsalted butter, room temperature

Topping for bread:
20g white sesame seeds

Method:
  • Mix all ingredients is Set A in a large mixing bowl to form a soft dough. Knead the dough till it is not sticky, about 15 minutes.
  • Add the Set B unsalted butter in and continue to knead till the dough is shiny and elastic. To test if the dough is ready, pull a small piece off and stretching it with your fingers. If dough is very elastic and pulls to almost see through without breaking, then it's done.
  • Place dough in a greased bowl and cover with plastic wrap and allow to proof for at least 60 minutes.
  • After proofing, punch out air and divide the dough into 8 equal portions. Roll each dough into balls and let rest for 15 minutes before molding.
  • Roll out the dough with the rolling pin into a flat disc and place about 1 tbsp of filling or more if preferred in the center. Seal tightly and press the dough into about 1" flat with the palm of your hands and place on baking tray.
  • Using a kitchen sears and cut 8 small slits on the edge of the dough to create the flower pedals effect.
  • Preheat oven to 180°C.
  • Let proof for 15 minutes and brush surface with egg wash. Sprinkle some white sesame on top of the bread.
  • Bake in the oven for 15 minutes or till the surface is golden brown. Remove from tray immediately when done.
Biting into the soft buns with the sweet fragrant lotus seed paste filling is really satisfying!
A shot of the lotus paste filling. Now this is done...I really need to think of what other recipes I can make with the rest of the lotus seed paste, haha! Yes, mooncakes...but any other ideas?

Monday, April 20, 2009

Mango Swiss Roll

Finally, I got to make this Mango Swiss Roll! If you have been following my posts, I did not manage to make it the previous time and ended up making chocolate swiss roll. But luck was on my side this time and I managed to get it done and even made 2 rolls for my family back home in Singapore too! Since mangoes are in season now, I really do not want to miss this opportunity to make this fresh delicious desert.
Well, I did a little experiment as well when baking the Mango Swiss rolls. What experiment you ask? Okay, there has been quite a controversial talk about using either cake or plain flour in baking a sponge cake. Naturally most people when they bake a sponge cake, cake flour comes to their mind. However after talking to some of my family members (whom used to own a bakery) and also reading up online, I realized there are some expert bakers that uses plain flour in their sponge cake.
You might wonder how can plain flour actually yield a lighter and fluffier texture? I know! I question that too! So the norm is sponge cake that uses cakes flour is soft and fluffier, however it does have this slight "springy" texture that a cake which uses plain flour does not have. Some people do not like this springy taste and thus I was pretty determine to try out the plain flour recipe. And to be able to yield soft and fluffy texture using plain flour really calls for technique and practice!

What I did was I made 2 separate Mango Swiss rolls, one using cake flour and the other plain flour. The cake flour recipe was adopted from Yochana's Mango Swiss roll recipe. The cake turn out great, I couldn't be more happy myself. ;) It's soft and fluffy but it does have a slight springy texture when eating the cake on it's own.
Sorry if it does not look anything near to what the original recipe is...I just did not have the leisure time to decorate that day! Wanted to bake another Swiss roll using plain flour and also need to pack for my trip back home! ~Stress~

As for the recipe with plain flour, I merely replace the cake flour with 110g of plain flour. Everything else stays the same. It turns out the cake cracked a little when I rolled it and the texture was a little coarse...where did I went wrong? I am pretty sure these problems has nothing to do with the plain flour, it's probably my technique. I guess I might have over mixed the batter? Anyway, I am very sure this will not be my last attempt in making a Swiss roll using plain flour...so stay tune if you want to know what's up my sleeves. ;) Will try to get it right the next time!

Guess what, those Mango Swiss rolls were still well received back home in Singapore.*phew!* My father-in-law even had second helpings, heehee. :) I was given more suggestions and advice on how to make it better. (taken notes on that!) I guess family support is the best huh! Thanks!

Thursday, April 16, 2009

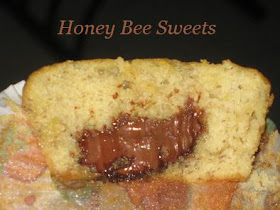
Banana Muffins with Nutella surprise

It's quite an eventful day for me today. Met up with my girlfriends this morning for breakfast at Village Park for their all famous Nasi Lemak. Had a wonderful time chit chatting with them as usual. I even discovered a yummy Roast Pork Rice store nearby my place! Yes, those that almost melt in your mouth....so good! Late in the afternoon, I met up with another 2 neighbor friends to do some baking too. We made Rocky Road Bars, it's a delicious treat with cookies, cherries, roasted peanuts and marshmallows coated generously with chocolate...sounds good right? It taste good too! Well I guess that will be another post. ;) But one thing is for sure, I am so happy to find some more baking buddies to share and discover new recipes together. ;) More on that later....

After cooking dinner, I still managed to squeeze out a little time to bake some cupcakes for my girls' snack. I wanted to make something real simple and also to use up the sour cream & banana in my pantry. And hence this Banana cupcakes with Nutella surprise.
I got this recipe from Bakin' And Eggs, another great food site that I discovered recently. The recipe is pretty simple and I got everything I need to make it, so game on! Note that I have reduce the sugar by 20g and also using 1 banana less, hoping that the cupcake won't be too sweet. :) So here's my version:

Ingre
dients for Banana Cupcakes With Nutella Surprise:
220g all purpose flour
3/4 tsp baking soda
1/2 tsp salt
100g caster sugar
90g light brown sugar
2 large eggs
2 very ripe bananas, mashed
1/2 cup light cour cream
1 tsp vanilla extract
50g unsalted butter, room temp
about 3/4 cup Nutella

Method:
  • Sieve flour, baking powder, salt together and set aside. Combine mashed banana and sour cream together.
  • Cream together butter and both sugars till light and fluffy.
  • Add one egg at a time and till well corporated then add the other egg. After well combined, add vanilla extract.
  • Add mashed banana mixture, then follow by flour mixture. Stir till just combine.
  • Preheat the oven to 180°C. Line the muffin tray with cupcake liners.
  • Scoop enough batter into the cupcake liners to fill 1/4 full. Then spoon about 1 tsp of Nutella into the center. Lastly, scoop more cake batter to cover up the Nutella, filling the cupcake liners up to 3/4 full.
  • Bake in the oven for 18 to 22 minutes till golden brown or tester comes out clean.
The cake is soft and it's a good combo with the chocolate. But perhaps I have been too generous and spoon too much Nutella into the middle, the cupcake is still a little too sweet to my liking. ;0 I guess the next time round, I would opt for dark chocolate instead. ;)

And guess what, while I was at my friend's place making Rocky Road Bars, one of my friend, Reese has generously made these delicious pumpkin "Ang Gu Kuih" for us! Lucky me! Another kind of my favorite nyona kuih! According to Reese, pumpkin paste has been added into the skin dough and thus the yellow colored skin and the filling is the usual mung bean paste....delicious! No worries, I will learn from the master and hopefully be able to make some myself soon. ;)

Overall, I had a wonderful time today with all my friends. And I feel really fortunate to have all these great friends around me. Hope I will be able to have more great times like these to come! Thanks dear friends! So....when are we meeting again harr??