Wednesday, November 30, 2011

Root Beer Float Cupcake

Hi there all! How is everyone doing? Well, if anyone have noticed, I've gone missing for 2 weeks and now I am finally back! I was far and away on a fun holiday with my little family. We went on a self-drive trip in lovely Melbourne and I have so many photos that I want to share with everyone! But that will probably be in my next post since there are much sorting and editing with those photos. :) In the meantime, I have this "unusual" yet delicious cupcake recipe to share with you all, Root Bear Float Cupcake. (^_^)
If you don't already know, I love root beer! It's probably the only soft drink that I consume. :) Last year I did a Root Beer Chocolate Chunks Chocolate Cake and it was really good too. However I find that this cupcake has a much intense root beer taste to it!
This recipe was inspired by Deb from Smitten Kitchen. When I saw it, I knew I had to give it a try. ;) I did several changes to it to match the amount of root beer in a standard can size for easier baking.

Ingredients for Root Beer Float Cupcakes (makes about 6 X 4oz cupcakes)
Cupcake
1 can or 330ml root beer (I used A&W brand, but any brand should do fine)
85g unsweetened cocoa powder
85g unsalted butter
180g Caster sugar
60g light brown sugar
170g cake flour
1/2 tsp baking soda
3/4 tsp salt
2 eggs
1 cup vanilla Swiss Meringue Buttercream (recipe follows)
Some maraschino cherry (cocktail) or fresh cherries

Method:
  • Preheat oven to 175°C. In a small saucepan, heat the root beer, cocoa powder and butter over medium heat until the butter is melted. Add the sugars and whisk until dissolved. Remove from heat and let cool.
  • In a large bowl, whisk flour, baking soda, and salt together. In a small bowl, whisk the eggs until just beaten then whisk them into the cooled cocoa mixture until combined.
  • Fold the liquid and flour mixtures together in the large bowl. The batter will be slightly lumpy; this is okay. If you overbeat it, it will get tough.
  • Fill cupcake liners about 80% full and bake for about 17 to 20 minutes or till the tester comes out clean. Transfer pan to a wire rack to cool completely.
Topping is Vanilla Swiss Meringue Buttercream (makes ~4 to 5 cups)
5 oz egg whites (~140g)
5 oz caster sugar
(~140g)
1/4 tsp salt
bean scrapings from 1/2 of a vanilla bean
1 tsp quality vanilla extract
500g unsalted butter, cut into 2” chunks, room temperature

Method:
  • Prepare a double boiler with a gentle simmer. In a heat proof bowl, combine egg whites, sugar and salt into it. Mix well but no beating is required. Place the bowl over the double boiler and placing a candy thermometer to monitor the temperature.
  • Stir once in awhile to prevent the egg white from curdling at sides. Aim to to have the temperature reached at least 146F / 63C for food safety reasons.
  • Once the temperature is reached, remove from heat and beat it till it is silky white. Add vanilla extract and mix well. If the mixture is still hot, place it over a bath of ice water to cool it down.
  • Add the butter chunks one piece at a time and continue to beat while doing so. Continue to beat till all the butter has been added and the buttercream is smooth and silken.
  • Use about 1 cup for the cupcake while you can chill the rest in the fridge for use in future.
I'm pretty sure many of you have had a root beer float before? In order to create that root beer float effect, that vanilla buttercream on top is supposingly the vanilla ice cream scoop. The cherry? Well, it does give it a more sundae look, don't you think? Although using a Maraschino cherry would be more "appropriate" but personally, I much prefer to fresh version. :))
Since I did reduce the sugar level quite a bit, so with the vanilla SMB, the sweetness is just right. And you know, after chilling it, every bite does gives you that root beer float taste! How cool, a favorite beverage recreated into cupcake form, lol! If you like root beer like me, this will knock your socks off!

I will be submitting this fun cupcake to this month's Aspiring Bakers #13: Enjoy Cupcakes! (November 2011) hosted by Min of Min's Blog. Thanks Sze Min!

Alrighty everyone! Hope you all have a good day now, cheers!


Monday, November 14, 2011

Steamed Flower Tofu and Pear Soup with ChuanBei (川贝雪梨汤)

Today I'm posting 2 healthful recipes which I am sure anyone can benefit from it. As I have mentioned before, my family loves eating tofu dishes. So I am always on the look out for good recipes. And just the other day, I happened to spot this recipe from Wendy's which pretty much had me when I saw the word steam tofu, lol! Steamed Flower Tofu, as the name implies, it's pretty to look at plus its healthy because it is steamed. Not forgetting it's so easy to whip up!
I made some changes to the recipe, so this "flower" will actually look different from Wendy's. :) I changed the mushroom at the center to Century eggs instead and I omitted the fake crab meat as well. I used Century eggs because personally I think its texture blends more nicely to this dish instead of the dried mushroom. :) I omitted the crab meat because I didn't have any when I make this. :)

I will be posting my version of the recipe for easy reference in future. Thanks to Wendy for sharing her recipe. :)

Ingredients for Steamed Flower Tofu: (Serves 4 adults)
2 century eggs, peeled, sliced into 6 -8 wedges per egg
4 slices Ham, sliced into strips
2 beaten fried egg, cooled and sliced into strips
1 silken tofu (250g)
1 egg
salt and pepper to taste

Method:
  • Line the steam bowl with heat resistance cling wrap, get ready the steamer.
  • Line the century egg wedges in the center of the bowl in a circular manner.
  • Then line the ham and egg strips along the wall lining of the bowl as well,, alternating each ingredient.
  • In a bowl, mash the tofu and egg with some salt and pepper and mix till well combined.
  • Pour the tofu mixture right in the center of the bowl.
  • Fold down the sides of the cling wrap to tug in the edges of the ham and egg strips.
  • Place in the steamer and steam at medium high for 20 minutes. Let cool for 10 minutes before flipping out on a plate.
How easy is that?! It has already become my family favorite, I already made it twice and planning to make it again this week. :D Do try it, it's very good!

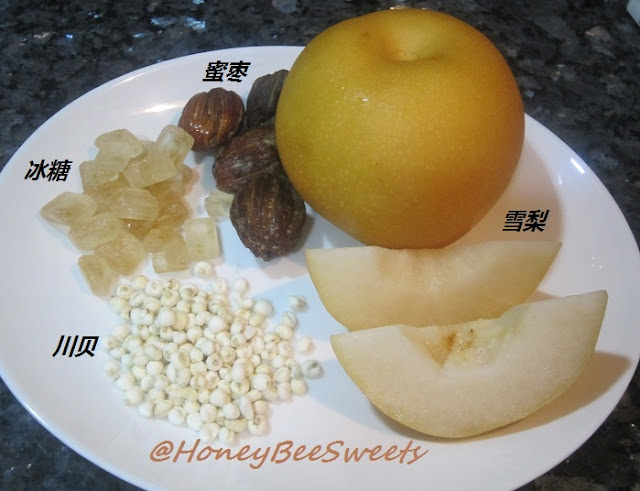
The second recipe is call Pear Soup with ChuanBei (川贝蜜枣雪梨汤). Okay, let me clarify, this is a sweet drink but a savory soup that you serve during dinner time. It's medicinal purpose mainly is to remove heat, stop coughing and clear phlegm. How I came about knowing this soup was that my husband loves to order it at Hong Kong airport whenever we transit there. He said he had it before way back at a Hong Kong restaurant in San Francisco and likes it very much. After realizing this, I was pretty determine to find out how to make this drink. Luckily, I found it in a soup recipe book call "The World of Nourishing & Fine Soups"!

Ingredients for Pear Soup with ChuanBei (川贝蜜枣雪梨汤) (makes about 2 cups)
12g chuanbei (川贝)
1 snow pear (雪梨) (mine was from Taiwan)
4 candy dates (蜜枣)
some cane sugar
300ml water ( original calls for 100ml only...too little!)
Cut pear into halves and remove core. Put all the ingredients into stewing pot, pour in water and cane sugar, stew for 2 hours. Serve when still warm. Chill is very nice too but might defeat the purpose of removing phlegm and cough. no?
This soup is actually quite pleasant to drink, whether served warm or chilled. Even my kids like it, since it's sweet and has no herbal taste at all. But do note that there are several grades of Chuanbei that you can purchase, some can be as expensive as S$24 per ounce! I bought the normal grade is S$8. :) If you are tired of drinking the usual barley or chrysanthemum drink for cooling, try this one, I'm pretty sure you'll like it.(^_^)

Okay, got to go for now. You all have a good week ahead! Cheers!


Friday, November 11, 2011

Coconut Cupcakes with Coconut Swiss Meringue Buttercream

Have not been baking much lately. Since exam is over, I'm out with my kids most of the time. Plus the weather is getting better too, less rain and more sunshine! We went swimming, walks in parks, movies and shopping, just to break away from the books for now. :) But I didn't want to stop blogging for too long as I know it will be really hard to get back on track again if I get into the slacking "mode". :P So I decided to make some Coconut cupcakes yesterday, a recipe that I've saved for sometime. But when I saw Jane posting it a couple weeks back, I then remember about it. The original recipe comes from 鲸鱼蓝蓝小窝居 , so thanks to these ladies, I finally bake this yummy cake. :)
I have decided to dress up the coconut cupcakes by topping it with Coconut Swiss Meringue Buttercream and some toasted coconut flakes. (^_^) Although the cupcake itself is already moist with nice coconut scent, but with the SMB, it becomes real decadent and even more delicious!
I was please that even my 2 kids whom are not fond of coconut flavor found these good. :) But I believe it has something to do with the SMB....they just LOVE Swiss Meringue Buttercream! They kept saying it taste like ice cream after it's chilled, lol!

Ingredients for Coconut Cupcakes (makes about 20 cupcakes)
200g butter, room temperature
100g caster sugar
4 eggs
6 tbsp milk
200g cake flour (I used Top flour)
2 tsp baking powder
100g coconut powder
40g desiccated coconut
80g plump raisins

Method:
  • Preheat the oven to 180C.
  • In a mixing bowl, cream the butter and sugar till light and creamy. Then crack in one egg at a time and mix well after each addition.
  • Add in the milk and mix well.
  • Then sieve in the coconut powder, flour, baking powder and mix till just incorporated.
  • Finally, add in the desiccated coconut flakes and raisins and stir to blend in.
  • Scoop batter into cupcake liners till 3/4 full. Then bake them in the preheated oven for 15 minutes till the tester comes out clean.

Coconut Swiss Meringue Buttercream:

20g coconut powder (Alternatively, you can just add 15g of coconut thick cream)


100g Swiss Meringue Buttercream (I followed Bravetart's recipe, please refer to link)


In a small bowl, weigh out the coconut powder, then add in 2 - 3 tbsp of hot water, mix well till it all the powder is incorporated. Mixture should be slightly thick. Let cool before mixing into the Swiss Meringue Buttercream. Once mix in, chill it till needed.


For the toasted coconut flakes, place about 1 heaping tbsp of desiccated coconut flakes on a non stick frying pan at medium low heat. Stir fry it constantly and try not to burnt it. Once it turns light golden brown, remove from fire and let cool completely before sprinkling over the cupcakes.


If you like coconut flavor and enjoy that extra texture of the flakes in the cake, you will love this one. I find that the coconut scent is slightly stronger the next day. I might try using vegetable oil in place of butter the next time so that the butter will not "steal" the lime light of the coconut scent. ;)
A look at the inside of this moist tender cake. With a cup of nice hot tea will be perfect! Try it out folks!

I am happy to submit this to this month's Aspiring Bakers #13: Enjoy Cupcakes! (November 2011) hosted by Min of Min's Blog. Thanks so much for hosting this month Min!

Take care all and have a great weekend!


Saturday, November 5, 2011

Homemade Egg Tofu using Black Soy Beans Milk

If you ask me if I have ever made tofu before a year ago from now, I would probably laugh it off and claim its really silly and quite a waste of time. Well I can't exactly rule out the latter completely since it does take time to make it as compared to just grabbing a ready made box in the grocer. I still remember when I first saw Wendy posting up her recipe, I was amazed. For something you can get for less then a buck...seriously? But I have to admit, somewhere inside, I was curious and eager to know how to do it...especially if I can do it myself, lol! After 2 attempts, I finally conclude that, it ain't really that silly and it was worth doing it from scratch....well sometimes, lol!
A simple healthy fried egg tofu served over some stir fried greens. In my household, we serve tofu at least twice a week, be it steamed, stewed or fried. We love tofu! In fact I will be posting up a some of the tofu dishes that I serve at home in the coming weeks.
Of course, prior to having homemade tofu, you gonna churn out some homemade soy milk! I make soy milk quite often at home, in fact I love serving it warm with you tiao or Ham Chim Peng on a weekend morning, yum! This time round, I have opted to try out black soy beans for this recipe. Taste and texture wise, no difference, just a slight grayish shade that's all.

Recipe of Homemade Egg Tofu (adapted from Wendy's)
500ml fresh unsweetened black soy milk
6 large eggs
1/4 tsp salt
1 tsp of corn flour mixed with 1 tbsp water

  • Crack all six eggs in a large bowl, add salt and beat it up lightly. Pour in the soy milk and stir gently yo blend well.
  • Add in the cornflour mix and stir well. Strain the whole mixture and set aside for use later.
  • Get ready the steamer. Line a heat proof cling wrap on your steaming container. Pour the soy milk mixture in carefully. Then cover it with another cling wrap which will prevent the steam water from dripping over the tofu.
  • Steam at low fire for 30 minutes. Let cool completely before removing and cutting it.
Note that the key to making a smoother tofu is the straining of the mixture and steaming it at low fire.
Well, that's about it. It is not that complicated to make it right? But please don't get the impression that I am so darn free as to make tofu whenever I need it, lol!


I reserved half of the egg tofu to make this Basil Chicken and Tofu (similar to Three Cups Chicken) the following day. I added some store bought tou gua (pressed tofu) plus the ones I made. Not trying to boast, but the homemade ones are definitely so much more tastier and flavorful!
I am glad I tried making some tofu and will probably make it again when I get the mood (plus free time). 
Before I end this post, just want to share something with everyone that made me so so happy! My hubby gave me an early birthday surprise, something that I have been wanting for awhile....check it out:
Obviously, I have much to learn about this new toy. Hopefully will produce more quality photos on my blogs in future. ;) Gonna leave you all on this happy note and hope everyone has a wonderful and restful long weekend! Cheers!

Wednesday, November 2, 2011

Chocolate Banana Cupcakes / Cake

Chocolate and banana, the perfect combination to a delicious desert. No matter how you combine them, they still taste good. (^_^) I then realize I have yet baked a cake that blends both chocolate and banana in it. Well, it's never too late right? And when I found THE recipe from Dorie Greenspan's book "Baking from my home to yours", I knew I had to try it! Since I have some ready ripen bananas around, what better excuse then to bake some right away?
This cake actually uses 1 whole cup of cocoa powder (vs 2 cup plain flour) which you can imagine how strong the chocolate aroma is. Can you see how dark the cake look...intense. :P But I do find the strong chocolate scent masking the banana taste though. :P So I went ahead and piped some Strawberry Swiss Meringue over the cakes to make it more moist. Didn't want to do big swirls of it as I worry it might just turn out too sweet. :P

Ingredients for Chocolate Banana Cupcakes (makes about 24) / Cake
2 cups (310g) all purpose flour (I used 300g cake flour)
1 cup (80g)cocoa powder
1 & 1/2 tsp baking powder
1/4 tsp salt
1/4 tsp baking soda
8 tbsp butter (113g), at room temperature
1 cup (250g) caster sugar (I used 180g)

1/4 cup (124g) packed light brown sugar
2 large eggs
3 ripe bananas, mashed
3/4 cup buttermilk (I used 3/4 cup fresh milk + 3/4 tsp fresh lemon juice, stand 5 mins)
3 oz bittersweet chocolate, chopped


Method:
  • Preheat the oven to 175C. Line a baking tray with some cupcake liners. Then sift together the flour, cocoa, baking powder, salt and baking soda.
  • In a mixer bowl, beat the butter until softened. Add the sugars and beat for 2 minutes more. Add the eggs one at a time, beating for a minute after each addition.
  • Reduce the mixer speed to low and mix in the mashed bananas. Add the dry ingredients in 3 additions, mixing only until they disappear into the batter.
  • Still on low speed, add the buttermilk, mixing until it is incorporated. Stir in the chopped chocolate. Divide the batter equally among the cupcake liners, filling them to about 3/4 full.
  • Bake for 14 to 15 minutes. or until a tester comes out clean. Transfer the pan to a rack and coo.

Will be submitting it to this month's Aspiring Bakers #13: Enjoy Cupcakes! (November 2011) hosted by Min of Min's Blog.

I actually made a loaf with half of the batter and it was equally good. :) But the brown is kind of dark, it scares me a little, lol!
If you like a chocolaty cake with slight banana scent, this would be the one for you. The cake is moist and adding the chocolate chip is also key to making it great. Try it!

Okay all, have a nice day! Cheers!