Monday, May 30, 2011

Chocolate Hot Fudge Pudding Cake & Steamed Chocolate Piggy Baos

Finally, school holiday is here! A little breather after the hectic schedules from the first half of the year. But again, there's quite a number of things lined up in the month of June. Father's day coming in a couple week's time; My elder child's birthday, which means I need to whip up a special cake for her; Friends....good friends to be specific, are coming to visit me from Malaysia! Not one but 2 separate groups of friends. :)) Excited? You bet I am, lol! So I didn't really plan for any get away trips this time. For I know I'm gonna have a blast when my girlfriends are here. :)

Back to today's post. I figured it's already the end of May now. So why not have the excuse of baking something chocolate to post the last submission to Aspiring Bakers for this month, heehee. :D But frankly speaking, I have so many chocolate recipes to share, just doesn't have the leisure to post them this month. *sigh* Anyway, I decided to post something really simple to whip up, yet so chocolaty, gooey good that is sure to melt any chocolate lover's heart. :)
I got this simple recipe from The America's Test Kitchen Family Baking Book which I bought awhile back. In fact I have been holding back to bake this for awhile now since my child was having cough earlier. Now that she's all better...yoohoo! Baking time! :) 15 minutes after its out from the oven, I topped it with a scoop of Rum & Raisin ice cream....and it's all good! :D Wanna give it a go? Here is the recipe, but I modified it to slightly less sweet:

Ingredients for Hot Fudge Pudding Cake: (makes about four/ five 6 oz ramekins)
2/3 cup (2 ounces) Dutch Processed cocoa powder (I used Valrohna)
6 tbsp (6 ounces) unsalted butter
2 ounces quality bittersweet chocolate (70% cocoa or higher), chopped coarse
3/4 cup all purpose (3 3/4 ounces) )
2 tsp baking powder
3/4 cup granulated sugar ( 5 1/4ounces) (Original calls for 1 cup)
3 tbsp light brown sugar (Original calls for 1/3 cup)
1/3 cup whole milk
1 tbsp pure vanilla extract
1 large egg yolk, room temp
1/4 tsp salt
1.5 cup weak coffee (i just used a packet of instant coffee mix + 1.5cups water)

Method:
  • Preheat the oven to 200C. Grease five 6 oz ramekins and set aside for use later.
  • In a saucepan, add in butter, 3/4 of the cocoa powder (1&3/4 ounces) and chopped chocolate and heat over low heat. Stir well and mix. Then turn off the heat once everything blends together. Set aside for now.
  • In a small bowl, whisk the flour and baking powder together. Then in a separate bowl, combined 1/4 cup of the granulated sugar, 1/4 cup cocoa powder and the light brown sugar. Stir to mix well and break up any lumps. Set aside for later use.
  • In a large bowl, whisk the remaining granulated sugar, milk, vanilla, egg yolk, and salt and stir to combine. Then whisk in the cooled chocolate mixture, followed by the flour mixture. Divide this batter equally into the ramekins. Sprinkle 1 heaping tbsp of coca powder mixture into each ramekin, follow by 3 tbsp of the coffee solution. Repeat till all the ramekin is filled.
  • Bake in the oven for 20 minutes till bubbly and puffed. Note that you shouldn't over bake this, else the gooey effect will be gone. Remove from oven and let cool for 15 minutes and serve while warm. Bon Appetit!
I love this chocolate pudding cake! The method may sound really unorthodox, as it doesn't mix in all the ingredients into the batter. But trust me, that sprinkle of cocoa mixture and coffee really create pure magic in the pudding. These "loose" ingredients form sort of a fudge sauce in the oven and, after the cake is baked, the sauce winds up underneath the cake....yum!! If you are chocolate fanatic like me, please don't miss out on this. :) I believe this is quite a wonderful desert to serve after dinner, just top it off with some creme fraiche / whipped cream or even better, some vanilla ice cream!

Before I finish this post, I would like to share with you all something fun I made a couple weeks back. It is actually the same bao recipe that I was raving about. Super soft and delicious even on its own. But this time round, I shaped the chocolate baos into cute little piggy heads and filled it with peanut butter paste. Yum? Yummy good! :))
Frankly speaking these piggies are cute enough to have their own post. But I really don't have that time to do that, so I have to do this combine post again. :P
Again the recipe turned out wonderful, soft and yummy, even days after. So even if you made a big batch, just chill in the fridge up to 5 days or freeze it up to a month, no problem. ;)
The peanut filling was really good, but it might have been a little on the dry side. Will improve it and make this version again as I love peanut butter more then red bean paste, lol! How I made the peanut paste was using roasted ground peanuts, peanut butter and some melted butter plus powdered sugar to taste.

As mentioned, I'm submitting this post to Aspiring Bakers #7 - Chocolate Delight (May 2011) hosted by DG from Tested and Tasted. I LOVE CHOCOLATE!

Hope the cute piggies have lightened your mood a little. ;) It sure did for me and best part is it filled my tummy too, lol! :D Okay, folks, have to leave you all for now and will post again when I get some free time. Have a nice day!!

Monday, May 23, 2011

Chocolate Banana Chiffon

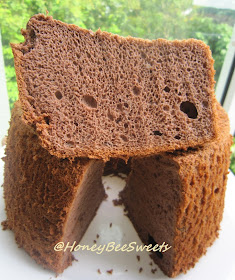
I have been itching to bake another chiffon cake lately but was procrastinating because of the choice of flavors to use. But when my MIL gave me half a bunch of ripe bananas over the weekend, it kind of solved the problem. :) That's because ever since I saw 茄子's post on 香蕉巧克力戚风 Chocolate Banana Chiffon, I told myself I should definitely try this out! Why? Well, firstly those tempting photos from 茄子's post is enough to convince me. Secondly...who doesn't like chocolate and banana combo? Here's my cake:
I have to say I have much success with this chiffon recipe, it was easy to prepare and it turned out tall, super soft and delicious! Thanks so much 茄子! But I did make some changes to the recipe, mainly to make a bigger cake and also to add more chocolate flavor to it. :) Who can say no to more chocolate? Here is my version:

Ingredients for Chocolate Banana Chiffon (fills a 21cm or 22cm tube pan):
Egg yolk Mixture:
5 egg yolks
20g caster sugar
50ml vegetable oil
40ml fresh milk
160g mashed ripe banana flesh
90g superfine cake flour
15g unsweetened cocoa powder (I used Valrohna)
1/2 tsp baking powder

Egg White Mixture:
6 egg whites
70g caster sugar
1/4 tsp cream of tartar

Method:
  • In a mixing bowl over double boiler, beat the egg yolks and caster sugar from the egg yolk mixture together. Continue to whisk till mixture is slightly thicken and the sugar has completely melted.
  • Add in vegetable oil and mix well. Then add in the mashed banana flesh and stir well again. Sift in the cake flour plus the cocoa powder and mix till everything is incorporated. Lastly add in the milk and mix till well combined.
  • Preheat the oven to 170C.
  • In another mixing bowl, add in the egg whites and cream of tartar and beat till foamy. Then gradually add in the caster sugar and beat at high speed till stiff peaks.
  • Gently fold in the white to the yolk mixture in 3 separate portions, making sure there is no visible egg white.
  • Pour the batter into the tube pan and bake in the preheated oven for 36 to 40 minutes.
  • Remove from oven and quickly invert the cake to cool completely before removing from the tube pan.
Besides those holes, this cake is really an absolute delight! My 2 kids gave a taste test and said they loved it! So this is definitely a family favorite from now onwards.

Needless to say, I will submit this to Aspiring Bakers #7 - Chocolate Delight (May 2011) hosted by DG from Tested and Tasted. Thanks Doris!

Hope everyone has a great week ahead! Cheerios!

Friday, May 20, 2011

Light Oreo Swirl Butter Cake

Yes yes, another Oreo bake. :) In fact I have been wanting to bake Oreo flavored butter cake for the longest time. :P Finally I got to do it, yah! And it was all that I have imagined it will be, buttery, delicious and "Oreoy"...not sure if that's even a word, lol! I actually made this cake a month back but was so busy that I didn't manage to post it up until now. :P Anyways, here it is!


I have used the egg separation method for this recipe, so here is my recipe if you are interested:
Ingredients for Light Oreo Swirl Butter Cake: (makes a 8" by 3" round):
Set A:
130g (1 tube) Oreo cookies, pulverized in blender together with the cream

Set B:
6 egg yolks
125g caster sugar

130ml fresh milk
160g unsalted butter, melted and cooled
100g cake flour
100g plain flour

1.5 tsp baking powder

Set C:
7 egg whites
1/4 tsp cream of tartar
130g caster sugar

Method:
  • Using a mixing bowl placed over a double boiler at a low heat, add the egg yolks and caster sugar in. Using a hand mixer, beat the mixture till ribbon stage.
  • Gently fold in the milk and cooled butter to the yolk mixture till incorporated. Next sift in the flours and baking powder in 3 separate portions into the mixture and gently mixing it in to no visible flour.
  • Preheat the oven to 175C. Grease and lined a 8" by 3" round.
  • In a stand mixer, beat the egg whites & cream of tartar till foamy. Continue to beat the whites at high speed and gradually adding in the caster sugar. Continue to beat the mixture till stiff peaks.
  • Gently fold the whites into the yolk mixture in 3 separate portions till all is mixed in. Then pour half of the batter into another bowl. Add the Oreo crumbs in Set A into one of the batter portions, mix well.
  • Alternating, pour the plain and Oreo batter into the prepared pan. Using a chop stick or butter knife, swirl the batter to create patterns.
  • Bake the cake in the preheated oven for 40 to 50 minutes or till the cake tester comes out clean.
The only downside for me was the cake kind of deflated a little after it cooled. :P Perhaps I had not beaten the eggs well enough? I can only guess. :P But good thing the cake still tasted great and my family loved it especially my younger kid...kept asking me for "The Oreo cake Mummy, I want the Oreo cake."

I love the swirls in the cake. I could have done the Zebra patterns but I figured that will be in another post, heehee. :D As you can see the "waist-line" of the cake, it's pretty figure friendly! Lol! Just kidding. :)

Anyway, hope you will have a go on this recipe and better luck with no  "shrinkage"". :))
Have a wonderful weekend all! Cheers!

Saturday, May 14, 2011

Fluffy Soft Steam Buns & Chocolate Swirl Mantou (超软蒸包和巧克力卷馒头 )

I have been looking for the perfect steam bun / bao recipe for a long time now. And it almost seems like most of the recipe turns out the same. Soft when just steamed but not so a few hours after it cooled down and needs to be reheated to get the same soft texture. Ohh...but it's not so for this new recipe. :) It stays fluffy soft for a good whole day or longer. Really! But you know what, I discovered this recipe through trial and error.....lucky me right? Lol!


This recipe is adapted from Carol 自在生活's 奶黃包. Initially, I had the full intention to use her recipe, but in the midst of multi-tasking in the kitchen, I added 74g of unsalted butter into the dough (by accident) and it was all good there after, lol! Trust me, it still turns out wonderful. :) You must be thinking, who uses butter for steam buns? Aren't you suppose to use shortening or something? You're right...but the butter scent wasn't evident at all, besides I would choose butter over shortening any day. :) Curious how it all comes, well here is my version:

Ingredients for fluffy Steam Buns recipe:
Starter dough:
120g pau flour (original calls for plain flour)
1/2 tsp active instant dry yeast
80ml warm water
pinch of salt

Method:
Knead all the ingredients together till it comes together to form a soft, smooth dough. Chill in the fridge up to 6-8hrs before use.

*Note: I increased the portion to about X1.5 to have more to make chocolate swirl mantou. So feel free to portion to your own liking.

Main Dough:
All of the above starter dough, approximately 165g
1.5 tsp active instant dry yeast
450g pau flour (Carol's recipe uses plain flour)
270ml fresh milk
40g caster sugar
1/4 tsp salt
74g unsalted butter, room temperature

Red Bean / Lotus paste filling

Method for Red bean / Lotus paste steam buns:
  1. Place everything in a large mixing bowl except the butter and knead till it comes together. Once it forms into a dough, add in the butter and continue to knead for a good 5 to 7 minutes on the mixer or 10 minutes by hand till it is elastic and smooth.
  2. Place the dough in a greased bowl and let proof till double in size. Punch out the air and divide the dough into 12 X 40g each. (Since I increased the recipe, I only weighed out 14 of the 40g portions and the rest I made into the chocolate mantou.) Reserve the rest of the dough for chocolate swirl mantou (chill in fridge) while you work with the buns.
  3. Take a dough portion and flatten it into a disc, making sure the center is thicker then the edges. place about 2 tbsp's worth of red bean / lotus paste filling in the center. Seal up and roll round. Place on a greased proof paper and put the bun into the steamer (already prep with water) to further proof for about 40 minutes. Repeat.
  4. Once proved, start the steamer and steam at medium high for 10 to 15 minutes. Note that do open the lid completely after steamed, open partially with a small gap for 15 minutes to let the buns cool slowly to prevent them to deflate.
For the Chocolate Swirl Mantou , here's the steps:
  1. Add 2 tbsps more of confectioner's sugar into the reserved dough and knead into it. Then I divide it to 2 equal portions and knead 1 heaping tbsp of Valronha cocoa powder to one of the portions. Let it rest for 10 mins covered before shaping.
  2. Roll both portions into 10cm by 20 cm rectangles. Brush a little water on the plain rectangle surface and place the chocolate rectangle on top. Seal the edges and roll up from the long side like a swiss roll and seal it nicely.
  3. Using a knife and cut the dough in to equal portions about 3cm thickness each. Place on a grease proof paper squares and also place in steamer prep with water. Let it proof for 40 minutes before steaming.
Just like any other mantou, it's pretty much plain in taste. Perhaps with a hint of chocolate taste and a wee bit more sweet then the dough used for filled ones. But the best part of all is the softness of this bao and mantou...fluffy! :) Check it out yourself:
This recipe is definitely a keeper for me. Perhaps will make it again with meat filling. :)

I will be submitting this post to Aspiring Bakers #7 - Chocolate Delight (May 2011) hosted by DG from Tested and Tasted. Have you joined in the fun and submitted yours?

Okay folks, hope you all have a wonderful weekend! ;) Cheers!

Monday, May 9, 2011

Flaky Chicken Pot Pies

A new era has began....seriously? I'm not too sure. :P With all that excitement that went on during the Singapore Election in the past weekend, now is truly the cooling off time. Now that 6 oppositions candidates(only!?) have successful made their way into the parliament...out of the 87 seats, which is actually the highest number ever since independence. Whether their presence will cause any impact or political changes are yet to be known. Seriously, no hurry in there, since it's another 5 more years, ain't nothing we can do now (same old Singaporean attitude isn't it). Regardless, I just hope this election is good enough to make a wake up call to the government, a sign of the peoples' displeasure....will it? *sigh*

Enough rambling, back to today's post. Yesterday was Mother's Day, so it's very natural me (the good daughter, ha!) baked something nice for my mum. But instead of baking the usual cream cake for my mum. I decided to bake some Mini Chicken Pot Pies for her & my Dad to enjoy. One of the main reason is also my mum is not too much of a sweet tooth person, so making something savory seems like a better choice. But I did still bake her a fresh Strawberry Chiffon (less sweet) for desert as well. :) Anyway, here is the flaky chicken pot pie I'm talking about:

I have actually made chicken pies many times before when I was still in States. Somehow I just didn't get to make it again once I returned to Asia. Weird huh...for something so delicious. :P But again, there are so many different delicious food there that we can make! :)) But for now, here is chicken pie recipe:


Ingredients for Mini Chicken Pot Pies (makes about 6 of 7oz pies):
Pastry Pie Crust:
180g plain flour
120g unsalted butter, cold and cut into small cubes
1 tbsp powdered sugar
1/4 tsp salt
2 tbsp cold water (optional, not needed if already moist)

Method:
In a large mixing bowl, sift the flour and salt in. Now add in the cold butter cubes and knead into the flour using just your finger tips until it resembles bread crumbs. Then adding one tablespoon of ice water to the flour mixture at a time till it just comes together. Wrap the dough into plastic wrap and chill in the fridge for at least 30 minutes.

Chicken pie filling:
1 chicken breast, cut into small bite size
1 white onion, chopped
1 large russet potato, skinned and cubed
1 small carrot, cubed
1/2 cup frozen peas
1/2 cup chicken stock
2 tsp corn flour
salt & pepper to taste

Method:
  1. In cooking saucepan, set the heat at medium low and add 1 tsp of vegetable oil. Add onions and potatoes and carrots in, stir fry for 5 minutes, then add a couple teaspoon of water and cover to slow cook for 5 to 8 minutes till cooked.
  2. Then add chicken and cook till opaque, add seasoning and chicken stock to cook for another 5 minutes.
  3. Stir in cornflour and 1 tbsp mix into the chicken mixture to thicken it. Scoop up the mixture to let cool till needed.
Assembly:
  1. Weigh out about 35g of dough for each pie pastry. While the remaining dough is also equally divided into 6 portions to be used as the pie cover later. (Or you can make a large pie). It should be enough to make at least 6 of 7oz pie pastry. Press the dough into the tart pan (or you can use disposable ones like me) and shape it nicely. Prick the base of the dough and repeat till all 6 of the pastry has been pressed in.
  2. Bake in the oven for 10 minutes to pre-bake it. After done, remove from oven and cool the pie shells until needed.
  3. Scoop about 3 to 4 tbsp of chicken pie filling in to the cooled pie shells. Then roll out the saved 6 portions of pie pastry dough into disc just enough to cover the pie cavity. Seal the edges with either your finger tips or a fork. Brush with egg wash and prick some holes on the top pie pastry for ventilation.
  4. Bake in the preheated oven of 180C for 10 to 12 minutes till the pie crust is golden brown. Remove from oven to cool before serving.
This is such a nice comfort food to enjoy at home with your family over the weekend. Highly recommended if you like pastry pies and savory dishes. :) I know my parents, especially my mum had a wonderful lunch eating this yummy chicken pies from me. ;)
A picture of the flaky pie crust with the yummy chicken filling. Hope you folks will give this a try...definitely will become a family's favorite comfort food. :) 
Have a great week ahead all! Cheers!

    Wednesday, May 4, 2011

    Orange Swiss Roll with Rich Chocolate Cream & A bundle Joy

    It's already the beginning of May and loads of things seems to be going on in this month. First is the Singapore Election that will be held this Saturday. Everyone is talking about it; on newspapers, radio shows, blogs and also FaceBook. Very happening now with rallies to attend and hearing the views from the nominated candidates. Also reviewing what Singapore's potential future leaders need to embark on and how it will directly affect us. I just sincerely hope whatever the result may be, it'll be for the best, be it for the people or the country.

    Going on as well is the mid term exams with the kids. It is stress time both for parents and children. But looking on the bright side, there seems to be a continuous string of long weekends for the children to do their revision. :) Anyway, I wish everyone best of luck for their papers!

    On the lighter side of things, yesterday I manage to bake a Swiss roll cake for a friend. I believe most of you knows who she is, its Grace from Kitchen Corner. She has been pretty busy lately and couldn't be with us much in the blog sphere. Why? Hope over to her blog and you'll know. :) Grace and I have been talking about meeting up for the past month. But since we were rather busy with our own stuff, we had to postpone the meet up until today. Wanted to bake more but only managed to churn out a simple Orange Swiss Roll with Rich Chocolate Cream cake for her.
    The initial plan was to make a much nicer pattern then just simple chocolate hearts on the Swiss roll. But since I had to prep for dinner, I just went with the easy way. *sorry Grace* Hopefully she & her hubby will enjoy this simple desert. Interested in the recipe? Here it is:

    Ingredients for Orange Chiffon Cake (makes a 10" by 14" tray):
    Egg yolk mixture:
    4 egg yolks
    30g sugar
    1/2 tsp orange essence (optional)
    75ml freshly squeezed orange juice
    80ml water
    Zest of 1 naval orange
    60g cake flour
    60g plain flour
    80ml vegetable oil

    Egg white mixture:
    4 egg whites

    94g caster sugar
    1/4 tsp cream of tartar
    Decorations:
    50g semisweet chocolate (I used Valrohna with 65% cocoa), melted and cooled

    Filing:
    80g semisweet chocolate, chopped small
    50g salted butter
    120ml non dairy whipping cream


    Melt the chocolate and butter in double boiler and let cool slightly. Then as the whipping cream is being whipped in the mixer and almost reaching stiff peaks, gradually pour the chocolate butter mixture in. Continue to whip till mixture is well combined. Chill it till needed.
    For detail steps on the Swiss roll method, please refer to my previous post on Pikachu Mango Swiss Roll. Thanks!

    I was a little disappointed with the chocolate hearts as it looks kind of messy on the roll. :P But luckily the cake still taste pretty nice, soft orange flavored cake with rich chocolaty cream. Yummy combo. :)
    While I was at Grace's place, I got to meet the new addition of her family. Believe me when I say I am totally charmed by him! He is such a beautiful little baby. He has such big bright eyes with cute little dimples on his cheeks and always generous with his smiles. :) He is really a bundle of joy! I'm so sure he's gonna be a girl-magnet next time, lol! Think I will pay Grace a visit again soon...see what I mean?! Lol!

    I am submitting this to Aspiring Bakers #7 - Chocolate Delight (May 2011) hosted by DG from Tested and Tasted. Thanks for hosting this month Doris!

    Hopefully I will have time to post up a tart recipe that I've been "dying" to try soon.
    Okay, hope you all have a nice week. Cheerio!