Saturday, May 29, 2010

Peanut Butter Chocolate Chip Cake with Creamy Peanut Frosting

For the past weeks, I have been busy unpacking my stuff that was shipped back from California. I still have quite a bit to go, but now I have to start packing for my coming trip back to California this weekend. :P All these unpacking and packing is driving me up the walls! But I tell myself, it is actually a good break for me to go back Bay Area for a week and not think about the overloading stuff I have to do. :P Furthermore, it's Summer in Sunshine California! Which means nicer weather and lots and lots of fresh produce and fruits, can't wait! ;) There are loads of stuff I want to do while I am back in CA, so hopefully I can make the best out of the short stay there. Will keep you all posted. :)

A couple days back, I decided to make a cake with one of my favorite ingredient, Peanut Butter. Yum!! I kicked it up a notch by adding in chocolate chips to the cake and coat it with creamy peanut butter frosting. Double yum yum!! :)

I love, yes, I love the creamy peanut butter frosting. Topped over the peanut flavored cake is just bursting with peanut heaven! Lol! Although I do have to modify the cake recipe a little to make the cake more moist and softer. :P
I made an 6 inch mini cake too besides the cupcakes and also frost it with the peanut butter frosting. In the end, I find the mini cake is better in texture verses the cupcakes! Perhaps lesser "exposure" to heat, so softer? If you are a peanut butter lover like me, check out the recipe! Do note that I used a peanut butter brand from Kirkland (Costco brand) which is Organic and no sugar added. It is super yummy with genuine peanut flavor. But if you do not mind, Skippy or Jif will still do the trick...., hey it rhythms, hahaha!

Ingredients for Peanut Butter Chocolate Chip Cake with Creamy Peanut Butter Frosting:
150g butter, room temperature
180g smooth peanut butter

120g light brown sugar

3 eggs

170ml buttermilk

240g self rising flour

100g semisweet chocolate chips


Ingredients for Creamy Peanut Butter Frosting:
1/2 cup butter, room temp
1 cup smooth peanut butter
1/2 cup confectioner's sugar (more if you have a sweet tooth)

1/2 tsp vanilla extract


Method:
  • To make cake: In a large mixing bowl, cream the butter, peanut butter and brown sugar together till it is creamy and the sugar has melted in, about 5 to 8 minutes.
  • Add egg one at a time and beat well. Add vanilla and combine.
  • Alternating 1/4 portion flour and 1/3 buttermilk into the egg mixture and stir well after each addition, until everything has been added in.
  • Lastly add in the chocolate chips and stir well.
  • Preheat the oven to 170°C. Grease baking pans if using or line muffin tins with paper cups.
  • Pour batter into baking pans / muffin tins and bake for 25 to 30 minutes till the tester comes out clean and the top is golden brown.
  • To make the frosting: Cream together the butter, peanut butter and confectioner's sugar together till everything is well combined. Add vanilla extract and stir well. Set aside until needed.
  • After the cake is baked and cooled completely, spread a tablespoon amount on each muffin and about 1 cup amount on the 6" cake if baking that size.
The semisweet chocolate chips in the peanut cake was like an extra bonus, which also makes the cake not too sweet. :) Plus the not too sweet creamy peanut butter frosting makes the cake more moist and easier to go down.....mmm... got milk?
Okay, its me...I took a bite even before I can finish taking a picture of the slice of cake! But it's good! Hahaha..no regrets on that bite for sure. :P If you're "nuts" over peanut butter like me...give this a try...it'll delight your afternoon snack time in a yummy nutty way, lol! Okay, have to get going and finish my packing before I run out of time! Have fun and happy baking all!


Monday, May 24, 2010

Steamed Banana Cake

I wonder if it's the same for you, always wondering what to do with that bunch of ripe bananas hanging in your house? Well, come 1st or 15th of the Lunar month, my FIL will always bring back a BIG bunch of already fully ripped bananas (along with other fruits) from the temple. There is of course nothing wrong with just eating it on it's own, but it can get a bit boring sometimes. And using it for baking is just a no brainer. So I am constantly looking for banana recipes, really! This time I happened to come across a fellow blogger Quizzine's post which she got this Steam Banana cake from Baker Lee. This recipe is simple and delicious...definitely worth the try, trust me. :)
Once you bite into a slice, you realize some wonderful this cake is; very soft and fluffy....almost like eating "banana cloud", like my daughter said, lol! Furthermore, it is really easy to whip up and no ovens required! A keeper I must say. :) And I am really into steam cake recipe now since it does yield a much more moist cake verses a baked one. :)
Can't wait to try this out? Check out the short list of ingredients required! Anyway, here is my slightly modified version, enjoy!

Ingredients for Steamed Banana Cake:
2 eggs
100g brown sugar (original uses white sugar)
2 large ripe bananas, mashed
150g self rising flour
1/8 tsp baking soda
75g vegetable oil


Method:
  • In a a large mixing bowl, beat together the eggs and sugar till it reaches ribbon stage and more then doubled its volume.
  • Add the mashed bananas and gently stir in till combined.
  • Sift in the flour and baking soda into the egg mixture and continue to beat at low speed till everything is incorporated.
  • Lastly, add in the vegetable oil and stir gently again till it all comes together and careful not to over mix and deflate the bubbles.
  • Prepare a steamer with boiling water and greased a 8" round cake pan and line with parchment paper.
  • Pour batter into the prepared cake pan and steam at medium high fire for 20 minutes or till the tester comes out clean or with moist crumbs.
Even if you are not really one that bakes often, this cake shouldn't give you any problems. :) Both my in-laws and my parents liked this cake...a delectable treat during tea time. :)
I have actually made this cake twice already and both very successful and delicious...pretty fool proof. Noticed that I made a much taller cake the 2nd round...because I doubled the recipe, lol! Perhaps the next time I can reduce the sugar and sledder it with some cream cheese frosting, now that would be an even more rich treat!. ;) All thanks to Baker Lee and Quizzine for this recipe...do try it out yourself. Have fun!


Thursday, May 20, 2010

Steam Chocolate Cake with Cream Cheese Sour Cream Chocolate Ganache

School term is almost coming to an end and school will be out in a week's time. I believe there are several parents out there whom already made plans for their kids to join some June Holiday activities in near by community center or school camping, make up lessons and even a short trip away from home. I just hope I can sign my kids up for some interesting lessons at the near by CC before it slips my mind again. Dealing with the new house has taken up the better part of me. Every evening I am always dog tired after all that unpacking and find myself dozing off by 10.30pm. Regardless how crazy busy it's been that day, I still find it such a stress release to be able to bake a cake for the family. So I hope I can plan out some kids friendly recipe and do some baking with my girls. They always enjoy some fun in the kitchen with me. And eating the baked goodies will be even more enjoyable, since it's all made with love. ;) Last Saturday I managed to do some stress release myself by baking a yummy chocolate cake; Steam Chocolate Cake with Cream Cheese Sour Cream Ganache.
I was motivated to bake this chocolate cake partly because my niece has been requesting for something chocolaty for the past weeks. I held back because my daughter was having a stubborn cough. When she had fully recovered, I got to work! I used the all "renounced" steam moist chocolate cake that most of the food bloggers had tried.
I got the recipe from Baking Mum, but I made slight modifications to it. Furthermore, I also did not use her chocolate ganache recipe. Hence I will place my recipe here for my reference in the future:

Ingredients for Steam Moist Chocolate Cake: (makes a 9" or 10" round)

350g butter, room temperature

220g caster sugar
1 can (400ml) evaporated milk
4 eggs, lightly beaten
220g all purpose flour
140g cocoa powder
1 tsp baking powder
1 tsp baking soda
1 tsp vanilla extract

Cream Cheese Sour Cream Chocolate Ganache:
200g cream cheese, room temperature
150g butter, room temperature
150ml sour cream
200g confectioner's sugar (more or less up to your taste)
100g cocoa powder
1 tsp vanilla extract
Milk chocolate chunks, chocolate Roche for deco

Method:
  • To make the cake, combine the sugar, evaporated milk and butter in a neat proof saucepan. Heat it over medium fire until butter has melted and it is well combined. Set aside to cool before use.
  • In another mixing bowl, add the beaten eggs with the vanilla extract together. Then slowly stir in the cooled sugar mixture and combine everything together.
  • Sift flour, cocoa powder, baking powder and baking soda into the egg mixture. Stir well and the batter should be runny.
  • At the meantime, prepare a steamer with some boiling water. Grease a 9" baking pan, grease it and line with parchment paper.
  • Pour batter into the prepared tin and steam at medium high heat for 1hr to 1hr15mins or till the tester comes out clean.
  • Remove from steamer and let cool on rack completely before removing from the pan.
  • To make the ganache, cream together the butter, sugar and cream cheese till fluffy. Add sour cream and vanilla extract and stir well to combine.
  • Lastly sift in the cocoa powder and make sure there is no lumps. Chill this ganache till it is ready for use, about 1hr.
  • Slice the cake horizontally across to get 2 round disc. Place about 1/3 of the ganache on the first slice and scatter some milk chocolate chunks over it.
  • Place the 2nd cake disc over and frost the ganache all over. Decorate as desired and chill well before serving.
Overall the cake was satisfactory, but I will have to remember that this cake batter has to be runny! Else it won't be as moist as what everyone is raving about.:P Luckily the cream cheese sour cream ganache was good and help made the cake yummy. But the dense chocolaty taste was really satisfying, can cure any chocoholic urge! Hope my nieces and my girls enjoyed it. Try this out and let me know how this delicious chocolate cake works for you. Cheers all!

Sunday, May 16, 2010

Simple Ham & Peas Pasta and Chocolate Cherries Oatmeal cookies

After almost 60 days of waiting...the container that me and my husband had laboriously packed our stuff in during our last trip back in California , has safely arrived in Singapore. It was a great relief for both of us since nothing was missing or damaged during this shipping process. Although it did worry us a bit when it was delayed for 2 weeks++. But some how it all turned out just right, because our house's renovation finishes just before the container arrived. Now I look back and ask myself "Why worry so much for nothing?" As the Chinese saying goes"船到桥头自然直" (translation : Things will work out fine on it's own) So better just be happy and worry less. :) However now, looking at the stack and stack of boxes to be unpacked...how can I not worry? *Sigh* Give me strength!
So with such a load of stuff to do, I need to cook up real simple and quick meals for my family. Something with minimal ingredients and requires little to no time to cook. May I present to you, a family favorite; Ham & Peas Pasta.


I used to make fresh pasta at least 3 times a month back in California, simply because it's absolutely delicious. (That will be another post...if I can find my pasta machine in those boxes!) And eating fresh pasta cooked in this method is fabulous!


Since we are just talking about simple today, so I shall only show you how I make this yummy pasta with ready to boil pasta. Here is the recipe:

Ingredients for Ham and Peas Pasta
6oz dried pasta ( 1 box of pasta is about 8oz, I didn't use all)
1/2 white onion, chopped small
1/2 cup carrots, peeled and chopped small

250g sliced ham, cut into small chunks

1 cup frozen sweet peas
1 cup fresh heavy cream
1 cup chicken stock

1/2 tsp sugar
salt and pepper to taste

Method:
  • Bring a pot of water to boil. Add pasta to boil over medium heat for 8 to 10 minutes till al dente.
  • In another stir fry pan, turn on the fire to medium low heat and add 1 tbsp of olive oil. Add chopped onions and carrots and stir for a moment, reduce fire to low and cover to let the vegetables soften.
  • After about 6 minutes, remove cover and add in ham and peas. Stir fry for a minute and then add in the chicken stock and heavy cream. At this point turn up the fire to medium high and let the mixture come to a boil.
  • After 5 minutes, the mixture will slightly thicken a little. Add sugar, salt and pepper to taste.
  • Drain the cooked pasta and pour into the cream sauce and stir to combine. Dish up immediately to serve.
This is a lovely meal that I believe anyone will like, especially kids...even my little picker eater loved it. :) Pick a fun pasta shape and I guarantee you, it'll be a big hit for the kids. ;)
Another of my family favorite is the Classic Oatmeal Cookies. It is such a comfort food to snack on when you want a quick bite. ;)

This classic cookie is so versatile! So long as you make the main oatmeal cookie dough, you can add in any extra ingredients you like, walnuts, raisins, peanut chips or the most traditional chocolate chips. This time I have decided to use two of my favorite add ons: Godiva chocolate and dried cherries. :)
I got both these items during my last trip back to California...yes, another great "steal", heehee! I love Godiva dark chocolate...so when I saw them selling this type of domestic 100g bar size at the grocery, I was elated! Sour cherries are a great add-on to cookies...they are much more tart then dried cranberries and are not so common here in Asia. So I got this from one of favorite store: Trader Joe's, which they come sweetened, not too tart, yum! Adding these 2 good stuff in the cookies makes it better then it already is. ;)

Ingredients for Chocolate Sour Cherry
Oatmeal Cookies:
227g unsalted butter, room temperature
180g caster sugar
200g packed brown sugar
2 large eggs
1.5 tsp vanilla extract
225g all purpose flour
250g uncooked roll oats
1 tsp baking powder
1 tsp baking soda
3/4 tsp salt
1 tsp ground cinnamon
150g Godiva chocolate (70% cocoa), cut into small chunks (you can use chocolate chips)
100g sweetened dried cherries (you can use dried raisins)

Method:
  • In a large mixing bowl, beat the butter and both sugars till creamy. Add eggs, one at a time and beat well after each addition. Add vanilla extract and beat well again.
  • Sift the flour, salt, baking power and baking soda and cinnamon. Add it to the egg mixture. Lastly add in the oats and stir well.
  • If using chocolate chunks and cherries, add in the cookie batter and stir well. Chill dough for at least 2hours.
  • Preheat oven to 180. Place a sheet of parchment paper on baking pan and grease it. Take about 2 tbsp amount of cookie dough, roll round and place on baking pan. Make sure the cookie dough is placed about 3 " apart from one another.
  • Bake cookie for 13 to 15 minutes. Do not over bake the cookies, it is meant to be soft and chewy. Allow the baked cookies to cool on the rack before storing in air tight container.
Even though I am a chocolate lover, this time I think the cherries' taste is much yummier then the chocolate chunks in the cookies. I might possibly never get tired eating these delicious cookies. And eating them will keep me going on unpacking my stuff, a sure motivation I have to say, hahaha! :) Do try it out when you have the time. Have fun baking!

Thursday, May 13, 2010

Baked Strawberry Cheesecake and Good Old Char Kwey Tiao

I have meant to put up this post over the weekend, but I guess I can never be able to blog as fast as I bake / cook, lol! I have 2 more posts overdue but have yet found time to write it out. Furthermore, there seems to be an endless list of things to do which I keep telling myself I will get to it soon. Simple things like replying a good friend's email can sometimes take me a week! So if you are one of them and reading this...please forgive me, lol! I remember I was never like this years back, I was much more organized and in control of things around me. Now? Geese...I wish I can get through a day without worrying simple things like whether I've placed clean socks in my girls' shoes, or even the lunch menu for tomorrow. Sometimes I feel that I haven't got much done and the day was already over. Helpless....But I believe there are many people out there have similar experiences.

But one thing is for sure...I will usually sacrifice my free time for baking / cooking. It's my comfort zone, my time out from all that hustle and bustle of my busy life. I am sure it is true for many of you out there too. ;)

For now, let's focus and talk about my bake: Baked Strawberry Cheesecake....verdict? Double thumbs up!

I made this for my dear mum when we met up for a dinner last Sunday. Yes, it's for Mother's day....my first Mother's Day cake for my mum. Like she always is, she was all praise even before she tasted it.
And since this was the first time I made this cake and I did not get a chance to taste it before giving it to my mum...I was rather nervous at that time. But I was lucky, it came out great and my whole family loved it. :)
I have actually came up with this recipe on my own, and I kind of forgotten certain proportion for some ingredients, so I think I shall not post it up for now. There were not many good strawberry cheesecake recipes out there...more blueberry ones I must say. So if you have a decent blueberry cheesecake recipe, feel free to substitute the blueberries to strawberries, it should work fine.

See that humongous strawberry? It's almost as big as my 4yr old's fist! My mum gave me half a dozen of those...perhaps she read my mind that I was gonna make something strawberry for her, lol! Overall, I must say this is indeed one of the best (only 2nd to this) cheesecake I've made. Hopefully I will have time to look through the recipe and get it out soon. ;)

The other item is my favorite hawker eat: Char Kway Teow (minus the fresh clams). As far as I can remember, char kway teow is probably the one food that I missed the most when I was residing overseas. I had replicate it several times in my kitchen while overseas...but now even in Asia! Don't ask me why...I don't feel it's troublesome at all, lol!


This is my version of char kway teow....meaning I have substituted some of the ingredients. I did not have fried pork oil, bean sprouts and clams, so I simple didn't use them. The result was still fabulous! My family and I enjoyed it very much. :) Wonder how I did it? Here it is:

Ingredients for HBS's Char Kway Teow:
500g wide flat rice noodle, blanched in hot water and rinsed
3 eggs, cracked and lightly beaten
some Cai-Xin ( 菜心)
2 tbsp chopped garlic
100g sliced lean pork
6 medium size prawns, peeled leaving tail and devined
some fish cake
1/2 Chinese sausage, removed casing and slice thinly

Seasoning A:
1.5 tbsp light soy sauce
1.5 tbsp dark soy sauce
Seasoning B:
1 tbsp light soy sauce
1 tbsp dark soy sauce

1 tbsp sweet dark soy sauce
1 tsp oyster sauce
some sesame oil
pinch of pepper & salt
some sugar to taste

Method:

  • Seasoned the sliced lean pork with 1/4 tsp of soy sauce, pinch of pepper, 1/2 tsp sesame oil & 1/4 tsp corn flour. Let it marinate.
  • Fry 1 tbsp of chopped garlic in oil till fragrant. Add rice noodle and stir well. Add seasoning A. Stir well till the noodles are coated with the soy sauces. Dish up and set aside for later use.
  • Again heat up the work and fried 2/3 of the beaten eggs. When done dish up and set aside.
  • Add 1 tsp oil and add in lean pork and stir fry till cooked. Add in Chinese sausage, fish cake and cai-xin. Stir fry till cai-xin is cooked down. Add in rice noodles and follow by Seasoning B. Stir fry till everything is well coated.
  • Add in the remaining 1/3 of the reserved egg and let it set a little before stirring in the noodles.
  • Lastly add in the previously fried eggs and stir well. Dish up and serve immediately.
My younger daughter loved it and asked for 2nds! I was super glad my version was still well recieved even though my family have tasted the "real thing" at the nearby hawker before. ;)It may look like a lot of hustle, but the only "troublesome" part to me was preparing the ingredients (which I didn't have a lot). The actual cooking only took me like 5 to 7 minutes tops! So do consider cooking your own char kway teow...you'll love it! Have fun!

Monday, May 10, 2010

Steam wholewheat red bean baos

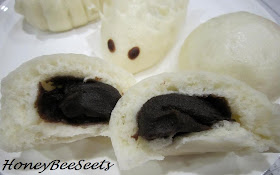
One of the favorite things I enjoy eating for breakfast is baos. Whether it is savory or sweet, a steamy bao is always very inviting. ;) I have been wanting to try my hands on making steam baos with sweet filling for a long time ...since last year! :P So after seeing my dear friend Reese making her Sauage Bao in her last post, I decided to make some myself. :) Since I don't want to be too adventurous this time, I simply used store bought red bean filling instead of making them myself. The thought of "slaving" over a hot of red bean paste is just too tedious for me these days. :P I have actually made 2 different batches of baos, one plain and one wholewheat version...here are the wholewheat ones:
Making baos is fun! It's almost like making bread! ;) Needless to say, you can see I had fun moulding the baos too. When I was moulding them, my daughters were both eager and excited about the cute animal shapes. Since I was rushing (as usual), I only mould 4 different shapes. Fellow blogger like My Kitchen Snippets and Happy Home Baking too had their share of making these fun baos not too long ago. ;)
I am pretty happy with this wholewheat version of the bao skin I made....soft, fluffy & healthy~! Sweet! :)
The store bought red bean paste was a wee bit too sweet to my liking, so I kind of make my bao skin a little less sweeter.Wanna try out this recipe, here it is:

Ingredients for Wholewheat Steam Red Bean Paste baos: (makes about 12 medium)
200g Hong Kong /bao flour
65g wholewheat flour
6g instant active yeast
50g wheat starch
40g caster sugar
8g double action baking powder
150ml water (
add just enough to make a nice soft dough)
20g shortening
20ml olive oil

Method:
  • In a large mixing bowl, sift in HK / bao flour together with whole wheat flour, baking powder and wheat starch. Add in sugar and yeast and whisk well to combine everything.
  • Next add in water, do not need to add up to 150ml if the dough is already soft and moist. Knead till it comes together and forms a soft dough and not sticky, about 5 mins.
  • Lastly add shortening and olive oil and knead dough till it is smooth and elastic.
  • Place dough into a lightly greased bowl, cover and let proof for 1 hr.
  • In the meantime, roll about 12 portion of the red bean filling, each weighing about 20g each. Place on plate and for use later.
  • After proofing, punch the air and divide the dough into 12 to 14 portions. Roll round and press the dough flat with your palm, making sure the edges are thinner then the center.
  • Place a ball of the filling in the center and seal the edges nicely and place the bao on a cut out small parchment paper.Repeat till all the dough and filling are used up.
  • Let the baos rest covered and proof for 25 minutes before steaming.
  • Prepare a steamer with boiling water. Steam the baos and steam at high fire for 12 to 15 minutes till the baos are done.
I'm not sure is it my moulding skill or the softness of the dough, but I think my piggy have droopy ears & noses! Furthermore, the wholewheat flour made my piggies look like they are having freckles...lol! Nevertheless, wholewheat is always a healthier version as compared to plain ones. Take a look at the first batch of plain baos I made earlier:
I will not be posting the plain skin baos recipe as I find it a bit tough the following day. But on the first day, the baos were great when they first come out from the steamer, yummy!;) Notice the one with the spiral pattern? My daughter calls it "wormy", lol!
I also made a few piggies with this dough. Wonder why one piggy is not pink? I only realized I forgot to tint the dough pink after I mould the first piggy...:P
I had loads of fun making this baos this time. Guess the next time I will try with black sesame paste or lotus paste...yum! If you are interested, try it out! Have fun too!